Cisco 7962G Administration Guide - Page 72
Option, Description, To Change, Name of the Domain Name System DNS domain
 |
UPC - 882658140341
View all Cisco 7962G manuals
Add to My Manuals
Save this manual to your list of manuals |
Page 72 highlights
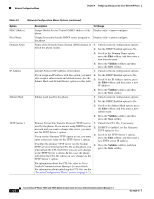
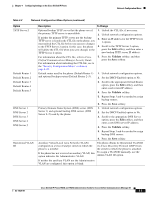
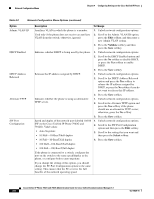
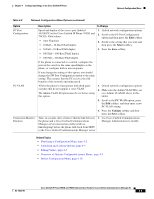
Network Configuration Menu Chapter 4 Configuring Settings on the Cisco Unified IP Phone Table 4-2 Network Configuration Menu Options (continued) Option MAC Address Host Name Domain Name IP Address Subnet Mask TFTP Server 1 Description To Change Unique Media Access Control (MAC) address of the Display only-cannot configure. phone. Unique host name that the DHCP server assigned to Display only-cannot configure. the phone. Name of the Domain Name System (DNS) domain in 1. Unlock network configuration options. which the phone resides. 2. Set the DHCP Enabled option to No. 3. Scroll to the Domain Name option, press the Edit softkey, and then enter a new domain name. 4. Press the Validate softkey and then press the Save softkey. Internet Protocol (IP) address of the phone. 1. Unlock network configuration options. If you assign an IP address with this option, you must 2. Set the DHCP Enabled option to No. also assign a subnet mask and default router. See the 3. Scroll to the IP Address option, press Subnet Mask and Default Router options in this table. the Edit softkey, and then enter a new IP Address. 4. Press the Validate softkey and then press the Save softkey. Subnet mask used by the phone. 1. Unlock network configuration options. 2. Set the DHCP Enabled option to No. 3. Scroll to the Subnet Mask option, press the Edit softkey, and then enter a new subnet mask. 4. Press the Validate softkey and then press the Save softkey. Primary Trivial File Transfer Protocol (TFTP) server used by the phone. If you are not using DHCP in your network and you want to change this server, you must use the TFTP Server 1 option. If you set the Alternate TFTP option to yes, you must enter a non-zero value for the TFTP Server 1 option. If neither the primary TFTP server nor the backup TFTP server is listed in the CTL file on the phone, you must unlock the CTL file before you can save changes to the TFTP Server 1 option. In this case, the phone will delete the CTL file when you save changes to the TFTP Server 1 option. 1. Unlock the CTL file, if necessary. 2. If DHCP is enabled, set the Alternate TFTP option to Yes. 3. Scroll to the TFTP Server 1 option, press the Edit softkey, and then enter a new TFTP server IP address. 4. Press the Validate softkey, and then press the Save softkey. For information about the CTL file, refer to Cisco Unified Communications Manager Security Guide. For information about unlocking the CTL file, see the "Security Configuration Menu" section on page 4-21. Cisco Unified IP Phone 7962G and 7942G Administration Guide for Cisco Unified Communications Manager 6.1 4-6 OL-14625-01
-
 1
1 -
2
-
3
-
4
-
5
-
6
-
7
-
8
-
9
-
10
-
11
-
12
-
13
-
14
-
15
-
16
-
17
-
18
-
19
-
20
-
21
-
22
-
23
-
24
-
25
-
26
-
27
-
28
-
29
-
30
-
31
-
32
-
33
-
34
-
35
-
36
-
37
-
38
-
39
-
40
-
41
-
42
-
43
-
44
-
45
-
46
-
47
-
48
-
49
-
50
-
51
-
52
-
53
-
54
-
55
-
56
-
57
-
58
-
59
-
60
-
61
-
62
-
63
-
64
-
65
-
66
-
 67
67 -
 68
68 -
 69
69 -
 70
70 -
 71
71 -
 72
72 -
 73
73 -
 74
74 -
 75
75 -
 76
76 -
 77
77 -
78
-
79
-
80
-
81
-
82
-
83
-
84
-
85
-
86
-
87
-
88
-
89
-
90
-
91
-
92
-
93
-
94
-
95
-
96
-
97
-
98
-
99
-
100
-
101
-
102
-
103
-
104
-
105
-
106
-
107
-
108
-
109
-
110
-
111
-
112
-
113
-
114
-
115
-
116
-
117
-
118
-
119
-
120
-
121
-
122
-
123
-
124
-
125
-
126
-
127
-
128
-
129
-
130
-
131
-
132
-
133
-
134
-
135
-
136
-
137
-
138
-
139
-
140
-
141
-
142
-
143
-
144
-
145
-
146
-
147
-
148
-
149
-
150
-
151
-
152
-
153
-
154
-
155
-
156
-
157
-
158
-
159
-
160
-
161
-
162
-
163
-
164
-
165
-
166
-
167
-
168
-
169
-
170
-
171
-
172
-
173
-
174
-
175
-
176
-
177
-
178
-
179
-
180
-
181
-
182
-
183
-
184
-
185
-
186
-
187
-
188
-
189
-
190
-
191
-
192
-
193
-
194
 |
 |
