Cisco 7962G Administration Guide - Page 57
Configuration Step and Notes, Related Topics, Each Cisco Unified IP Phone ships with one Ethernet
 |
UPC - 882658140341
View all Cisco 7962G manuals
Add to My Manuals
Save this manual to your list of manuals |
Page 57 highlights
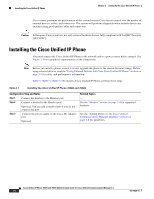
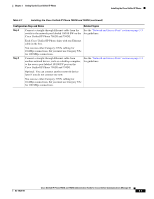
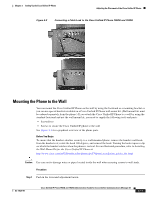
Chapter 3 Setting Up the Cisco Unified IP Phone Installing the Cisco Unified IP Phone Table 3-1 Installing the Cisco Unified IP Phone 7962G and 7942G (continued) Configuration Step and Notes Related Topics Step 4 Connect a straight-through Ethernet cable from the See the "Network and Access Ports" section on page 3-3 switch to the network port labeled 10/100 SW on the for guidelines. Cisco Unified IP Phone 7962G and 7942G. Each Cisco Unified IP Phone ships with one Ethernet cable in the box. You can use either Category 3/5/5e cabling for 10-Mbps connections, but you must use Category 5/5e for 100 Mbps connections. Step 5 Connect a straight-through Ethernet cable from another network device, such as a desktop computer, to the access port labeled 10/100 PC port on the Cisco Unified IP Phone 7962G and 7942G. See the "Network and Access Ports" section on page 3-3 for guidelines. Optional. You can connect another network device later if you do not connect one now. You can use either Category 3/5/5e cabling for 10-Mbps connections, but you must use Category 5/5e for 100 Mbps connections. OL-14625-01 Cisco Unified IP Phone 7962G and 7942G Administration Guide for Cisco Unified Communications Manager 6.1 3-7
-
 1
1 -
2
-
3
-
4
-
5
-
6
-
7
-
8
-
9
-
10
-
11
-
12
-
13
-
14
-
15
-
16
-
17
-
18
-
19
-
20
-
21
-
22
-
23
-
24
-
25
-
26
-
27
-
28
-
29
-
30
-
31
-
32
-
33
-
34
-
35
-
36
-
37
-
38
-
39
-
40
-
41
-
42
-
43
-
44
-
45
-
46
-
47
-
48
-
49
-
50
-
51
-
 52
52 -
 53
53 -
 54
54 -
 55
55 -
 56
56 -
 57
57 -
 58
58 -
 59
59 -
 60
60 -
 61
61 -
 62
62 -
63
-
64
-
65
-
66
-
67
-
68
-
69
-
70
-
71
-
72
-
73
-
74
-
75
-
76
-
77
-
78
-
79
-
80
-
81
-
82
-
83
-
84
-
85
-
86
-
87
-
88
-
89
-
90
-
91
-
92
-
93
-
94
-
95
-
96
-
97
-
98
-
99
-
100
-
101
-
102
-
103
-
104
-
105
-
106
-
107
-
108
-
109
-
110
-
111
-
112
-
113
-
114
-
115
-
116
-
117
-
118
-
119
-
120
-
121
-
122
-
123
-
124
-
125
-
126
-
127
-
128
-
129
-
130
-
131
-
132
-
133
-
134
-
135
-
136
-
137
-
138
-
139
-
140
-
141
-
142
-
143
-
144
-
145
-
146
-
147
-
148
-
149
-
150
-
151
-
152
-
153
-
154
-
155
-
156
-
157
-
158
-
159
-
160
-
161
-
162
-
163
-
164
-
165
-
166
-
167
-
168
-
169
-
170
-
171
-
172
-
173
-
174
-
175
-
176
-
177
-
178
-
179
-
180
-
181
-
182
-
183
-
184
-
185
-
186
-
187
-
188
-
189
-
190
-
191
-
192
-
193
-
194
 |
 |
