Cisco 7962G Administration Guide - Page 34
Installing Cisco Unified IP Phones - power supply
 |
UPC - 882658140341
View all Cisco 7962G manuals
Add to My Manuals
Save this manual to your list of manuals |
Page 34 highlights
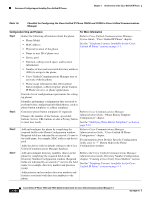
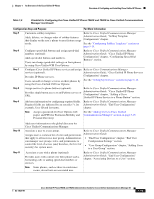
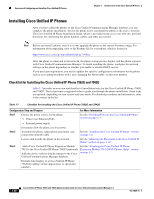
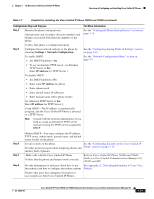
Overview of Configuring and Installing Cisco Unified IP Phones Chapter 1 An Overview of the Cisco Unified IP Phone Installing Cisco Unified IP Phones After you have added the phones to the Cisco Unified Communications Manager database, you can complete the phone installation. You (or the phone users) can install the phone at the users's location. The Cisco Unified IP Phone Installation Guide, which is provided on the cisco.com web site, provides directions for connecting the phone handset, cables, and other accessories. Note Before you install a phone, even if it is new, upgrade the phone to the current firmware image. For information about upgrading, refer to the Readme file for your phone, which is located at: http://www.cisco.com/cgi-bin/tablebuild.pl/ip-7900ser After the phone is connected to the network, the phone startup process begins, and the phone registers with Cisco Unified Communications Manager. To finish installing the phone, configure the network settings on the phone depending on whether you enable or disable DHCP service. If you used auto-registration, you need to update the specific configuration information for the phone such as associating the phone with a user, changing the button table, or directory number. Checklist for Installing the Cisco Unified IP Phone 7962G and 7942G Table 1-7 provides an overview and checklist of installation tasks for the Cisco Unified IP Phone 7962G and 7942G. The list presents a suggested order to guide you through the phone installation. Some tasks are optional, depending on your system and user needs. For detailed procedures and information, refer to the sources in the list. Table 1-7 Checklist for Installing the Cisco Unified IP Phone 7962G and 7942G Configuration Step and Purpose For More Information Step 1 Choose the power source for the phone: • Power over Ethernet (PoE) See the "Providing Power to the Cisco Unified IP Phone" section on page 2-3. • External power supply Determines how the phone receives power. Step 2 Assemble the phone, adjust phone placement, and connect the network cable. See the "Installing the Cisco Unified IP Phone" section on page 3-6. Locates and installs the phone in the network. See the "Adjusting the Placement of the Cisco Unified IP Phone" section on page 3-10. Step 3 Add a Cisco Unified IP Phone Expansion Module See the "Attaching the Cisco Unified IP Phone 7914 to the Cisco Unified IP Phone 7962G (optional). Expansion Module 7914 (SCCP Phones Only)" section Adds the device with its default settings to the Cisco on page 3-9. Unified Communications Manager database. Extends functionality of a Cisco Unified IP Phone 7962G by adding 14 line appearances or speed dial numbers. 1-20 Cisco Unified IP Phone 7962G and 7942G Administration Guide for Cisco Unified Communications Manager 6.1 OL-14625-01
-
 1
1 -
2
-
3
-
4
-
5
-
6
-
7
-
8
-
9
-
10
-
11
-
12
-
13
-
14
-
15
-
16
-
17
-
18
-
19
-
20
-
21
-
22
-
23
-
24
-
25
-
26
-
27
-
28
-
 29
29 -
 30
30 -
 31
31 -
 32
32 -
 33
33 -
 34
34 -
 35
35 -
 36
36 -
 37
37 -
 38
38 -
 39
39 -
40
-
41
-
42
-
43
-
44
-
45
-
46
-
47
-
48
-
49
-
50
-
51
-
52
-
53
-
54
-
55
-
56
-
57
-
58
-
59
-
60
-
61
-
62
-
63
-
64
-
65
-
66
-
67
-
68
-
69
-
70
-
71
-
72
-
73
-
74
-
75
-
76
-
77
-
78
-
79
-
80
-
81
-
82
-
83
-
84
-
85
-
86
-
87
-
88
-
89
-
90
-
91
-
92
-
93
-
94
-
95
-
96
-
97
-
98
-
99
-
100
-
101
-
102
-
103
-
104
-
105
-
106
-
107
-
108
-
109
-
110
-
111
-
112
-
113
-
114
-
115
-
116
-
117
-
118
-
119
-
120
-
121
-
122
-
123
-
124
-
125
-
126
-
127
-
128
-
129
-
130
-
131
-
132
-
133
-
134
-
135
-
136
-
137
-
138
-
139
-
140
-
141
-
142
-
143
-
144
-
145
-
146
-
147
-
148
-
149
-
150
-
151
-
152
-
153
-
154
-
155
-
156
-
157
-
158
-
159
-
160
-
161
-
162
-
163
-
164
-
165
-
166
-
167
-
168
-
169
-
170
-
171
-
172
-
173
-
174
-
175
-
176
-
177
-
178
-
179
-
180
-
181
-
182
-
183
-
184
-
185
-
186
-
187
-
188
-
189
-
190
-
191
-
192
-
193
-
194
 |
 |
