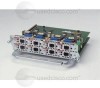
Cisco NM-8B-U User Guide - Page 107
Disabling Per-Port Storm-Control, Configuring Separate Voice and Data Subnets
 |
UPC - 074632001001
View all Cisco NM-8B-U manuals
Add to My Manuals
Save this manual to your list of manuals |
Page 107 highlights
16- and 36-Port Ethernet Switch Module for Cisco 2600 Series, Cisco 3600 Series, and Cisco 3700 Series Configuration Tasks Disabling Per-Port Storm-Control Beginning in privileged EXEC mode, follow these steps to disable per-port storm-control: Step 1 Step 2 Step 3 Step 4 Step 5 Step 6 Command configure terminal interface interface no storm-control {broadcast | multicast | unicast} level no storm-control action shutdown end show storm-control {broadcast | multicast | unicast} Purpose Enters global configuration mode. Enters interface configuration mode, and enter the port to configure. Disables per-port storm control. Disables the specified storm control action. Returns to privileged EXEC mode. Verifies your entries. Configuring Separate Voice and Data Subnets For ease of network administration and increased scalability, network managers can configure the Ethernet switch network module to support Cisco IP phones such that the voice and data traffic reside on separate subnets. You should always use separate VLANs when you are able to segment the existing IP address space of your branch office. User priority bits in the 802.1p portion of the 802.1Q standard header are used to provide prioritization in Ethernet switches. This is a vital component in designing Cisco AVVID networks. The Ethernet switch network module provides the performance and intelligent services of Cisco IOS software for branch office applications. The Ethernet switch network module can identify user applications-such as voice or multicast video-and classify traffic with the appropriate priority levels. QoS policies are enforced using Layer 2 and 3 information such as 802.1p, IP precedence, and DSCP. Note Refer to the Cisco AVVID QoS Design Guide for more information on how to implement end-to-end QoS as you deploy Cisco AVVID solutions. To automatically configure Cisco IP phones to send voice traffic on the voice VLAN ID (VVID) on a per-port basis (see the "Voice Traffic and VVID" section on page 108), use the following commands beginning in global configuration mode: Step 1 Command Router(config)# enable Step 2 Step 3 Router(config)# configure terminal Router(config)# interface interface Purpose Enters the privileged EXEC mode. A preset password may be required to enter this mode. Enters global configuration mode. Enters the interface configuration mode and the port to be configured (for example, interface fa5/1). Cisco IOS Release 12.2(2)XT, 12.2(8)T, and 12.2(15)ZJ 107
-
 1
1 -
2
-
3
-
4
-
5
-
6
-
7
-
8
-
9
-
10
-
11
-
12
-
13
-
14
-
15
-
16
-
17
-
18
-
19
-
20
-
21
-
22
-
23
-
24
-
25
-
26
-
27
-
28
-
29
-
30
-
31
-
32
-
33
-
34
-
35
-
36
-
37
-
38
-
39
-
40
-
41
-
42
-
43
-
44
-
45
-
46
-
47
-
48
-
49
-
50
-
51
-
52
-
53
-
54
-
55
-
56
-
57
-
58
-
59
-
60
-
61
-
62
-
63
-
64
-
65
-
66
-
67
-
68
-
69
-
70
-
71
-
72
-
73
-
74
-
75
-
76
-
77
-
78
-
79
-
80
-
81
-
82
-
83
-
84
-
85
-
86
-
87
-
88
-
89
-
90
-
91
-
92
-
93
-
94
-
95
-
96
-
97
-
98
-
99
-
100
-
101
-
 102
102 -
 103
103 -
 104
104 -
 105
105 -
 106
106 -
 107
107 -
 108
108 -
 109
109 -
 110
110 -
 111
111 -
 112
112 -
113
-
114
-
115
-
116
-
117
-
118
-
119
-
120
-
121
-
122
-
123
-
124
-
125
-
126
-
127
-
128
-
129
-
130
-
131
-
132
-
133
-
134
-
135
-
136
-
137
-
138
-
139
-
140
-
141
-
142
-
143
-
144
-
145
-
146
-
147
-
148
-
149
-
150
-
151
-
152
-
153
-
154
-
155
-
156
-
157
-
158
-
159
-
160
-
161
-
162
-
163
-
164
-
165
-
166
-
167
-
168
-
169
-
170
-
171
-
172
-
173
-
174
-
175
-
176
-
177
-
178
-
179
-
180
-
181
-
182
-
183
-
184
-
185
-
186
-
187
-
188
-
189
-
190
-
191
-
192
-
193
-
194
-
195
-
196
-
197
-
198
-
199
-
200
-
201
-
202
-
203
-
204
-
205
-
206
-
207
-
208
-
209
-
210
-
211
-
212
-
213
-
214
-
215
-
216
-
217
-
218
-
219
-
220
-
221
-
222
-
223
-
224
-
225
-
226
-
227
-
228
-
229
-
230
-
231
-
232
-
233
-
234
-
235
-
236
-
237
-
238
-
239
-
240
-
241
-
242
-
243
-
244
-
245
-
246
 |
 |
