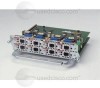
Cisco NM-8B-U User Guide - Page 85
Including Comments About Entries in ACLs, Applying the ACL to an Interface, no permit, no deny, remark
 |
UPC - 074632001001
View all Cisco NM-8B-U manuals
Add to My Manuals
Save this manual to your list of manuals |
Page 85 highlights
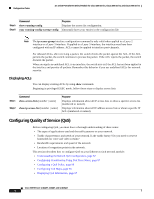
16- and 36-Port Ethernet Switch Module for Cisco 2600 Series, Cisco 3600 Series, and Cisco 3700 Series Configuration Tasks When making the standard and extended ACL, remember that, by default, the end of the ACL contains an implicit deny statement for everything if it did not find a match before reaching the end. For standard ACLs, if you omit the mask from an associated IP host address access list specification, 0.0.0.0 is assumed to be the mask. After you create an ACL, any additions are placed at the end of the list. You cannot selectively add ACEs to a specific ACL. However, you can use no permit and no deny commands to remove ACEs from a named ACL. Being able to selectively remove lines from a named ACL is one reason you might use named ACLs instead of numbered ACLs. After creating an ACL, you must apply it to a line or interface, as described in the "Applying the ACL to an Interface" section on page 85. Including Comments About Entries in ACLs You can use the remark command to include comments (remarks) about entries in any IP standard or extended ACL. The remarks make the ACL easier for you to understand and scan. Each remark line is limited to 100 characters. The remark can go before or after a permit or deny statement. You should be consistent about where you put the remark so that it is clear which remark describes which permit or deny statement. For example, it would be confusing to have some remarks before the associated permit or deny statements and some remarks after the associated statements. For IP numbered standard or extended ACLs, use the access-list access-list number remark remark global configuration command to include a comment about an access list. To remove the remark, use the no form of this command. For an entry in a named IP ACL, use the remark access-list global configuration command. To remove the remark, use the no form of this command. Applying the ACL to an Interface After you create an ACL, you can apply it to one or more interfaces. ACLs can be applied on inbound interfaces. This section describes how to accomplish this task for network interfaces. Note these guidelines: • When controlling access to a line, you must use a number. Numbered ACLs can be applied to lines. • When controlling access to an interface, you can use a name or number. Beginning in privileged EXEC mode, follow these steps to control access to a Layer 2 or Layer 3 interface: Step 1 Step 2 Step 3 Step 4 Command Purpose configure terminal Enters global configuration mode. interface interface-id Identifies a specific interface for configuration and enter interface configuration mode. The interface must be a Layer 2 interface or routed port. ip access-group {access-list-number | Controls access to the specified interface. name} {in} end Returns to privileged EXEC mode. Cisco IOS Release 12.2(2)XT, 12.2(8)T, and 12.2(15)ZJ 85
-
 1
1 -
2
-
3
-
4
-
5
-
6
-
7
-
8
-
9
-
10
-
11
-
12
-
13
-
14
-
15
-
16
-
17
-
18
-
19
-
20
-
21
-
22
-
23
-
24
-
25
-
26
-
27
-
28
-
29
-
30
-
31
-
32
-
33
-
34
-
35
-
36
-
37
-
38
-
39
-
40
-
41
-
42
-
43
-
44
-
45
-
46
-
47
-
48
-
49
-
50
-
51
-
52
-
53
-
54
-
55
-
56
-
57
-
58
-
59
-
60
-
61
-
62
-
63
-
64
-
65
-
66
-
67
-
68
-
69
-
70
-
71
-
72
-
73
-
74
-
75
-
76
-
77
-
78
-
79
-
 80
80 -
 81
81 -
 82
82 -
 83
83 -
 84
84 -
 85
85 -
 86
86 -
 87
87 -
 88
88 -
 89
89 -
 90
90 -
91
-
92
-
93
-
94
-
95
-
96
-
97
-
98
-
99
-
100
-
101
-
102
-
103
-
104
-
105
-
106
-
107
-
108
-
109
-
110
-
111
-
112
-
113
-
114
-
115
-
116
-
117
-
118
-
119
-
120
-
121
-
122
-
123
-
124
-
125
-
126
-
127
-
128
-
129
-
130
-
131
-
132
-
133
-
134
-
135
-
136
-
137
-
138
-
139
-
140
-
141
-
142
-
143
-
144
-
145
-
146
-
147
-
148
-
149
-
150
-
151
-
152
-
153
-
154
-
155
-
156
-
157
-
158
-
159
-
160
-
161
-
162
-
163
-
164
-
165
-
166
-
167
-
168
-
169
-
170
-
171
-
172
-
173
-
174
-
175
-
176
-
177
-
178
-
179
-
180
-
181
-
182
-
183
-
184
-
185
-
186
-
187
-
188
-
189
-
190
-
191
-
192
-
193
-
194
-
195
-
196
-
197
-
198
-
199
-
200
-
201
-
202
-
203
-
204
-
205
-
206
-
207
-
208
-
209
-
210
-
211
-
212
-
213
-
214
-
215
-
216
-
217
-
218
-
219
-
220
-
221
-
222
-
223
-
224
-
225
-
226
-
227
-
228
-
229
-
230
-
231
-
232
-
233
-
234
-
235
-
236
-
237
-
238
-
239
-
240
-
241
-
242
-
243
-
244
-
245
-
246
 |
 |
