Cisco NM-8B-U User Guide - Page 90
Configuring a QoS Policy, no mls qos cos, override, switchport priority, show mls qos interface
 |
UPC - 074632001001
View all Cisco NM-8B-U manuals
Add to My Manuals
Save this manual to your list of manuals |
Page 90 highlights
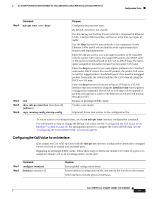
Configuration Tasks 16- and 36-Port Ethernet Switch Module for Cisco 2600 Series, Cisco 3600 Series, and Cisco 3700 Series Step 3 Step 4 Step 5 Step 6 Command mls qos cos {default-cos | override} end show mls qos interface copy running-config startup-config Purpose Configures the default CoS value for the port. For default-cos, specify a default CoS value to be assigned to a port. If the port is CoS trusted and packets are untagged, the default CoS value becomes the CoS value for the packet. The CoS range is 0 to 7. The default is 0. Use the override keyword to override the previously configured trust state of the incoming packets and to apply the default port CoS value to all incoming packets. By default, CoS override is disabled. Use the override keyword when all incoming packets on certain ports deserve higher priority than packets entering from other ports. Even if a port was previously set to trust DSCP, this command overrides the previously configured trust state, and all the incoming CoS values are assigned the default CoS value configured with this command. If an incoming packet is tagged, the CoS value of the packet is modified with the default CoS of the port at the ingress port. Returns to privileged EXEC mode. Verifies your entries. (Optional) Saves your entries in the configuration file. To return to the default setting, use the no mls qos cos {default-cos | override} interface configuration command. Note The mls qos cos command replaced the switchport priority command in Cisco IOS Release 12.1(6)EA2. Configuring a QoS Policy Configuring a QoS policy typically requires classifying traffic into classes, configuring policies applied to those traffic classes, and attaching policies to interfaces. For background information, see the "Classification" section on page 32 and the "Policing and Marking" section on page 34. This section contains this configuration information: • Classifying Traffic by Using ACLs, page 91 • Classifying Traffic by Using Class Maps, page 93 • Classifying, Policing, and Marking Traffic by Using Policy Maps, page 94 Cisco IOS Release 12.2(2)XT, 12.2(8)T, and 12.2(15)ZJ 90
-
 1
1 -
2
-
3
-
4
-
5
-
6
-
7
-
8
-
9
-
10
-
11
-
12
-
13
-
14
-
15
-
16
-
17
-
18
-
19
-
20
-
21
-
22
-
23
-
24
-
25
-
26
-
27
-
28
-
29
-
30
-
31
-
32
-
33
-
34
-
35
-
36
-
37
-
38
-
39
-
40
-
41
-
42
-
43
-
44
-
45
-
46
-
47
-
48
-
49
-
50
-
51
-
52
-
53
-
54
-
55
-
56
-
57
-
58
-
59
-
60
-
61
-
62
-
63
-
64
-
65
-
66
-
67
-
68
-
69
-
70
-
71
-
72
-
73
-
74
-
75
-
76
-
77
-
78
-
79
-
80
-
81
-
82
-
83
-
84
-
 85
85 -
 86
86 -
 87
87 -
 88
88 -
 89
89 -
 90
90 -
 91
91 -
 92
92 -
 93
93 -
 94
94 -
 95
95 -
96
-
97
-
98
-
99
-
100
-
101
-
102
-
103
-
104
-
105
-
106
-
107
-
108
-
109
-
110
-
111
-
112
-
113
-
114
-
115
-
116
-
117
-
118
-
119
-
120
-
121
-
122
-
123
-
124
-
125
-
126
-
127
-
128
-
129
-
130
-
131
-
132
-
133
-
134
-
135
-
136
-
137
-
138
-
139
-
140
-
141
-
142
-
143
-
144
-
145
-
146
-
147
-
148
-
149
-
150
-
151
-
152
-
153
-
154
-
155
-
156
-
157
-
158
-
159
-
160
-
161
-
162
-
163
-
164
-
165
-
166
-
167
-
168
-
169
-
170
-
171
-
172
-
173
-
174
-
175
-
176
-
177
-
178
-
179
-
180
-
181
-
182
-
183
-
184
-
185
-
186
-
187
-
188
-
189
-
190
-
191
-
192
-
193
-
194
-
195
-
196
-
197
-
198
-
199
-
200
-
201
-
202
-
203
-
204
-
205
-
206
-
207
-
208
-
209
-
210
-
211
-
212
-
213
-
214
-
215
-
216
-
217
-
218
-
219
-
220
-
221
-
222
-
223
-
224
-
225
-
226
-
227
-
228
-
229
-
230
-
231
-
232
-
233
-
234
-
235
-
236
-
237
-
238
-
239
-
240
-
241
-
242
-
243
-
244
-
245
-
246
 |
 |
