Cisco NM-8B-U User Guide - Page 110
Adding Trap Managers, Configuring IP Information, Assigning IP Information to the Switch
 |
UPC - 074632001001
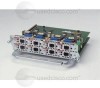
View all Cisco NM-8B-U manuals
Add to My Manuals
Save this manual to your list of manuals |
Page 110 highlights
Configuration Tasks 16- and 36-Port Ethernet Switch Module for Cisco 2600 Series, Cisco 3600 Series, and Cisco 3700 Series • Configuring Voice Ports, page 112 • Enabling Switch Port Analyzer, page 114 • Managing the ARP Table, page 114 • Managing the MAC Address Tables, page 115 Adding Trap Managers A trap manager is a management station that receives and processes traps. When you configure a trap manager, community strings for each member switch must be unique. If a member switch has an IP address assigned to it, the management station accesses the switch by using its assigned IP address. By default, no trap manager is defined, and no traps are issued. To add a trap manager and community string, use the following commands beginning in privileged EXEC mode: Step 1 Step 2 Step 3 Command Purpose Router# config terminal Enters global configuration mode. Router(config)# snmp-server host Enters the trap manager IP address, community string, and the 172.2.128.263 traps1 snmp vlan-membership traps to generate. Router(config)# end Returns to privileged EXEC mode. Verifying Trap Managers Step 1 Use the show running-config command to verify that the information was entered correctly by displaying the running configuration: Router# show running-config Configuring IP Information This section describes how to assign IP information on the Ethernet switch network module. The following topics are included: • Assigning IP Information to the Switch, page 110 • Specifying a Domain Name and Configuring the DNS, page 111 Assigning IP Information to the Switch You can use a BOOTP server to automatically assign IP information to the switch; however, the BOOTP server must be set up in advance with a database of physical MAC addresses and corresponding IP addresses, subnet masks, and default gateway addresses. In addition, the switch must be able to access the BOOTP server through one of its ports. At startup, a switch without an IP address requests the information from the BOOTP server; the requested information is saved in the switch running the configuration file. To ensure that the IP information is saved when the switch is restarted, save the configuration by entering the write memory command in privileged EXEC mode. 110 Cisco IOS Release 12.2(2)XT, 12.2(8)T, and 12.2(15)ZJ
-
 1
1 -
2
-
3
-
4
-
5
-
6
-
7
-
8
-
9
-
10
-
11
-
12
-
13
-
14
-
15
-
16
-
17
-
18
-
19
-
20
-
21
-
22
-
23
-
24
-
25
-
26
-
27
-
28
-
29
-
30
-
31
-
32
-
33
-
34
-
35
-
36
-
37
-
38
-
39
-
40
-
41
-
42
-
43
-
44
-
45
-
46
-
47
-
48
-
49
-
50
-
51
-
52
-
53
-
54
-
55
-
56
-
57
-
58
-
59
-
60
-
61
-
62
-
63
-
64
-
65
-
66
-
67
-
68
-
69
-
70
-
71
-
72
-
73
-
74
-
75
-
76
-
77
-
78
-
79
-
80
-
81
-
82
-
83
-
84
-
85
-
86
-
87
-
88
-
89
-
90
-
91
-
92
-
93
-
94
-
95
-
96
-
97
-
98
-
99
-
100
-
101
-
102
-
103
-
104
-
 105
105 -
 106
106 -
 107
107 -
 108
108 -
 109
109 -
 110
110 -
 111
111 -
 112
112 -
 113
113 -
 114
114 -
 115
115 -
116
-
117
-
118
-
119
-
120
-
121
-
122
-
123
-
124
-
125
-
126
-
127
-
128
-
129
-
130
-
131
-
132
-
133
-
134
-
135
-
136
-
137
-
138
-
139
-
140
-
141
-
142
-
143
-
144
-
145
-
146
-
147
-
148
-
149
-
150
-
151
-
152
-
153
-
154
-
155
-
156
-
157
-
158
-
159
-
160
-
161
-
162
-
163
-
164
-
165
-
166
-
167
-
168
-
169
-
170
-
171
-
172
-
173
-
174
-
175
-
176
-
177
-
178
-
179
-
180
-
181
-
182
-
183
-
184
-
185
-
186
-
187
-
188
-
189
-
190
-
191
-
192
-
193
-
194
-
195
-
196
-
197
-
198
-
199
-
200
-
201
-
202
-
203
-
204
-
205
-
206
-
207
-
208
-
209
-
210
-
211
-
212
-
213
-
214
-
215
-
216
-
217
-
218
-
219
-
220
-
221
-
222
-
223
-
224
-
225
-
226
-
227
-
228
-
229
-
230
-
231
-
232
-
233
-
234
-
235
-
236
-
237
-
238
-
239
-
240
-
241
-
242
-
243
-
244
-
245
-
246
 |
 |
