Dell PowerEdge M420 Hardware Owner's Manual - Page 240
See Using the System Setup Program and UEFI Boot Manager on, PowerEdge M610x
 |
View all Dell PowerEdge M420 manuals
Add to My Manuals
Save this manual to your list of manuals |
Page 240 highlights
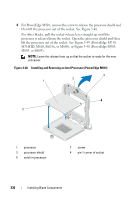
d For PowerEdge M910, tighten the screw securing the processor shield. For other blades, rotate the socket release lever down until it snaps into place, securing the processor. 3 Install the heat sink: a If you are reinstalling a heat sink, use a clean, lint-free cloth to remove the existing thermal grease from the heat sink. If you are upgrading a processor and a new heat sink was supplied with the processor, install the new heat sink. If you are reinstalling a processor, also clean any remnants of thermal grease from the processor. b Apply thermal grease evenly to the top of the processor. c Place the heat sink onto the processor. The heat sink must match the orientation shown in Figure 3-39 (PowerEdge M910), Figure 3-40 (PowerEdge M905), Figure 3-41 (PowerEdge M805), Figure 3-42 (PowerEdge M710), Figure 3-43 (PowerEdge M710HD), Figure 3-44 (PowerEdge M610), Figure 3-45 (PowerEdge M610x), Figure 3-46 (PowerEdge M600), or Figure 3-47 (PowerEdge M605). NOTE: Do not over-tighten the heat sink retention screws when installing the heat sink. To prevent over-tightening, tighten the retention screw until resistance is felt, and stop once the screw is seated. The screw tension should be no more than 6 in-lb (6.9 kg-cm). d Carefully tighten the four screws to secure the heat sink to the blade board. 4 Close the blade. See "Closing the Blade" on page 159. 5 Install the blade. See "Installing a Blade" on page 148. As the system boots, it detects the presence of the new processor and automatically changes the system configuration information in the System Setup program. 6 Press to enter the System Setup program, and check that the processor information matches the new system configuration. See "Using the System Setup Program and UEFI Boot Manager" on page 127 for instructions about using the System Setup program. 240 Installing Blade Components
-
 1
1 -
2
-
3
-
4
-
5
-
6
-
7
-
8
-
9
-
10
-
11
-
12
-
13
-
14
-
15
-
16
-
17
-
18
-
19
-
20
-
21
-
22
-
23
-
24
-
25
-
26
-
27
-
28
-
29
-
30
-
31
-
32
-
33
-
34
-
35
-
36
-
37
-
38
-
39
-
40
-
41
-
42
-
43
-
44
-
45
-
46
-
47
-
48
-
49
-
50
-
51
-
52
-
53
-
54
-
55
-
56
-
57
-
58
-
59
-
60
-
61
-
62
-
63
-
64
-
65
-
66
-
67
-
68
-
69
-
70
-
71
-
72
-
73
-
74
-
75
-
76
-
77
-
78
-
79
-
80
-
81
-
82
-
83
-
84
-
85
-
86
-
87
-
88
-
89
-
90
-
91
-
92
-
93
-
94
-
95
-
96
-
97
-
98
-
99
-
100
-
101
-
102
-
103
-
104
-
105
-
106
-
107
-
108
-
109
-
110
-
111
-
112
-
113
-
114
-
115
-
116
-
117
-
118
-
119
-
120
-
121
-
122
-
123
-
124
-
125
-
126
-
127
-
128
-
129
-
130
-
131
-
132
-
133
-
134
-
135
-
136
-
137
-
138
-
139
-
140
-
141
-
142
-
143
-
144
-
145
-
146
-
147
-
148
-
149
-
150
-
151
-
152
-
153
-
154
-
155
-
156
-
157
-
158
-
159
-
160
-
161
-
162
-
163
-
164
-
165
-
166
-
167
-
168
-
169
-
170
-
171
-
172
-
173
-
174
-
175
-
176
-
177
-
178
-
179
-
180
-
181
-
182
-
183
-
184
-
185
-
186
-
187
-
188
-
189
-
190
-
191
-
192
-
193
-
194
-
195
-
196
-
197
-
198
-
199
-
200
-
201
-
202
-
203
-
204
-
205
-
206
-
207
-
208
-
209
-
210
-
211
-
212
-
213
-
214
-
215
-
216
-
217
-
218
-
219
-
220
-
221
-
222
-
223
-
224
-
225
-
226
-
227
-
228
-
229
-
230
-
231
-
232
-
233
-
234
-
 235
235 -
 236
236 -
 237
237 -
 238
238 -
 239
239 -
 240
240 -
 241
241 -
 242
242 -
 243
243 -
 244
244 -
 245
245 -
246
-
247
-
248
-
249
-
250
-
251
-
252
-
253
-
254
-
255
-
256
-
257
-
258
-
259
-
260
-
261
-
262
-
263
-
264
-
265
-
266
-
267
-
268
-
269
-
270
-
271
-
272
-
273
-
274
-
275
-
276
-
277
-
278
-
279
-
280
-
281
-
282
-
283
-
284
-
285
-
286
-
287
-
288
-
289
-
290
-
291
-
292
-
293
-
294
-
295
-
296
-
297
-
298
-
299
-
300
-
301
-
302
-
303
-
304
-
305
-
306
-
307
-
308
-
309
-
310
-
311
-
312
-
313
-
314
-
315
-
316
-
317
-
318
-
319
-
320
-
321
-
322
-
323
-
324
-
325
-
326
-
327
-
328
-
329
-
330
-
331
-
332
-
333
-
334
-
335
-
336
-
337
-
338
-
339
-
340
-
341
-
342
-
343
-
344
-
345
-
346
 |
 |
