Dell PowerEdge MX740c EMC PowerEdge MX740c Installation and Service Manual - Page 113
Installing the system board
 |
View all Dell PowerEdge MX740c manuals
Add to My Manuals
Save this manual to your list of manuals |
Page 113 highlights
Figure 85. Installing the system board 4. Lower the system board and install the screws to secure the system board to the system. Next steps 1. Install the following: a. Internal USB key b. iDRAC card c. IDSDM d. Mini Mezzanine card e. Mezzanine card(s) f. PERC card g. Drive cage h. Drive backplane i. Drives NOTE: Ensure that you reinstall the drives in their original locations. j. BBU module k. Memory modules l. Processor(s) and heat sink(s) m. Air shroud 2. Remove the plastic I/O connector cover from the back of the system. 3. Install the sled in the enclosure. 4. Follow the procedure listed in After working inside your sled on page 42. 5. Ensure that you: Installing and removing system components 113
-
 1
1 -
2
-
3
-
4
-
5
-
6
-
7
-
8
-
9
-
10
-
11
-
12
-
13
-
14
-
15
-
16
-
17
-
18
-
19
-
20
-
21
-
22
-
23
-
24
-
25
-
26
-
27
-
28
-
29
-
30
-
31
-
32
-
33
-
34
-
35
-
36
-
37
-
38
-
39
-
40
-
41
-
42
-
43
-
44
-
45
-
46
-
47
-
48
-
49
-
50
-
51
-
52
-
53
-
54
-
55
-
56
-
57
-
58
-
59
-
60
-
61
-
62
-
63
-
64
-
65
-
66
-
67
-
68
-
69
-
70
-
71
-
72
-
73
-
74
-
75
-
76
-
77
-
78
-
79
-
80
-
81
-
82
-
83
-
84
-
85
-
86
-
87
-
88
-
89
-
90
-
91
-
92
-
93
-
94
-
95
-
96
-
97
-
98
-
99
-
100
-
101
-
102
-
103
-
104
-
105
-
106
-
107
-
 108
108 -
 109
109 -
 110
110 -
 111
111 -
 112
112 -
 113
113 -
 114
114 -
 115
115 -
 116
116 -
 117
117 -
 118
118 -
119
-
120
-
121
-
122
-
123
-
124
-
125
-
126
-
127
-
128
-
129
-
130
-
131
-
132
-
133
-
134
-
135
 |
 |

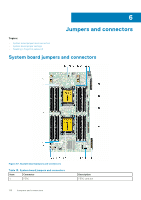
Figure 85. Installing the system board
4.
Lower the system board and install the screws to secure the system board to the system.
Next steps
1.
Install the following:
a.
Internal USB key
b.
iDRAC card
c.
IDSDM
d.
Mini Mezzanine card
e.
Mezzanine card(s)
f.
PERC card
g.
Drive cage
h.
Drive backplane
i.
Drives
NOTE:
Ensure that you reinstall the drives in their original locations.
j.
BBU module
k.
Memory modules
l.
Processor(s) and heat sink(s)
m.
Air shroud
2.
Remove the plastic I/O connector cover from the back of the system.
3.
Install the sled in the enclosure.
4.
Follow the procedure listed in
After working inside your sled
on page 42.
5.
Ensure that you:
Installing and removing system components
113