Epson ActionLaser 1500 User Manual - Page 140
Installing the PCL5/RITech upgrade board, Removing the controller board - action laser printer
 |
View all Epson ActionLaser 1500 manuals
Add to My Manuals
Save this manual to your list of manuals |
Page 140 highlights
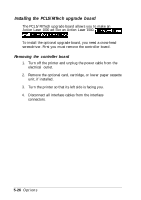
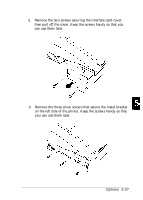
Installing the PCL5/RITech upgrade board The PCL5/RITech upgrade board allows you to make an Action Laser 1000 act like an Action Laser 1500. To install the optional upgrade board, you need a cross-head screwdriver. First you must remove the controller board. Removing the controller board 1. Turn off the printer and unplug the power cable from the electrical outlet. 2. Remove the optional card, cartridge, or lower paper cassette unit, if installed. 3. Turn the printer so that its left side is facing you. 4. Disconnect all interface cables from the interface connectors. 5-26 Options
-
 1
1 -
2
-
3
-
4
-
5
-
6
-
7
-
8
-
9
-
10
-
11
-
12
-
13
-
14
-
15
-
16
-
17
-
18
-
19
-
20
-
21
-
22
-
23
-
24
-
25
-
26
-
27
-
28
-
29
-
30
-
31
-
32
-
33
-
34
-
35
-
36
-
37
-
38
-
39
-
40
-
41
-
42
-
43
-
44
-
45
-
46
-
47
-
48
-
49
-
50
-
51
-
52
-
53
-
54
-
55
-
56
-
57
-
58
-
59
-
60
-
61
-
62
-
63
-
64
-
65
-
66
-
67
-
68
-
69
-
70
-
71
-
72
-
73
-
74
-
75
-
76
-
77
-
78
-
79
-
80
-
81
-
82
-
83
-
84
-
85
-
86
-
87
-
88
-
89
-
90
-
91
-
92
-
93
-
94
-
95
-
96
-
97
-
98
-
99
-
100
-
101
-
102
-
103
-
104
-
105
-
106
-
107
-
108
-
109
-
110
-
111
-
112
-
113
-
114
-
115
-
116
-
117
-
118
-
119
-
120
-
121
-
122
-
123
-
124
-
125
-
126
-
127
-
128
-
129
-
130
-
131
-
132
-
133
-
134
-
 135
135 -
 136
136 -
 137
137 -
 138
138 -
 139
139 -
 140
140 -
 141
141 -
 142
142 -
 143
143 -
 144
144 -
 145
145 -
146
-
147
-
148
-
149
-
150
-
151
-
152
-
153
-
154
-
155
-
156
-
157
-
158
-
159
-
160
-
161
-
162
-
163
-
164
-
165
-
166
-
167
-
168
-
169
-
170
-
171
-
172
-
173
-
174
-
175
-
176
-
177
-
178
-
179
-
180
-
181
-
182
-
183
-
184
-
185
-
186
-
187
-
188
-
189
-
190
-
191
-
192
-
193
-
194
-
195
-
196
-
197
-
198
-
199
-
200
-
201
-
202
-
203
-
204
-
205
-
206
-
207
-
208
-
209
-
210
-
211
-
212
-
213
-
214
-
215
-
216
-
217
-
218
-
219
-
220
-
221
-
222
-
223
-
224
-
225
-
226
-
227
-
228
-
229
-
230
-
231
-
232
-
233
-
234
-
235
-
236
-
237
-
238
-
239
-
240
-
241
-
242
-
243
-
244
-
245
-
246
-
247
-
248
-
249
-
250
-
251
-
252
-
253
-
254
-
255
-
256
-
257
-
258
-
259
-
260
-
261
-
262
-
263
-
264
-
265
-
266
-
267
-
268
-
269
-
270
-
271
-
272
 |
 |

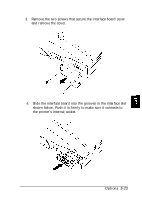
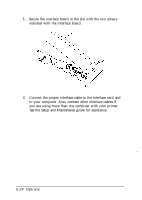
Installing the PCL5/RITech upgrade board
The PCL5/RITech upgrade board allows you to make an
Action Laser 1000 act like an Action Laser 1500.
To install the optional upgrade board, you need a cross-head
screwdriver. First you must remove the controller board.
Removing the controller board
1.
Turn off the printer and unplug the power cable from the
electrical outlet.
2.
Remove the optional card, cartridge, or lower paper cassette
unit, if installed.
3.
Turn the printer so that its left side is facing you.
4.
Disconnect all interface cables from the interface
connectors.
5-26
Options