Epson BrightLink 450Wi User's Guide - Page 103
Using SNMP to Monitor the Projector
 |
View all Epson BrightLink 450Wi manuals
Add to My Manuals
Save this manual to your list of manuals |
Page 103 highlights
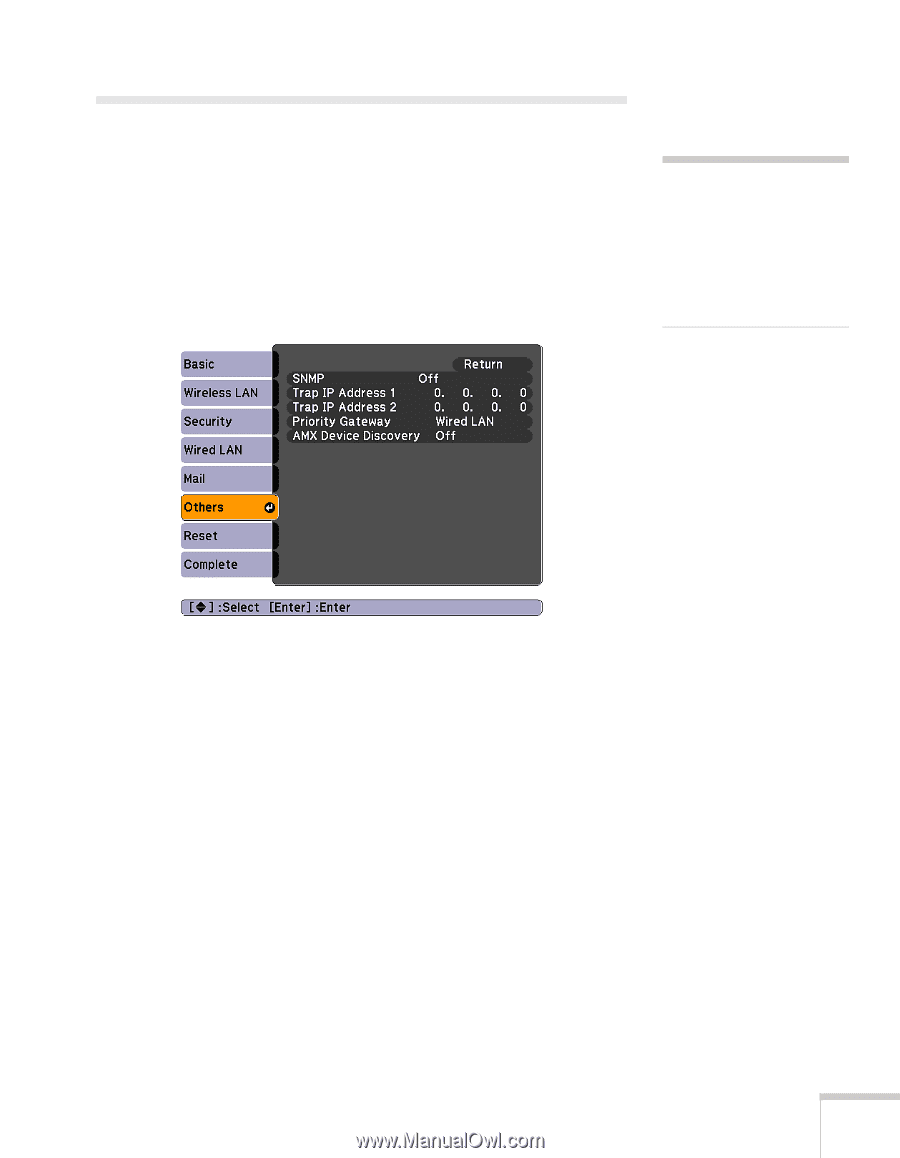
Using SNMP to Monitor the Projector Network administrators can use SNMP (Simple Network Management Protocol) to monitor projectors. 1. Press the Menu button on the remote control, select the Network menu, then press Enter. 2. Choose Network Configuration and press Enter. 3. Choose Others, then press Enter. You see the following screen: note If you're a network administrator, you can use the SNMP option to enter a trap IP address. This lets you receive trap alerts for the projectors you're monitoring. 4. Turn on the SNMP setting. 5. Enter up to two IP addresses for notification in the Trap IP Address fields. You can enter a number from 0 to 255 in each field of the address. However, the following IP addresses cannot be used: 127.x.x.x, 224.0.0.0 to 255.255.255.255 (where x is a number from 0 to 255). To enter numbers, use the arrow buttons on the remote control to select each number on the screen, then press the Enter button. When you're finished entering an address in the network menu, highlight Finish, then press the Enter button. 6. For Priority Gateway, select Wired or Wireless. Press Esc to return to the previous screen. Using the Projector on a Network 103
-
 1
1 -
2
-
3
-
4
-
5
-
6
-
7
-
8
-
9
-
10
-
11
-
12
-
13
-
14
-
15
-
16
-
17
-
18
-
19
-
20
-
21
-
22
-
23
-
24
-
25
-
26
-
27
-
28
-
29
-
30
-
31
-
32
-
33
-
34
-
35
-
36
-
37
-
38
-
39
-
40
-
41
-
42
-
43
-
44
-
45
-
46
-
47
-
48
-
49
-
50
-
51
-
52
-
53
-
54
-
55
-
56
-
57
-
58
-
59
-
60
-
61
-
62
-
63
-
64
-
65
-
66
-
67
-
68
-
69
-
70
-
71
-
72
-
73
-
74
-
75
-
76
-
77
-
78
-
79
-
80
-
81
-
82
-
83
-
84
-
85
-
86
-
87
-
88
-
89
-
90
-
91
-
92
-
93
-
94
-
95
-
96
-
97
-
 98
98 -
 99
99 -
 100
100 -
 101
101 -
 102
102 -
 103
103 -
 104
104 -
 105
105 -
 106
106 -
 107
107 -
 108
108 -
109
-
110
-
111
-
112
-
113
-
114
-
115
-
116
-
117
-
118
-
119
-
120
-
121
-
122
-
123
-
124
-
125
-
126
-
127
-
128
-
129
-
130
-
131
-
132
-
133
-
134
-
135
-
136
-
137
-
138
-
139
-
140
-
141
-
142
-
143
-
144
-
145
-
146
-
147
-
148
-
149
-
150
-
151
-
152
-
153
-
154
-
155
-
156
-
157
-
158
-
159
-
160
-
161
-
162
-
163
-
164
-
165
-
166
-
167
-
168
-
169
-
170
-
171
-
172
-
173
-
174
-
175
-
176
-
177
-
178
-
179
-
180
-
181
-
182
-
183
-
184
-
185
-
186
 |
 |