Epson BrightLink 450Wi User's Guide - Page 31
Connecting a Component Video Source, If you want to play sound through the projector, see
 |
View all Epson BrightLink 450Wi manuals
Add to My Manuals
Save this manual to your list of manuals |
Page 31 highlights
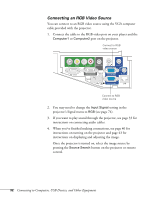
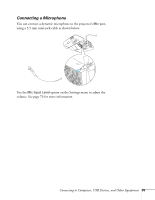
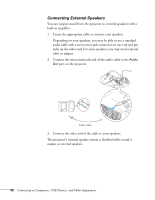
Connecting a Component Video Source If your video equipment has component video connectors (three connectors labeled either Y/Cb/Cr or Y/Pb/Pr), you will need a component-to-VGA video cable or a component video cable and adapter. You can order the component-to-VGA cable (ELPKC19) from Epson (see page 20) or an electronics dealer. 1. Connect the component end of the cable (3 male RCA) to the color-coded Y/Cb/Cr (or Y/Pb/Pr) connectors on your player. 2. Connect the other end of the cable (HD15 male) to the blue Computer1 or Computer2 port on the projector. Connect componentto-VGA cable Component-toVGA cable (ELPKC19) Connect componentto-VGA cable 3. You may need to change the Input Signal setting in the projector's Signal menu to Auto (see page 74). 4. If you want to play sound through the projector, see page 33 for instructions on connecting an audio cable. 5. When you've finished making connections, see page 40 for instructions on turning on the projector and page 43 for instructions on displaying and adjusting the image. Once the projector is turned on, select the image source by pressing the Source Search button on the projector or remote control. Connecting to Computers, USB Devices, and Other Equipment 31
-
 1
1 -
2
-
3
-
4
-
5
-
6
-
7
-
8
-
9
-
10
-
11
-
12
-
13
-
14
-
15
-
16
-
17
-
18
-
19
-
20
-
21
-
22
-
23
-
24
-
25
-
 26
26 -
 27
27 -
 28
28 -
 29
29 -
 30
30 -
 31
31 -
 32
32 -
 33
33 -
 34
34 -
 35
35 -
 36
36 -
37
-
38
-
39
-
40
-
41
-
42
-
43
-
44
-
45
-
46
-
47
-
48
-
49
-
50
-
51
-
52
-
53
-
54
-
55
-
56
-
57
-
58
-
59
-
60
-
61
-
62
-
63
-
64
-
65
-
66
-
67
-
68
-
69
-
70
-
71
-
72
-
73
-
74
-
75
-
76
-
77
-
78
-
79
-
80
-
81
-
82
-
83
-
84
-
85
-
86
-
87
-
88
-
89
-
90
-
91
-
92
-
93
-
94
-
95
-
96
-
97
-
98
-
99
-
100
-
101
-
102
-
103
-
104
-
105
-
106
-
107
-
108
-
109
-
110
-
111
-
112
-
113
-
114
-
115
-
116
-
117
-
118
-
119
-
120
-
121
-
122
-
123
-
124
-
125
-
126
-
127
-
128
-
129
-
130
-
131
-
132
-
133
-
134
-
135
-
136
-
137
-
138
-
139
-
140
-
141
-
142
-
143
-
144
-
145
-
146
-
147
-
148
-
149
-
150
-
151
-
152
-
153
-
154
-
155
-
156
-
157
-
158
-
159
-
160
-
161
-
162
-
163
-
164
-
165
-
166
-
167
-
168
-
169
-
170
-
171
-
172
-
173
-
174
-
175
-
176
-
177
-
178
-
179
-
180
-
181
-
182
-
183
-
184
-
185
-
186
 |
 |
