Epson BrightLink 450Wi User's Guide - Page 92
capital letters, highlight the option and press, To toggle symbol settings or
 |
View all Epson BrightLink 450Wi manuals
Add to My Manuals
Save this manual to your list of manuals |
Page 92 highlights
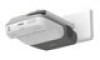
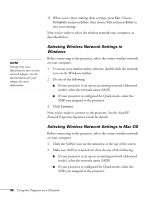
3. Choose Basic and press Enter. You see the following screen: 4. Make sure the projector has a unique name, so you can identify it on your network. If you need to rename it, highlight the Projector name text box then press Enter. 5. Use the arrow buttons on the remote control to select individual letters; then press Enter to input a character. To add a blank space or to navigate backward and forward through the input text, highlight the arrows and press Enter. To toggle symbol settings or capital letters, highlight the option and press Enter. When you're done, highlight Finish and press Enter. 6. If you want to create a password for using PJLink to control the projector, highlight PJLink Password, press Enter, and enter a password of up to 8 alphanumeric characters. When you're done, highlight Finish and press Enter. 92 Using the Projector on a Network
-
 1
1 -
2
-
3
-
4
-
5
-
6
-
7
-
8
-
9
-
10
-
11
-
12
-
13
-
14
-
15
-
16
-
17
-
18
-
19
-
20
-
21
-
22
-
23
-
24
-
25
-
26
-
27
-
28
-
29
-
30
-
31
-
32
-
33
-
34
-
35
-
36
-
37
-
38
-
39
-
40
-
41
-
42
-
43
-
44
-
45
-
46
-
47
-
48
-
49
-
50
-
51
-
52
-
53
-
54
-
55
-
56
-
57
-
58
-
59
-
60
-
61
-
62
-
63
-
64
-
65
-
66
-
67
-
68
-
69
-
70
-
71
-
72
-
73
-
74
-
75
-
76
-
77
-
78
-
79
-
80
-
81
-
82
-
83
-
84
-
85
-
86
-
 87
87 -
 88
88 -
 89
89 -
 90
90 -
 91
91 -
 92
92 -
 93
93 -
 94
94 -
 95
95 -
 96
96 -
 97
97 -
98
-
99
-
100
-
101
-
102
-
103
-
104
-
105
-
106
-
107
-
108
-
109
-
110
-
111
-
112
-
113
-
114
-
115
-
116
-
117
-
118
-
119
-
120
-
121
-
122
-
123
-
124
-
125
-
126
-
127
-
128
-
129
-
130
-
131
-
132
-
133
-
134
-
135
-
136
-
137
-
138
-
139
-
140
-
141
-
142
-
143
-
144
-
145
-
146
-
147
-
148
-
149
-
150
-
151
-
152
-
153
-
154
-
155
-
156
-
157
-
158
-
159
-
160
-
161
-
162
-
163
-
164
-
165
-
166
-
167
-
168
-
169
-
170
-
171
-
172
-
173
-
174
-
175
-
176
-
177
-
178
-
179
-
180
-
181
-
182
-
183
-
184
-
185
-
186
 |
 |