Epson WorkForce WF-2630 User Manual - Page 40
Printing to Fit the Paper Size - Mac OS X, More Options, Fit to Print, Paper Size
 |
View all Epson WorkForce WF-2630 manuals
Add to My Manuals
Save this manual to your list of manuals |
Page 40 highlights
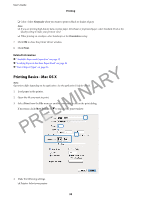
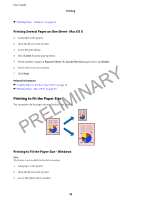
User's Guide Printing 4. Make the following settings on the More Options tab. ❏ Document Size: Select the paper size you set in the application. ❏ Output Paper: Select the paper size you loaded in the printer. Fit to Page is selected automatically. Note: If you want to print a reduced image at the center of the page, select Center. 5. Set the other items on the Main and More Options tabs as necessary, and then click OK. 6. Click Print. Related Information & "Loading Paper in the Rear Paper Feed" on page 26 PRELIMINARY & "Printing Basics - Windows" on page 34 Printing to Fit the Paper Size - Mac OS X 1. Load paper in the printer. 2. Open the file you want to print. 3. Access the print dialog. 4. Select the size of the paper you set in the application as the Paper Size setting. 5. Select Paper Handling from the pop-up menu. 6. Select Scale to fit paper size. 7. Select the paper size you loaded in the printer as the Destination Paper Size setting. 8. Set the other items as necessary. 9. Click Print. Related Information & "Loading Paper in the Rear Paper Feed" on page 26 & "Printing Basics - Mac OS X" on page 35 40
-
 1
1 -
2
-
3
-
4
-
5
-
6
-
7
-
8
-
9
-
10
-
11
-
12
-
13
-
14
-
15
-
16
-
17
-
18
-
19
-
20
-
21
-
22
-
23
-
24
-
25
-
26
-
27
-
28
-
29
-
30
-
31
-
32
-
33
-
34
-
 35
35 -
 36
36 -
 37
37 -
 38
38 -
 39
39 -
 40
40 -
 41
41 -
 42
42 -
 43
43 -
 44
44 -
 45
45 -
46
-
47
-
48
-
49
-
50
-
51
-
52
-
53
-
54
-
55
-
56
-
57
-
58
-
59
-
60
-
61
-
62
-
63
-
64
-
65
-
66
-
67
-
68
-
69
-
70
-
71
-
72
-
73
-
74
-
75
-
76
-
77
-
78
-
79
-
80
-
81
-
82
-
83
-
84
-
85
-
86
-
87
-
88
-
89
-
90
-
91
-
92
-
93
-
94
-
95
-
96
-
97
-
98
-
99
-
100
-
101
-
102
-
103
-
104
-
105
-
106
-
107
-
108
-
109
-
110
-
111
-
112
-
113
-
114
-
115
-
116
-
117
-
118
-
119
-
120
-
121
-
122
-
123
-
124
-
125
-
126
-
127
-
128
-
129
-
130
-
131
-
132
 |
 |
