Gateway E-475M Gateway Notebook Reference Guide (Windows XP) - Page 18
Bottom - model
 |
View all Gateway E-475M manuals
Add to My Manuals
Save this manual to your list of manuals |
Page 18 highlights
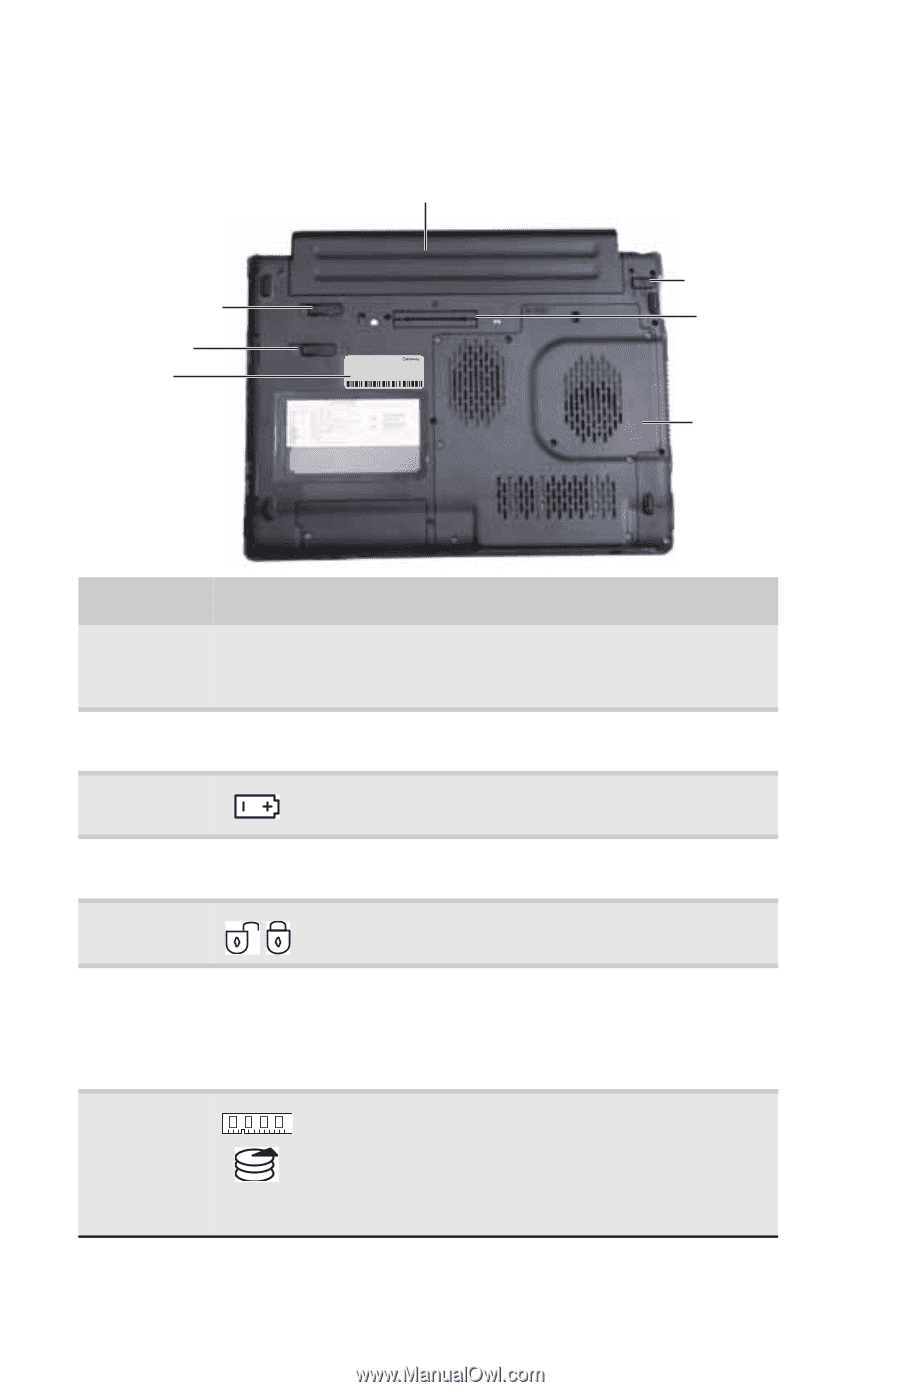
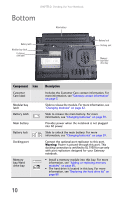
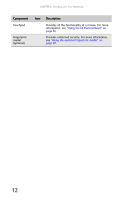
CHAPTER 2: Checking Out Your Notebook Bottom Main battery Battery latch Modular bay latch Customer care label Online Support: Tech Support Phone: Hours: Model: S/No: Battery lock Docking port Memory bay/Hard drive bay Component Icon Customer Care label Modular bay latch Battery latch Main battery Battery lock Docking port Memory bay/Hard drive bay Description Includes the Customer Care contact information. For more information, see "Gateway contact information" on page 3. Slide to release the module. For more information, see "Changing modules" on page 42. Slide to release the main battery. For more information, see "Changing batteries" on page 59. Provides power when the notebook is not plugged into AC power. Slide to unlock the main battery. For more information, see "Changing batteries" on page 59. Connect the optional port replicator to this port. Warning: Power is passed through this port. This docking connection is certified to UL 1950 for use only with port replicators designed for your Gateway notebook. ■ Install a memory module into this bay. For more information, see "Adding or replacing memory modules" on page 85. ■ The hard drive is located in this bay. For more information, see "Replacing the hard drive kit" on page 89. 10
-
 1
1 -
2
-
3
-
4
-
5
-
6
-
7
-
8
-
9
-
10
-
11
-
12
-
 13
13 -
 14
14 -
 15
15 -
 16
16 -
 17
17 -
 18
18 -
 19
19 -
 20
20 -
 21
21 -
 22
22 -
 23
23 -
24
-
25
-
26
-
27
-
28
-
29
-
30
-
31
-
32
-
33
-
34
-
35
-
36
-
37
-
38
-
39
-
40
-
41
-
42
-
43
-
44
-
45
-
46
-
47
-
48
-
49
-
50
-
51
-
52
-
53
-
54
-
55
-
56
-
57
-
58
-
59
-
60
-
61
-
62
-
63
-
64
-
65
-
66
-
67
-
68
-
69
-
70
-
71
-
72
-
73
-
74
-
75
-
76
-
77
-
78
-
79
-
80
-
81
-
82
-
83
-
84
-
85
-
86
-
87
-
88
-
89
-
90
-
91
-
92
-
93
-
94
-
95
-
96
-
97
-
98
-
99
-
100
-
101
-
102
-
103
-
104
-
105
-
106
-
107
-
108
-
109
-
110
-
111
-
112
-
113
-
114
-
115
-
116
-
117
-
118
-
119
-
120
-
121
-
122
-
123
-
124
-
125
-
126
-
127
-
128
-
129
-
130
-
131
-
132
-
133
-
134
-
135
-
136
-
137
-
138
-
139
-
140
-
141
-
142
-
143
-
144
-
145
-
146
-
147
-
148
-
149
-
150
-
151
-
152
 |
 |