HP 4500 HP Color LaserJet 4500, 4500N, 4500DN Printer User Guide - Page 117
Cleaning the Toner Density Sensor, To clean the toner density, sensor
 |
View all HP 4500 manuals
Add to My Manuals
Save this manual to your list of manuals |
Page 117 highlights
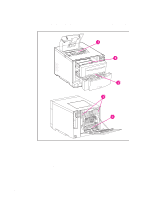
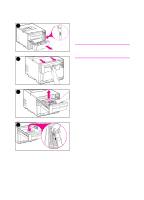
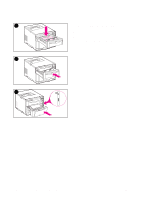
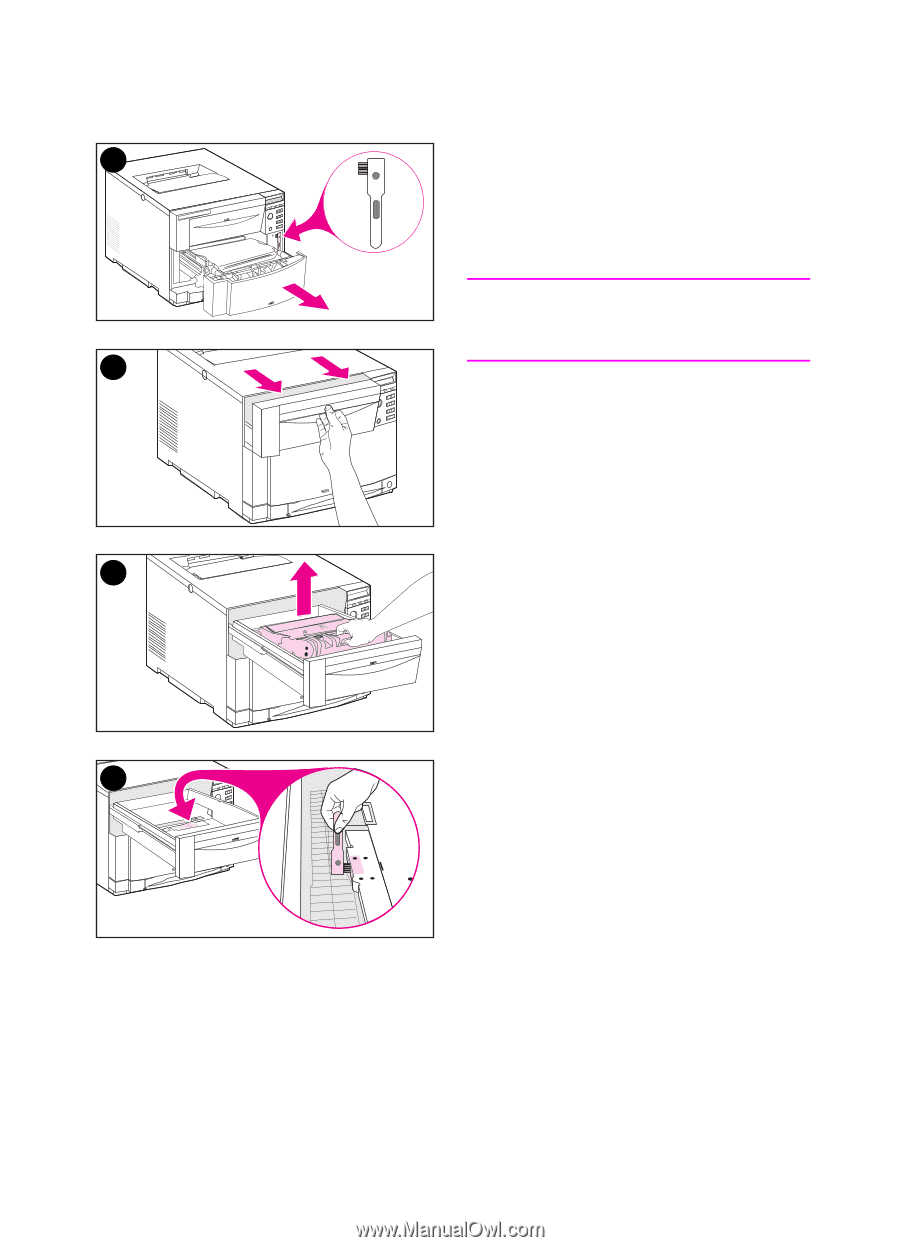
Cleaning the Toner Density Sensor 1 The toner density sensor should be cleaned whenever the imaging drum is replaced or whenever the control panel message DENSITY SENSOR OUT OF RANGE displays. CAUTION To avoid scratching the sensor, do not clean it with any paper products. 2 To clean the toner density sensor 1 Open the lower front drawer and remove the cleaning brush mounted inside. 2 Pull open the top front drawer. 3 3 Remove the imaging drum by the blue handle. 4 Use the cleaning brush to remove all dust and toner particles from the sensor as illustrated. 4 EN Chapter 7 117
-
 1
1 -
2
-
3
-
4
-
5
-
6
-
7
-
8
-
9
-
10
-
11
-
12
-
13
-
14
-
15
-
16
-
17
-
18
-
19
-
20
-
21
-
22
-
23
-
24
-
25
-
26
-
27
-
28
-
29
-
30
-
31
-
32
-
33
-
34
-
35
-
36
-
37
-
38
-
39
-
40
-
41
-
42
-
43
-
44
-
45
-
46
-
47
-
48
-
49
-
50
-
51
-
52
-
53
-
54
-
55
-
56
-
57
-
58
-
59
-
60
-
61
-
62
-
63
-
64
-
65
-
66
-
67
-
68
-
69
-
70
-
71
-
72
-
73
-
74
-
75
-
76
-
77
-
78
-
79
-
80
-
81
-
82
-
83
-
84
-
85
-
86
-
87
-
88
-
89
-
90
-
91
-
92
-
93
-
94
-
95
-
96
-
97
-
98
-
99
-
100
-
101
-
102
-
103
-
104
-
105
-
106
-
107
-
108
-
109
-
110
-
111
-
 112
112 -
 113
113 -
 114
114 -
 115
115 -
 116
116 -
 117
117 -
 118
118 -
 119
119 -
 120
120 -
 121
121 -
 122
122 -
123
-
124
-
125
-
126
-
127
-
128
-
129
-
130
-
131
-
132
-
133
-
134
-
135
-
136
-
137
-
138
-
139
-
140
-
141
-
142
-
143
-
144
-
145
-
146
-
147
-
148
-
149
-
150
-
151
-
152
-
153
-
154
-
155
-
156
-
157
-
158
-
159
-
160
-
161
-
162
-
163
-
164
-
165
-
166
-
167
-
168
-
169
-
170
-
171
-
172
-
173
-
174
-
175
-
176
-
177
-
178
-
179
-
180
-
181
-
182
-
183
-
184
-
185
-
186
-
187
-
188
-
189
-
190
-
191
-
192
-
193
-
194
-
195
-
196
-
197
-
198
-
199
-
200
-
201
-
202
-
203
-
204
-
205
-
206
-
207
-
208
-
209
-
210
-
211
-
212
-
213
-
214
-
215
-
216
-
217
-
218
-
219
-
220
 |
 |
EN
Chapter 7
117
Cleaning the Toner Density Sensor
The toner density sensor should be
cleaned whenever the imaging drum is
replaced or whenever the control panel
message DENSITY SENSOR OUT OF
RANGE displays.
CAUTION
To avoid scratching the sensor, do not
clean it with any paper products.
To clean the toner density
sensor
1
Open the lower front drawer and
remove the cleaning brush mounted
inside.
2
Pull open the top front drawer.
3
Remove the imaging drum by the
blue handle.
4
Use the cleaning brush to remove all
dust and toner particles from the
sensor as illustrated.
1
3
4
2