HP 4500 HP Color LaserJet 4500, 4500N, 4500DN Printer User Guide - Page 79
Adjusting Color Balance
 |
View all HP 4500 manuals
Add to My Manuals
Save this manual to your list of manuals |
Page 79 highlights
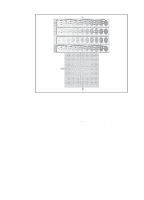
Adjusting Color Balance CAUTION Note This printer features automatic color calibration to provide high-quality color output. In situations that require critical color control, you can manually adjust the density balance of the printer's four toner colors. This procedure should only be performed by your network administrator. Performing this procedure changes the color balance of the printer by altering halftones and affects all print jobs. To adjust color balance Step 1: Print a color balance calibration page. The color balance calibration page displays current color settings and provides a record of the printer's initial settings before any adjustments are made. 1 Press MENU until CALIBRATION MENU displays. 2 Press ITEM until PRINT CALIBRATION PAGE displays. 3 Press SELECT to print the color balance calibration page. The page consists of four color bars (cyan, magenta, yellow, and black) and a box containing gray balance circles (see figure 4-1). The factory default setting for each color is zero. The range of settings is -5 to +5. Adjusting densities using the four color bars provides coarse color balance adjustments. After making these adjustments, you can finetune color densities by adjusting the gray balance. (See step 7 for instructions.) EN Chapter 4 79
-
 1
1 -
2
-
3
-
4
-
5
-
6
-
7
-
8
-
9
-
10
-
11
-
12
-
13
-
14
-
15
-
16
-
17
-
18
-
19
-
20
-
21
-
22
-
23
-
24
-
25
-
26
-
27
-
28
-
29
-
30
-
31
-
32
-
33
-
34
-
35
-
36
-
37
-
38
-
39
-
40
-
41
-
42
-
43
-
44
-
45
-
46
-
47
-
48
-
49
-
50
-
51
-
52
-
53
-
54
-
55
-
56
-
57
-
58
-
59
-
60
-
61
-
62
-
63
-
64
-
65
-
66
-
67
-
68
-
69
-
70
-
71
-
72
-
73
-
 74
74 -
 75
75 -
 76
76 -
 77
77 -
 78
78 -
 79
79 -
 80
80 -
 81
81 -
 82
82 -
 83
83 -
 84
84 -
85
-
86
-
87
-
88
-
89
-
90
-
91
-
92
-
93
-
94
-
95
-
96
-
97
-
98
-
99
-
100
-
101
-
102
-
103
-
104
-
105
-
106
-
107
-
108
-
109
-
110
-
111
-
112
-
113
-
114
-
115
-
116
-
117
-
118
-
119
-
120
-
121
-
122
-
123
-
124
-
125
-
126
-
127
-
128
-
129
-
130
-
131
-
132
-
133
-
134
-
135
-
136
-
137
-
138
-
139
-
140
-
141
-
142
-
143
-
144
-
145
-
146
-
147
-
148
-
149
-
150
-
151
-
152
-
153
-
154
-
155
-
156
-
157
-
158
-
159
-
160
-
161
-
162
-
163
-
164
-
165
-
166
-
167
-
168
-
169
-
170
-
171
-
172
-
173
-
174
-
175
-
176
-
177
-
178
-
179
-
180
-
181
-
182
-
183
-
184
-
185
-
186
-
187
-
188
-
189
-
190
-
191
-
192
-
193
-
194
-
195
-
196
-
197
-
198
-
199
-
200
-
201
-
202
-
203
-
204
-
205
-
206
-
207
-
208
-
209
-
210
-
211
-
212
-
213
-
214
-
215
-
216
-
217
-
218
-
219
-
220
 |
 |