HP 4500 HP Color LaserJet 4500, 4500N, 4500DN Printer User Guide - Page 172
DIMM Installation, levers lock into place.
 |
View all HP 4500 manuals
Add to My Manuals
Save this manual to your list of manuals |
Page 172 highlights
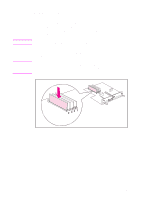
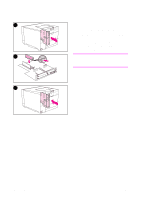
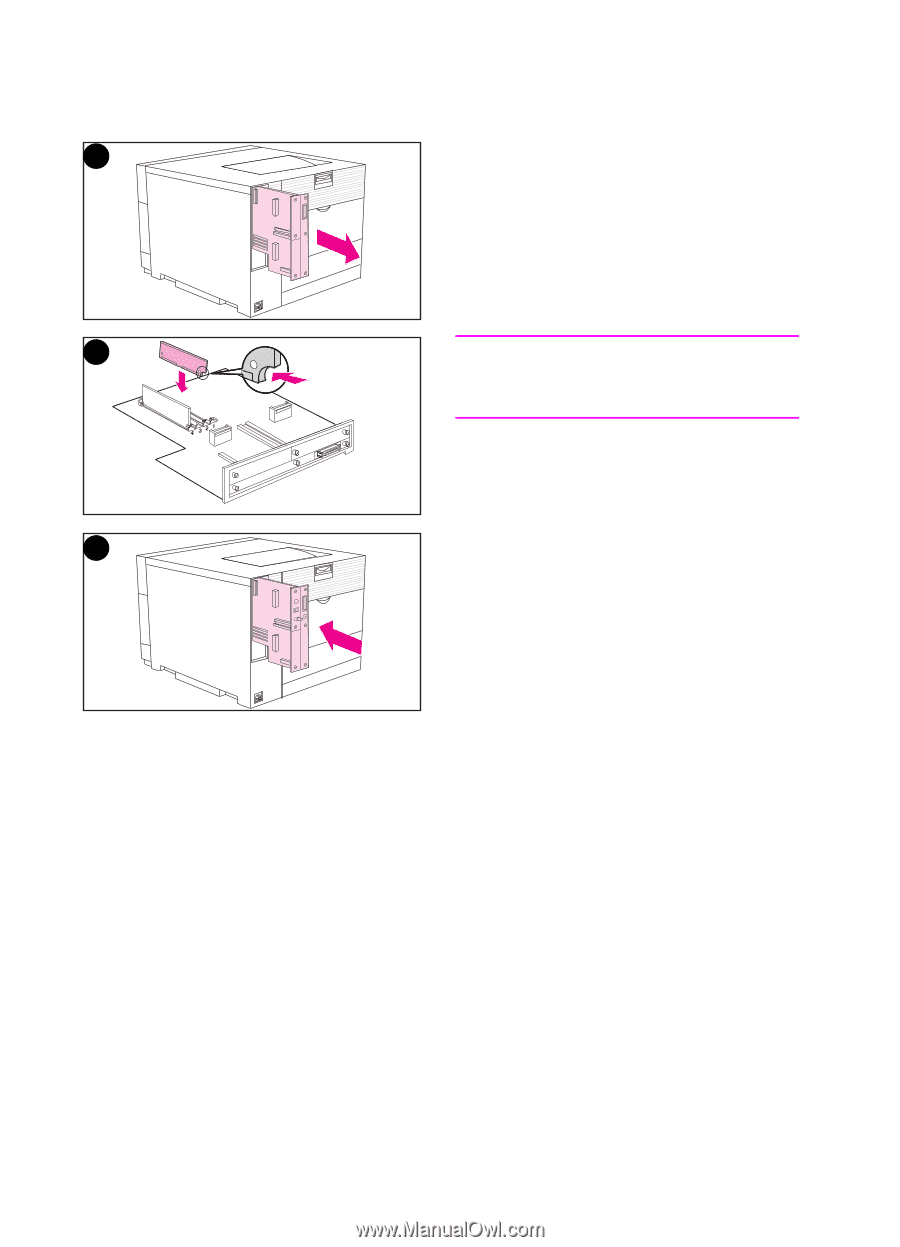
4 4 Slide out the formatter board and set it on a clean, flat, grounded surface. 5 Align the connectors on the DIMM with the notches in the DIMM slot. Insert the DIMM into the slot and then firmly push the DIMM until the levers lock into place. 5 Note Repeat step 5 for each DIMM you are installing. 6 Insert the formatter board into the printer. 6 172 DIMM Installation EN
-
 1
1 -
2
-
3
-
4
-
5
-
6
-
7
-
8
-
9
-
10
-
11
-
12
-
13
-
14
-
15
-
16
-
17
-
18
-
19
-
20
-
21
-
22
-
23
-
24
-
25
-
26
-
27
-
28
-
29
-
30
-
31
-
32
-
33
-
34
-
35
-
36
-
37
-
38
-
39
-
40
-
41
-
42
-
43
-
44
-
45
-
46
-
47
-
48
-
49
-
50
-
51
-
52
-
53
-
54
-
55
-
56
-
57
-
58
-
59
-
60
-
61
-
62
-
63
-
64
-
65
-
66
-
67
-
68
-
69
-
70
-
71
-
72
-
73
-
74
-
75
-
76
-
77
-
78
-
79
-
80
-
81
-
82
-
83
-
84
-
85
-
86
-
87
-
88
-
89
-
90
-
91
-
92
-
93
-
94
-
95
-
96
-
97
-
98
-
99
-
100
-
101
-
102
-
103
-
104
-
105
-
106
-
107
-
108
-
109
-
110
-
111
-
112
-
113
-
114
-
115
-
116
-
117
-
118
-
119
-
120
-
121
-
122
-
123
-
124
-
125
-
126
-
127
-
128
-
129
-
130
-
131
-
132
-
133
-
134
-
135
-
136
-
137
-
138
-
139
-
140
-
141
-
142
-
143
-
144
-
145
-
146
-
147
-
148
-
149
-
150
-
151
-
152
-
153
-
154
-
155
-
156
-
157
-
158
-
159
-
160
-
161
-
162
-
163
-
164
-
165
-
166
-
 167
167 -
 168
168 -
 169
169 -
 170
170 -
 171
171 -
 172
172 -
 173
173 -
 174
174 -
 175
175 -
 176
176 -
 177
177 -
178
-
179
-
180
-
181
-
182
-
183
-
184
-
185
-
186
-
187
-
188
-
189
-
190
-
191
-
192
-
193
-
194
-
195
-
196
-
197
-
198
-
199
-
200
-
201
-
202
-
203
-
204
-
205
-
206
-
207
-
208
-
209
-
210
-
211
-
212
-
213
-
214
-
215
-
216
-
217
-
218
-
219
-
220
 |
 |
172
DIMM Installation
EN
4
Slide out the formatter board and set
it on a clean, flat, grounded surface.
5
Align the connectors on the DIMM
with the notches in the DIMM slot.
Insert the DIMM into the slot and
then firmly push the DIMM until the
levers lock into place.
Note
Repeat step 5 for each DIMM you are
installing.
6
Insert the formatter board into the
printer.
4
5
6