HP 4500 HP Color LaserJet 4500, 4500N, 4500DN Printer User Guide - Page 55
Controlling Print Jobs, Selecting Output Bins, reverse order
 |
View all HP 4500 manuals
Add to My Manuals
Save this manual to your list of manuals |
Page 55 highlights
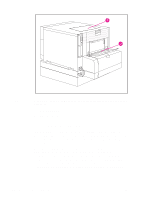
Controlling Print Jobs CAUTION Note Among the aspects of a print job that you can control are the tray from which the printer pulls media, the bin to which you send the job, and the configuration for type and size of media for each tray. You can control print jobs through the printer driver, your software application, or the printer control panel. To avoid affecting print jobs of other users, whenever possible, make printer setup changes through your software application or the printer driver. Printer setup changes made through the control panel become default settings for subsequent jobs. Changes made through an application or printer driver affect only that specific job. Selecting Output Bins This printer has two media output bins. The position of the door to the rear output bin determines the bin used: If the door to the rear output bin is open, media is directed to that bin. If it is closed, media is directed to the top output bin. There are no driver or software options for selecting an output bin. Figure 3-1 illustrates the top and rear output bins. q The top output bin holds up to 250 sheets of standard paper in correct order, facing down. When the bin is full, a sensor directs the printer to stop printing. Printing resumes when you remove paper from the bin. q The rear output bin holds up to 100 sheets of standard paper in reverse order, facing up. When the door to the rear output bin is open, media is directed to this bin. When this door is closed, media is directed to the top output bin. Because there is no sensor at this output bin, you should monitor the bin and empty it when it is full. If the rear output bin is open, duplex printing is not possible. Close the rear output bin when duplex printing. When printing on transparencies, close the rear output bin. This causes the transparencies to be sent to the top output bin and reduces the risk of jamming. EN Chapter 3 55
-
 1
1 -
2
-
3
-
4
-
5
-
6
-
7
-
8
-
9
-
10
-
11
-
12
-
13
-
14
-
15
-
16
-
17
-
18
-
19
-
20
-
21
-
22
-
23
-
24
-
25
-
26
-
27
-
28
-
29
-
30
-
31
-
32
-
33
-
34
-
35
-
36
-
37
-
38
-
39
-
40
-
41
-
42
-
43
-
44
-
45
-
46
-
47
-
48
-
49
-
 50
50 -
 51
51 -
 52
52 -
 53
53 -
 54
54 -
 55
55 -
 56
56 -
 57
57 -
 58
58 -
 59
59 -
 60
60 -
61
-
62
-
63
-
64
-
65
-
66
-
67
-
68
-
69
-
70
-
71
-
72
-
73
-
74
-
75
-
76
-
77
-
78
-
79
-
80
-
81
-
82
-
83
-
84
-
85
-
86
-
87
-
88
-
89
-
90
-
91
-
92
-
93
-
94
-
95
-
96
-
97
-
98
-
99
-
100
-
101
-
102
-
103
-
104
-
105
-
106
-
107
-
108
-
109
-
110
-
111
-
112
-
113
-
114
-
115
-
116
-
117
-
118
-
119
-
120
-
121
-
122
-
123
-
124
-
125
-
126
-
127
-
128
-
129
-
130
-
131
-
132
-
133
-
134
-
135
-
136
-
137
-
138
-
139
-
140
-
141
-
142
-
143
-
144
-
145
-
146
-
147
-
148
-
149
-
150
-
151
-
152
-
153
-
154
-
155
-
156
-
157
-
158
-
159
-
160
-
161
-
162
-
163
-
164
-
165
-
166
-
167
-
168
-
169
-
170
-
171
-
172
-
173
-
174
-
175
-
176
-
177
-
178
-
179
-
180
-
181
-
182
-
183
-
184
-
185
-
186
-
187
-
188
-
189
-
190
-
191
-
192
-
193
-
194
-
195
-
196
-
197
-
198
-
199
-
200
-
201
-
202
-
203
-
204
-
205
-
206
-
207
-
208
-
209
-
210
-
211
-
212
-
213
-
214
-
215
-
216
-
217
-
218
-
219
-
220
 |
 |