HP 4500 HP Color LaserJet 4500, 4500N, 4500DN Printer User Guide - Page 80
Color Balance Calibration Step 2: Adjust the cyan C density setting., key to increase the value
 |
View all HP 4500 manuals
Add to My Manuals
Save this manual to your list of manuals |
Page 80 highlights
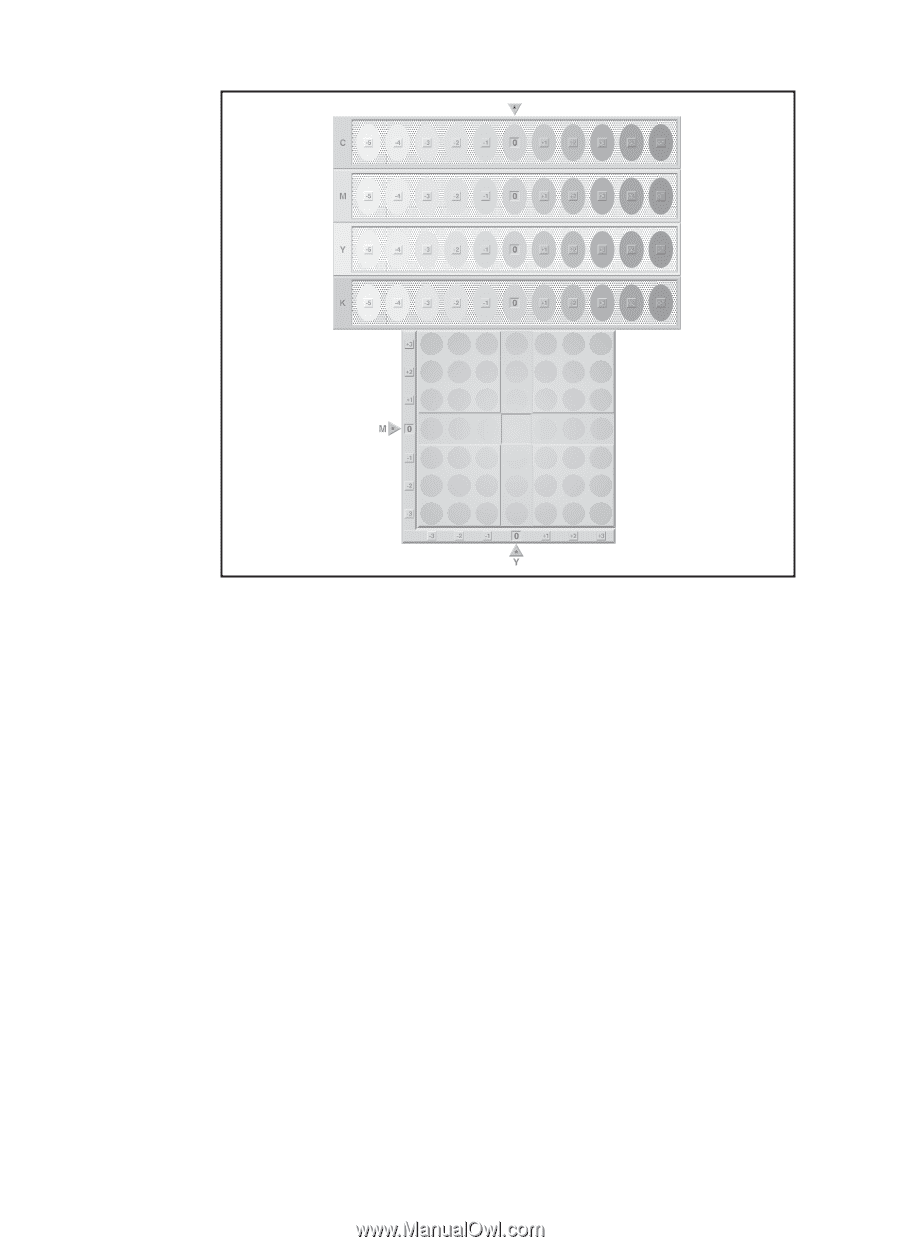
Figure 4-1 Color Balance Calibration Page Step 2: Adjust the cyan (C) density setting. Examine the cyan density bar (C) on the color balance calibration page (see figure 4-1) from a distance of 2 meters (6 ft). If the center oval matches the background pattern more than the other ovals, the cyan density does not need to be adjusted and you should continue on to the magenta (M) setting. If an oval left of center or right of center matches the background more than the center oval, use the following steps to enter the number: 1 Press ITEM until CYAN DENSITY displays. 2 Press the right side of the VALUE key to increase the value, or press the left side to decrease it, until the number corresponding to the oval that most closely matches the background pattern is displayed. 3 Press SELECT to save the value. An asterisk (*) displays next to the selected setting. 80 Using Color EN
-
 1
1 -
2
-
3
-
4
-
5
-
6
-
7
-
8
-
9
-
10
-
11
-
12
-
13
-
14
-
15
-
16
-
17
-
18
-
19
-
20
-
21
-
22
-
23
-
24
-
25
-
26
-
27
-
28
-
29
-
30
-
31
-
32
-
33
-
34
-
35
-
36
-
37
-
38
-
39
-
40
-
41
-
42
-
43
-
44
-
45
-
46
-
47
-
48
-
49
-
50
-
51
-
52
-
53
-
54
-
55
-
56
-
57
-
58
-
59
-
60
-
61
-
62
-
63
-
64
-
65
-
66
-
67
-
68
-
69
-
70
-
71
-
72
-
73
-
74
-
 75
75 -
 76
76 -
 77
77 -
 78
78 -
 79
79 -
 80
80 -
 81
81 -
 82
82 -
 83
83 -
 84
84 -
 85
85 -
86
-
87
-
88
-
89
-
90
-
91
-
92
-
93
-
94
-
95
-
96
-
97
-
98
-
99
-
100
-
101
-
102
-
103
-
104
-
105
-
106
-
107
-
108
-
109
-
110
-
111
-
112
-
113
-
114
-
115
-
116
-
117
-
118
-
119
-
120
-
121
-
122
-
123
-
124
-
125
-
126
-
127
-
128
-
129
-
130
-
131
-
132
-
133
-
134
-
135
-
136
-
137
-
138
-
139
-
140
-
141
-
142
-
143
-
144
-
145
-
146
-
147
-
148
-
149
-
150
-
151
-
152
-
153
-
154
-
155
-
156
-
157
-
158
-
159
-
160
-
161
-
162
-
163
-
164
-
165
-
166
-
167
-
168
-
169
-
170
-
171
-
172
-
173
-
174
-
175
-
176
-
177
-
178
-
179
-
180
-
181
-
182
-
183
-
184
-
185
-
186
-
187
-
188
-
189
-
190
-
191
-
192
-
193
-
194
-
195
-
196
-
197
-
198
-
199
-
200
-
201
-
202
-
203
-
204
-
205
-
206
-
207
-
208
-
209
-
210
-
211
-
212
-
213
-
214
-
215
-
216
-
217
-
218
-
219
-
220
 |
 |