HP 5200tn HP LaserJet 5200L Series Printer - User Guide - Page 141
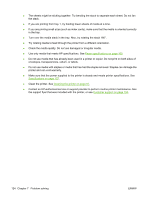
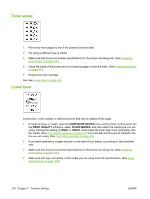
Lines, Gray background, CON DEVICE, PRINT QUALITY, TONER DENSITY
 |
UPC - 882780123762
View all HP 5200tn manuals
Add to My Manuals
Save this manual to your list of manuals |
Page 141 highlights
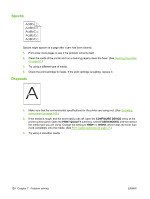
Lines AaBbCc AaBbCc AaBbCc AaBbCc AaBbCc 1. Print a few more pages to see if the problem corrects itself. 2. Clean the inside of the printer and run a cleaning page to clean the fuser. (See Cleaning the printer on page 91.) 3. Replace the print cartridge. Gray background 1. Do not use media that has already been run through the printer. 2. Try using a different type of media. 3. Print a few more pages to see if the problem corrects itself. 4. Turn over the stack in the tray. Also, try rotating the stack 180°. 5. Open the CONFIGURE DEVICE menu at the printer control panel. On the PRINT QUALITY submenu, increase the TONER DENSITY setting. See Print Quality submenu on page 27. 6. Make sure that the environmental specifications for the printer are being met. (See Operating environment on page 159.) 7. Replace the print cartridge. ENWW Troubleshooting print-quality problems 129
-
 1
1 -
2
-
3
-
4
-
5
-
6
-
7
-
8
-
9
-
10
-
11
-
12
-
13
-
14
-
15
-
16
-
17
-
18
-
19
-
20
-
21
-
22
-
23
-
24
-
25
-
26
-
27
-
28
-
29
-
30
-
31
-
32
-
33
-
34
-
35
-
36
-
37
-
38
-
39
-
40
-
41
-
42
-
43
-
44
-
45
-
46
-
47
-
48
-
49
-
50
-
51
-
52
-
53
-
54
-
55
-
56
-
57
-
58
-
59
-
60
-
61
-
62
-
63
-
64
-
65
-
66
-
67
-
68
-
69
-
70
-
71
-
72
-
73
-
74
-
75
-
76
-
77
-
78
-
79
-
80
-
81
-
82
-
83
-
84
-
85
-
86
-
87
-
88
-
89
-
90
-
91
-
92
-
93
-
94
-
95
-
96
-
97
-
98
-
99
-
100
-
101
-
102
-
103
-
104
-
105
-
106
-
107
-
108
-
109
-
110
-
111
-
112
-
113
-
114
-
115
-
116
-
117
-
118
-
119
-
120
-
121
-
122
-
123
-
124
-
125
-
126
-
127
-
128
-
129
-
130
-
131
-
132
-
133
-
134
-
135
-
 136
136 -
 137
137 -
 138
138 -
 139
139 -
 140
140 -
 141
141 -
 142
142 -
 143
143 -
 144
144 -
 145
145 -
 146
146 -
147
-
148
-
149
-
150
-
151
-
152
-
153
-
154
-
155
-
156
-
157
-
158
-
159
-
160
-
161
-
162
-
163
-
164
-
165
-
166
-
167
-
168
-
169
-
170
-
171
-
172
-
173
-
174
-
175
-
176
-
177
-
178
-
179
-
180
-
181
-
182
-
183
-
184
-
185
-
186
-
187
-
188
-
189
-
190
-
191
-
192
-
193
-
194
-
195
-
196
-
197
-
198
-
199
-
200
-
201
-
202
-
203
-
204
-
205
-
206
-
207
-
208
-
209
-
210
-
211
-
212
 |
 |