HP 6120XG HP ProCurve Series 6120 Blade Switches Advanced Traffic Management G - Page 52
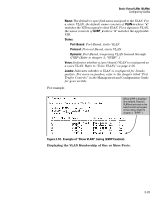
Example of the Port-Based VLAN Port Assignment Screen in the Menu, Interface, Tagged
 |
View all HP 6120XG manuals
Add to My Manuals
Save this manual to your list of manuals |
Page 52 highlights
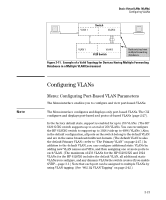
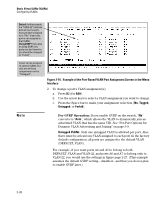
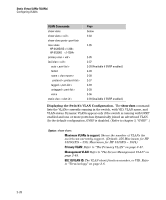
Static Virtual LANs (VLANs) Configuring VLANs Default: In this example, the "VLAN-22" has been defined, but no ports have yet been assigned to it. ("No" means the port is not assigned to that VLAN.) Using GVRP? If you plan on using GVRP, any ports you don't want to join should be changed to "Forbid". A port can be assigned to several VLANs, but only one of those assignments can be "Untagged". Figure 2-16. Example of the Port-Based VLAN Port Assignment Screen in the Menu Interface 2. To change a port's VLAN assignment(s): a. Press [E] (for Edit). b. Use the arrow keys to select a VLAN assignment you want to change. c. Press the Space bar to make your assignment selection (No, Tagged, Untagged, or Forbid). Note For GVRP Operation: If you enable GVRP on the switch, "No" converts to "Auto", which allows the VLAN to dynamically join an advertised VLAN that has the same VID. See "Per-Port Options for Dynamic VLAN Advertising and Joining" on page 3-9. Untagged VLANs: Only one untagged VLAN is allowed per port. Also, there must be at least one VLAN assigned to each port. In the factory default configuration, all ports are assigned to the default VLAN (DEFAULT_VLAN). For example, if you want ports A4 and A5 to belong to both DEFAULT_VLAN and VLAN-22, and ports A6 and A7 to belong only to VLAN-22, you would use the settings in figure page 2-27. (This example assumes the default GVRP setting-disabled-and that you do not plan to enable GVRP later.) 2-26
-
 1
1 -
2
-
3
-
4
-
5
-
6
-
7
-
8
-
9
-
10
-
11
-
12
-
13
-
14
-
15
-
16
-
17
-
18
-
19
-
20
-
21
-
22
-
23
-
24
-
25
-
26
-
27
-
28
-
29
-
30
-
31
-
32
-
33
-
34
-
35
-
36
-
37
-
38
-
39
-
40
-
41
-
42
-
43
-
44
-
45
-
46
-
 47
47 -
 48
48 -
 49
49 -
 50
50 -
 51
51 -
 52
52 -
 53
53 -
 54
54 -
 55
55 -
 56
56 -
 57
57 -
58
-
59
-
60
-
61
-
62
-
63
-
64
-
65
-
66
-
67
-
68
-
69
-
70
-
71
-
72
-
73
-
74
-
75
-
76
-
77
-
78
-
79
-
80
-
81
-
82
-
83
-
84
-
85
-
86
-
87
-
88
-
89
-
90
-
91
-
92
-
93
-
94
-
95
-
96
-
97
-
98
-
99
-
100
-
101
-
102
-
103
-
104
-
105
-
106
-
107
-
108
-
109
-
110
-
111
-
112
-
113
-
114
-
115
-
116
-
117
-
118
-
119
-
120
-
121
-
122
-
123
-
124
-
125
-
126
-
127
-
128
-
129
-
130
-
131
-
132
-
133
-
134
-
135
-
136
-
137
-
138
-
139
-
140
-
141
-
142
-
143
-
144
-
145
-
146
-
147
-
148
-
149
-
150
-
151
-
152
-
153
-
154
-
155
-
156
-
157
-
158
-
159
-
160
-
161
-
162
-
163
-
164
-
165
-
166
-
167
-
168
-
169
-
170
-
171
-
172
-
173
-
174
-
175
-
176
-
177
-
178
-
179
-
180
-
181
-
182
-
183
-
184
-
185
-
186
-
187
-
188
-
189
-
190
-
191
-
192
-
193
-
194
-
195
-
196
-
197
-
198
-
199
-
200
-
201
-
202
-
203
-
204
-
205
-
206
-
207
-
208
-
209
-
210
-
211
-
212
-
213
-
214
-
215
-
216
-
217
-
218
-
219
-
220
-
221
-
222
-
223
-
224
-
225
-
226
-
227
-
228
-
229
-
230
-
231
-
232
-
233
-
234
-
235
-
236
-
237
-
238
-
239
-
240
-
241
-
242
-
243
-
244
-
245
-
246
-
247
-
248
-
249
-
250
-
251
-
252
-
253
-
254
-
255
-
256
-
257
-
258
-
259
-
260
-
261
-
262
-
263
-
264
-
265
-
266
-
267
-
268
-
269
-
270
-
271
-
272
-
273
-
274
-
275
-
276
-
277
-
278
-
279
-
280
-
281
-
282
-
283
-
284
-
285
-
286
-
287
-
288
 |
 |
