HP Color LaserJet 9500 Service Manual - Page 206
Service LED, Event log, if connected
 |
View all HP Color LaserJet 9500 manuals
Add to My Manuals
Save this manual to your list of manuals |
Page 206 highlights
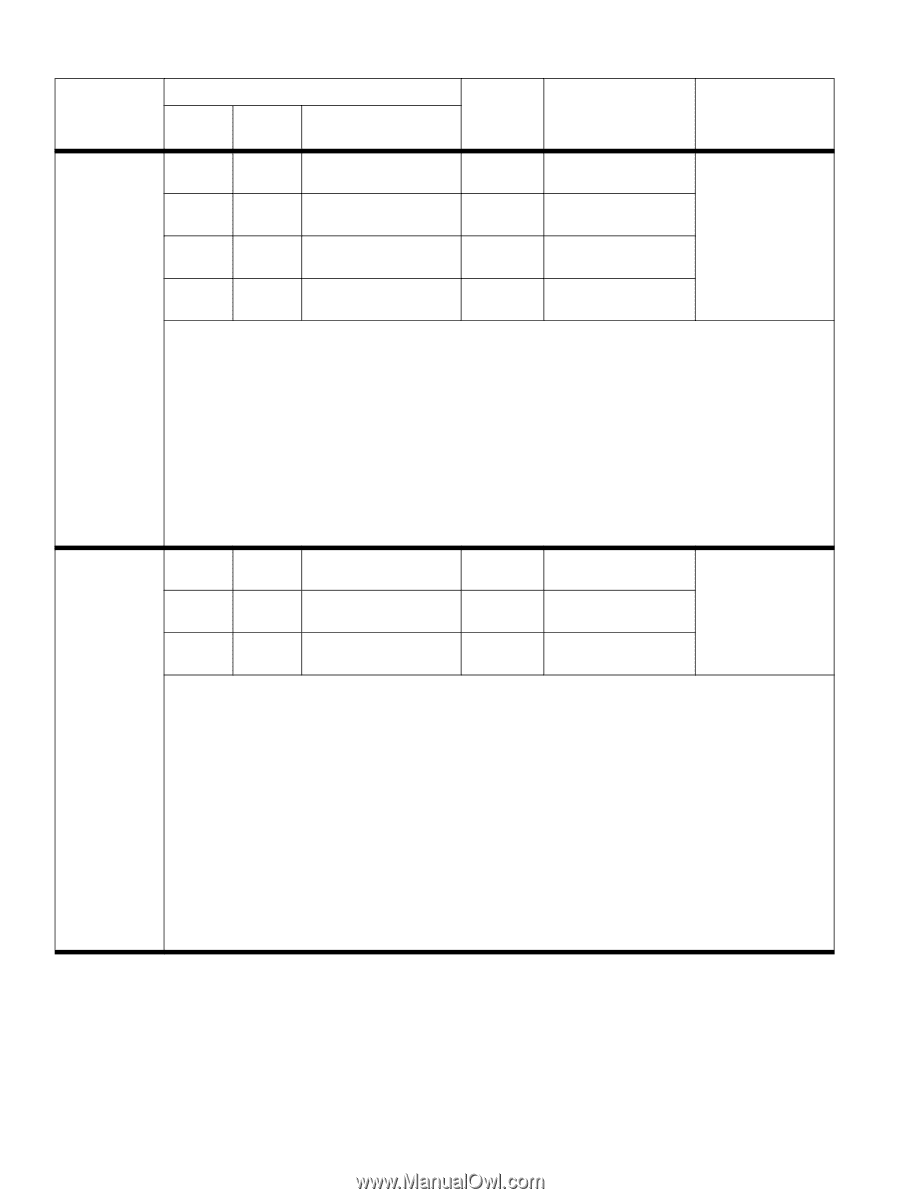
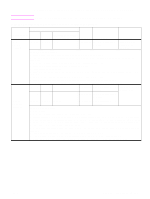
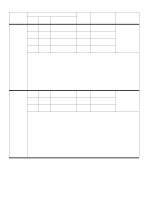
Table 27. Control panel and event log messages-multifunction finisher (continued) Event log, if connected to Control panel 9500, 9500mfp, 9050, message LJ9000 9000mfp 9050/9040mfp User LED Service LED Description 13.12.31 13.12.1F 13.12.1F 13.12.31 Red blinking Yellow (3 blinks) Green A jam has occurred in (1 blink) the paper path area. 13.12.32 13.12.20 13.12.20 13.12.32 Red blinking Yellow (3 blinks) Green (2 blinks) 13.12.33 13.12.21 13.12.21 13.12.33 Red blinking Yellow (3 blinks) Green (3 blinks) 13.12.34 Jam in left accessory 13.12.22 13.12.22 13.12.34 Red blinking Yellow (3 blinks) Green (4 blinks) Recommended action: 1 Clear the jam. 2 Make sure that the ejectors are even, relative to each other. If they are not, then unscrew the screw located between the ejectors to loosen the mechanism and adjust the ejector belt. After adjustment, tighten the screw. 3 Make sure that the jobs meet the required specifications. 4 Test the delivery motor M3 by using the motor test (see "Testing a motor, solenoid, or clutch" on page 238). 5 Verify the functionality of the feed-path sensor PI1 (see page 80) by using the sensor test (see "Testing sensors and switches" on page 238). 6 Verify that the connectors at the controller PCA are correctly seated, and check the harness connection at each end. 7 Turn the printer or MFP off and then on again to see if the jam persists. 8 If the harness is connected, but the message persists, then replace the flipper assembly. 9 If, after you replace the flipper assembly, the message persists, then replace the controller PCA. 13.12.41 13.12.42 13.12.29 13.12.29 13.12.41 13.12.2A 13.12.2A 13.12.42 Red blinking Yellow (4 blinks) Green (1 blink) Red blinking Yellow (4 blinks) Green (2 blinks) A jam has occurred in the folding/booklet area. 13.12.43 Jam in left accessory 13.12.2B 13.12.2B 13.12.43 Red blinking Yellow (4 blinks) Green (3 blinks) Recommended action: 1 Clear the jam. 2 Make sure that no media is inside the multifunction finisher at power-on. 3 Make sure that the jobs meet the required specifications. 4 Make sure that the stapler is at the rear side. 5 Test the staple fold motor M7 by using the motor test (see "Testing a motor, solenoid, or clutch" on page 238). 6 Clean the surface of the folding-position sensor PI10 (see page 80) without disassembling the flipper. 7 Verify the functionality of the folding-position sensor PI10 and the folding home-position sensor PI11 (see page 80) by using the sensor test (see "Testing sensors and switches" on page 238). 8 Verify that the connectors at the controller PCA are correctly seated, and check the harness connection at each end. 9 Turn the printer or MFP off and then on again to see if the jam persist. 10 If the harness is connected, but the message persists, then replace the folding mechanism assembly. 11 If, after you replace the folding mechanism assembly, the message persists, then replace the controller PCA. 204 Troubleshooting ENWW
-
 1
1 -
2
-
3
-
4
-
5
-
6
-
7
-
8
-
9
-
10
-
11
-
12
-
13
-
14
-
15
-
16
-
17
-
18
-
19
-
20
-
21
-
22
-
23
-
24
-
25
-
26
-
27
-
28
-
29
-
30
-
31
-
32
-
33
-
34
-
35
-
36
-
37
-
38
-
39
-
40
-
41
-
42
-
43
-
44
-
45
-
46
-
47
-
48
-
49
-
50
-
51
-
52
-
53
-
54
-
55
-
56
-
57
-
58
-
59
-
60
-
61
-
62
-
63
-
64
-
65
-
66
-
67
-
68
-
69
-
70
-
71
-
72
-
73
-
74
-
75
-
76
-
77
-
78
-
79
-
80
-
81
-
82
-
83
-
84
-
85
-
86
-
87
-
88
-
89
-
90
-
91
-
92
-
93
-
94
-
95
-
96
-
97
-
98
-
99
-
100
-
101
-
102
-
103
-
104
-
105
-
106
-
107
-
108
-
109
-
110
-
111
-
112
-
113
-
114
-
115
-
116
-
117
-
118
-
119
-
120
-
121
-
122
-
123
-
124
-
125
-
126
-
127
-
128
-
129
-
130
-
131
-
132
-
133
-
134
-
135
-
136
-
137
-
138
-
139
-
140
-
141
-
142
-
143
-
144
-
145
-
146
-
147
-
148
-
149
-
150
-
151
-
152
-
153
-
154
-
155
-
156
-
157
-
158
-
159
-
160
-
161
-
162
-
163
-
164
-
165
-
166
-
167
-
168
-
169
-
170
-
171
-
172
-
173
-
174
-
175
-
176
-
177
-
178
-
179
-
180
-
181
-
182
-
183
-
184
-
185
-
186
-
187
-
188
-
189
-
190
-
191
-
192
-
193
-
194
-
195
-
196
-
197
-
198
-
199
-
200
-
 201
201 -
 202
202 -
 203
203 -
 204
204 -
 205
205 -
 206
206 -
 207
207 -
 208
208 -
 209
209 -
 210
210 -
 211
211 -
212
-
213
-
214
-
215
-
216
-
217
-
218
-
219
-
220
-
221
-
222
-
223
-
224
-
225
-
226
-
227
-
228
-
229
-
230
-
231
-
232
-
233
-
234
-
235
-
236
-
237
-
238
-
239
-
240
-
241
-
242
-
243
-
244
-
245
-
246
-
247
-
248
-
249
-
250
-
251
-
252
-
253
-
254
-
255
-
256
-
257
-
258
-
259
-
260
-
261
-
262
-
263
-
264
-
265
-
266
-
267
-
268
-
269
-
270
-
271
-
272
-
273
-
274
-
275
-
276
-
277
-
278
-
279
-
280
-
281
-
282
-
283
-
284
-
285
-
286
-
287
-
288
-
289
-
290
-
291
-
292
-
293
-
294
-
295
-
296
-
297
-
298
-
299
-
300
 |
 |