HP Deskjet 6940 User Guide - Windows 2000 - Page 76
Automatic two-sided printing, Print Task Quick Sets
 |
UPC - 882780263406
View all HP Deskjet 6940 manuals
Add to My Manuals
Save this manual to your list of manuals |
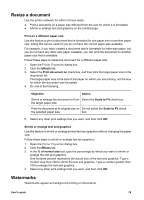
Page 76 highlights
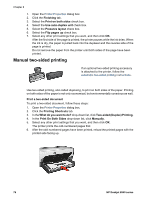
Chapter 8 Note The printer software can save up to 25 print task quick sets. Create a print task or use the specially designed print tasks that are available in the Print Task Quick Sets drop-down list. Use a print task quick set Follow these steps to use a print task quick set: 1. Open the Printer Properties dialog box. A Print Task Quick Sets drop-down list is displayed at the top of most tabs. 2. Go to Print Task Quick Sets on any tab where it is displayed. 3. In the drop-down list, click the print task that you want to use. 4. Click OK. Note To restore default print settings, click Default Print Settings in the Print Task Quick Sets drop-down list, and then click OK. Create a print task quick set Follow these steps to create a print task quick set: 1. Open the Printer Properties dialog box. 2. Select the options that you want to include in the new print task. 3. Go to Print Task Quick Sets on any tab where it is displayed. 4. Type a name for the new print task in the Print Task Quick Sets drop-down list, and then click Save. The print task quick set is added to the drop-down list. Note If you add more options to the print task, rename the print task and then click OK. Delete a print task quick set Follow these steps to delete a print task quick set: 1. Open the Printer Properties dialog box. A Print Task Quick Sets drop-down list is displayed at the top of most tabs. 2. Go to Print Task Quick Sets on any tab where it is displayed. 3. In the drop-down list, click the print task that you want to delete and then click Delete. Note Some print task quick sets cannot be deleted. Automatic two-sided printing To print a two-sided document automatically, one of the following accessories must be attached to the printer: 74 HP Deskjet 6940 series
-
 1
1 -
2
-
3
-
4
-
5
-
6
-
7
-
8
-
9
-
10
-
11
-
12
-
13
-
14
-
15
-
16
-
17
-
18
-
19
-
20
-
21
-
22
-
23
-
24
-
25
-
26
-
27
-
28
-
29
-
30
-
31
-
32
-
33
-
34
-
35
-
36
-
37
-
38
-
39
-
40
-
41
-
42
-
43
-
44
-
45
-
46
-
47
-
48
-
49
-
50
-
51
-
52
-
53
-
54
-
55
-
56
-
57
-
58
-
59
-
60
-
61
-
62
-
63
-
64
-
65
-
66
-
67
-
68
-
69
-
70
-
 71
71 -
 72
72 -
 73
73 -
 74
74 -
 75
75 -
 76
76 -
 77
77 -
 78
78 -
 79
79 -
 80
80 -
 81
81 -
82
-
83
-
84
-
85
-
86
-
87
-
88
-
89
-
90
-
91
-
92
-
93
-
94
-
95
-
96
-
97
-
98
-
99
-
100
-
101
-
102
-
103
-
104
-
105
-
106
-
107
-
108
-
109
-
110
-
111
-
112
-
113
-
114
-
115
-
116
-
117
-
118
-
119
-
120
-
121
-
122
-
123
-
124
-
125
-
126
-
127
-
128
-
129
-
130
-
131
-
132
-
133
-
134
-
135
-
136
-
137
-
138
-
139
-
140
-
141
-
142
-
143
-
144
-
145
-
146
-
147
-
148
 |
 |
