HP SW TL881 DLT Mini-Lib/1 Compaq TL881 MiniLibrary System Users Guide (May 19 - Page 101
Setting MiniLibrary Base Module slave, Configuration, A Configuration Example - Setting the SCSI ID
 |
View all HP SW TL881 DLT Mini-Lib/1 manuals
Add to My Manuals
Save this manual to your list of manuals |
Page 101 highlights
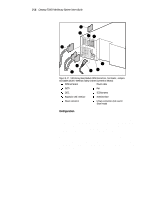
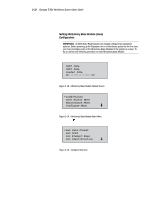
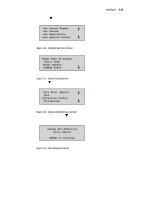
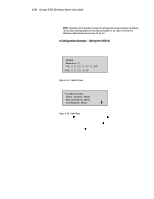
3-32 Compaq TL881 Minilibrary System Users Guide The settings can be changed using the procedure described in the section entitled A Configuration Example - Setting the SCSI ID, covered later. Before changing any configuration settings, consult your host system documentation to determine which settings may need to be changed. Setting MiniLibrary Base Module (slave) Configuration IMPORTANT: All MiniLibrary Base Modules are shipped configured as standalone systems. Before powering up the Expansion Unit in a MiniLibrary system for the first time, you must reconfigure each of the MiniLibrary Base Modules in the system as a slave. To do so, perform the following procedure on each MiniLibrary Base Module. 1. Turn on the power switch on the MiniLibrary Base Module. After a series of self-test screens, the screen shown in Figure 3-18 appears: SHR-1473 Figure 3-18. MiniLibrary Base Module Default Screen 2. Press the Enter button to display the Main Menu, shown in Figure 3-19: SHR-1331 Figure 3-19. MiniLibrary Base Module Main Menu 3. Press the button. three times to select the Configure Menu, then press the Enter button. The screen shown in Figure 3-20 appears: Figure 3-20. Configure Submenu SHR-1332
-
 1
1 -
2
-
3
-
4
-
5
-
6
-
7
-
8
-
9
-
10
-
11
-
12
-
13
-
14
-
15
-
16
-
17
-
18
-
19
-
20
-
21
-
22
-
23
-
24
-
25
-
26
-
27
-
28
-
29
-
30
-
31
-
32
-
33
-
34
-
35
-
36
-
37
-
38
-
39
-
40
-
41
-
42
-
43
-
44
-
45
-
46
-
47
-
48
-
49
-
50
-
51
-
52
-
53
-
54
-
55
-
56
-
57
-
58
-
59
-
60
-
61
-
62
-
63
-
64
-
65
-
66
-
67
-
68
-
69
-
70
-
71
-
72
-
73
-
74
-
75
-
76
-
77
-
78
-
79
-
80
-
81
-
82
-
83
-
84
-
85
-
86
-
87
-
88
-
89
-
90
-
91
-
92
-
93
-
94
-
95
-
 96
96 -
 97
97 -
 98
98 -
 99
99 -
 100
100 -
 101
101 -
 102
102 -
 103
103 -
 104
104 -
 105
105 -
 106
106 -
107
-
108
-
109
-
110
-
111
-
112
-
113
-
114
-
115
-
116
-
117
-
118
-
119
-
120
-
121
-
122
-
123
-
124
-
125
-
126
-
127
-
128
-
129
-
130
-
131
-
132
-
133
-
134
-
135
-
136
-
137
-
138
-
139
-
140
-
141
-
142
-
143
-
144
-
145
-
146
-
147
-
148
-
149
-
150
-
151
-
152
-
153
-
154
-
155
-
156
-
157
-
158
-
159
-
160
-
161
-
162
-
163
-
164
-
165
-
166
-
167
-
168
-
169
-
170
-
171
-
172
-
173
-
174
-
175
-
176
-
177
-
178
-
179
-
180
-
181
-
182
-
183
-
184
-
185
-
186
-
187
-
188
-
189
-
190
-
191
-
192
-
193
-
194
-
195
-
196
-
197
-
198
-
199
-
200
 |
 |
