HP SW TL881 DLT Mini-Lib/1 Compaq TL881 MiniLibrary System Users Guide (May 19 - Page 92
Installing the Pass-Thru Mechanism in the Rack
 |
View all HP SW TL881 DLT Mini-Lib/1 manuals
Add to My Manuals
Save this manual to your list of manuals |
Page 92 highlights
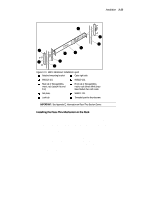
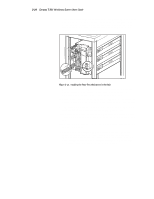
Installation 3-23 2 1 1 2 1 2 3 10 2 1 2 6 1 2 1 9 2 7 1 8 4 5 SHR-1244 Figure 3-13. Metric Rackmount Installation Layout 1 Attached mounting bracket 6 Outer right side 2 968313-101 7 968313-101 3 Rear rail of StorageWorks metric rack (attach this end first) 8 Front rail of StorageWorks metric rack (where MiniLibrary Base Module face will reside 4 Nut plate; 9 968312-101 5 Lock tab - Threaded post for thumbscrew IMPORTANT: See Appendix E, Information on Pass-Thru Section Covers. Installing the Pass-Thru Mechanism in the Rack 1. If you have not previously done so, install the angle brackets on the rack slide extensions of the top and bottom modules, using one 10-32 screw and an L-shaped nut plate for each angle bracket. The L-shaped nut plates should hang from the top of the slide extensions on the outside. Place the angle brackets so the front edge of the vertical part is 15/16" behind the rear edge of the slide body, as shown in the inset in Figure 314. 2. Referring to Figure 3-14, position the Pass-Thru mechanism against the back of the installed modules so that the support braces rest on the previously installed angle brackets. Install an M4 x 20 mm screw and washer through the rear hole in each angle bracket into the support braces. Do not tighten.
-
 1
1 -
2
-
3
-
4
-
5
-
6
-
7
-
8
-
9
-
10
-
11
-
12
-
13
-
14
-
15
-
16
-
17
-
18
-
19
-
20
-
21
-
22
-
23
-
24
-
25
-
26
-
27
-
28
-
29
-
30
-
31
-
32
-
33
-
34
-
35
-
36
-
37
-
38
-
39
-
40
-
41
-
42
-
43
-
44
-
45
-
46
-
47
-
48
-
49
-
50
-
51
-
52
-
53
-
54
-
55
-
56
-
57
-
58
-
59
-
60
-
61
-
62
-
63
-
64
-
65
-
66
-
67
-
68
-
69
-
70
-
71
-
72
-
73
-
74
-
75
-
76
-
77
-
78
-
79
-
80
-
81
-
82
-
83
-
84
-
85
-
86
-
 87
87 -
 88
88 -
 89
89 -
 90
90 -
 91
91 -
 92
92 -
 93
93 -
 94
94 -
 95
95 -
 96
96 -
 97
97 -
98
-
99
-
100
-
101
-
102
-
103
-
104
-
105
-
106
-
107
-
108
-
109
-
110
-
111
-
112
-
113
-
114
-
115
-
116
-
117
-
118
-
119
-
120
-
121
-
122
-
123
-
124
-
125
-
126
-
127
-
128
-
129
-
130
-
131
-
132
-
133
-
134
-
135
-
136
-
137
-
138
-
139
-
140
-
141
-
142
-
143
-
144
-
145
-
146
-
147
-
148
-
149
-
150
-
151
-
152
-
153
-
154
-
155
-
156
-
157
-
158
-
159
-
160
-
161
-
162
-
163
-
164
-
165
-
166
-
167
-
168
-
169
-
170
-
171
-
172
-
173
-
174
-
175
-
176
-
177
-
178
-
179
-
180
-
181
-
182
-
183
-
184
-
185
-
186
-
187
-
188
-
189
-
190
-
191
-
192
-
193
-
194
-
195
-
196
-
197
-
198
-
199
-
200
 |
 |
