HP SW TL881 DLT Mini-Lib/1 Compaq TL881 MiniLibrary System Users Guide (May 19 - Page 91
Procedure for installing modules 2
 |
View all HP SW TL881 DLT Mini-Lib/1 manuals
Add to My Manuals
Save this manual to your list of manuals |
Page 91 highlights
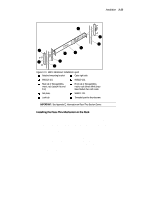
3-22 Compaq TL881 Minilibrary System Users Guide c. Extend the slide/bracket assembly forward to mate with the rack. Align the holes marked #1 on the slide/bracket assembly with the hole #1 on the front bracket and fasten two mounting screws through the two #1 holes. d. Be careful to mount all four brackets at the same height. You can use a ruler or count holes to achieve this. e. Tighten all four corners and the slide extension. Procedure for installing modules 2, 3, 4, 5 or 6: a. Each unit is 7 inches high. To locate the mounting location of the next bracket/slide assembly, use a ruler to measure 7 inches vertical distance of the protruding stud from the bracket above to the stud of the bracket which is to be installed. The mounting holes marked for the number of the module being installed should automatically line up with the rack holes. b. Using mounting screws (P/N 213164-108), mount the slide bracket assembly using the two mounting holes marked 2, 3, 4, 5 or 6 to mount the second, third, fourth, fifth, or sixth module respectively. Start by mounting the slide/bracket assembly to the rear of the StorageWorks cabinet. Hold the bracket/slide assembly in place with one hand, fasten the mounting screw to the bracket holes marked with a number that corresponds to the module number. c. Be careful to mount all four brackets at the same height. You can use a ruler or count the hole numbers to achieve this. d. Tighten all four corners and the slide extension. You are now ready to install the Pass-Thru mechanism in the rack as described in the section entitled Installing the Pass-Thru Mechanism in the Rack.
-
 1
1 -
2
-
3
-
4
-
5
-
6
-
7
-
8
-
9
-
10
-
11
-
12
-
13
-
14
-
15
-
16
-
17
-
18
-
19
-
20
-
21
-
22
-
23
-
24
-
25
-
26
-
27
-
28
-
29
-
30
-
31
-
32
-
33
-
34
-
35
-
36
-
37
-
38
-
39
-
40
-
41
-
42
-
43
-
44
-
45
-
46
-
47
-
48
-
49
-
50
-
51
-
52
-
53
-
54
-
55
-
56
-
57
-
58
-
59
-
60
-
61
-
62
-
63
-
64
-
65
-
66
-
67
-
68
-
69
-
70
-
71
-
72
-
73
-
74
-
75
-
76
-
77
-
78
-
79
-
80
-
81
-
82
-
83
-
84
-
85
-
 86
86 -
 87
87 -
 88
88 -
 89
89 -
 90
90 -
 91
91 -
 92
92 -
 93
93 -
 94
94 -
 95
95 -
 96
96 -
97
-
98
-
99
-
100
-
101
-
102
-
103
-
104
-
105
-
106
-
107
-
108
-
109
-
110
-
111
-
112
-
113
-
114
-
115
-
116
-
117
-
118
-
119
-
120
-
121
-
122
-
123
-
124
-
125
-
126
-
127
-
128
-
129
-
130
-
131
-
132
-
133
-
134
-
135
-
136
-
137
-
138
-
139
-
140
-
141
-
142
-
143
-
144
-
145
-
146
-
147
-
148
-
149
-
150
-
151
-
152
-
153
-
154
-
155
-
156
-
157
-
158
-
159
-
160
-
161
-
162
-
163
-
164
-
165
-
166
-
167
-
168
-
169
-
170
-
171
-
172
-
173
-
174
-
175
-
176
-
177
-
178
-
179
-
180
-
181
-
182
-
183
-
184
-
185
-
186
-
187
-
188
-
189
-
190
-
191
-
192
-
193
-
194
-
195
-
196
-
197
-
198
-
199
-
200
 |
 |
