HP SW TL881 DLT Mini-Lib/1 Compaq TL881 MiniLibrary System Users Guide (May 19 - Page 89
Metric Conversion Bracket Description and, Identification, relative to the top module.
 |
View all HP SW TL881 DLT Mini-Lib/1 manuals
Add to My Manuals
Save this manual to your list of manuals |
Page 89 highlights
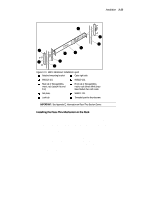
3-20 Compaq TL881 Minilibrary System Users Guide 1 8 5 4 7 2 2 1 9 2 1 6 2 2 1 1 2 x 968312-101 4 x 968313-101 4 10 4 3 3 6 4 4 3 3 2 x 968319-101 4 x 968320-101 5 3 2 x 213164-108 2 x 972629-132 4 SHR-1243 Figure 3-12. Parts List for StorageWorks Metric Rackmounting 1 Outer slide 6 Front 2 7 Intermediate slide Mounting bracket 3 Inner slide 8 Nut plate; 4 Lock tab 9 For 1st or 2nd modules from top (units 1 and 2) 5 Rear - For 3rd or 4th modules from top (units 3 and 4) NOTE: Brackets for modules 5 and 6 are not shown in Figure 3-12. WARNING: The cooling fan at the rear of the drive must not be obstructed when the drive is installed in the rack. It is advisable to allow two inches of clearance behind the rear panel of the module. Make certain that when the Module is fully extended that a force of 20% of the rack weight, but not more than 57 lb. applied in any direction but upwards does not cause the rack to overbalance. Metric Conversion Bracket Description and Identification: 1. Refer to Figure 3-12 to identify and take inventory of the metric conversion hardware included in your metric rackmount kit. 2. Determine where the module you are installing is going to be located relative to the top module. a. If the module you are installing is going to be located on the top of the stack or the second from the top (unit 1 or 2), the parts which you will need to install this module are: 2 pieces 968312-101
-
 1
1 -
2
-
3
-
4
-
5
-
6
-
7
-
8
-
9
-
10
-
11
-
12
-
13
-
14
-
15
-
16
-
17
-
18
-
19
-
20
-
21
-
22
-
23
-
24
-
25
-
26
-
27
-
28
-
29
-
30
-
31
-
32
-
33
-
34
-
35
-
36
-
37
-
38
-
39
-
40
-
41
-
42
-
43
-
44
-
45
-
46
-
47
-
48
-
49
-
50
-
51
-
52
-
53
-
54
-
55
-
56
-
57
-
58
-
59
-
60
-
61
-
62
-
63
-
64
-
65
-
66
-
67
-
68
-
69
-
70
-
71
-
72
-
73
-
74
-
75
-
76
-
77
-
78
-
79
-
80
-
81
-
82
-
83
-
 84
84 -
 85
85 -
 86
86 -
 87
87 -
 88
88 -
 89
89 -
 90
90 -
 91
91 -
 92
92 -
 93
93 -
 94
94 -
95
-
96
-
97
-
98
-
99
-
100
-
101
-
102
-
103
-
104
-
105
-
106
-
107
-
108
-
109
-
110
-
111
-
112
-
113
-
114
-
115
-
116
-
117
-
118
-
119
-
120
-
121
-
122
-
123
-
124
-
125
-
126
-
127
-
128
-
129
-
130
-
131
-
132
-
133
-
134
-
135
-
136
-
137
-
138
-
139
-
140
-
141
-
142
-
143
-
144
-
145
-
146
-
147
-
148
-
149
-
150
-
151
-
152
-
153
-
154
-
155
-
156
-
157
-
158
-
159
-
160
-
161
-
162
-
163
-
164
-
165
-
166
-
167
-
168
-
169
-
170
-
171
-
172
-
173
-
174
-
175
-
176
-
177
-
178
-
179
-
180
-
181
-
182
-
183
-
184
-
185
-
186
-
187
-
188
-
189
-
190
-
191
-
192
-
193
-
194
-
195
-
196
-
197
-
198
-
199
-
200
 |
 |
