HP SW TL881 DLT Mini-Lib/1 Compaq TL881 MiniLibrary System Users Guide (May 19 - Page 87
Rackmounting in a Standard 19 EIA/RETMA, Cabinet
 |
View all HP SW TL881 DLT Mini-Lib/1 manuals
Add to My Manuals
Save this manual to your list of manuals |
Page 87 highlights
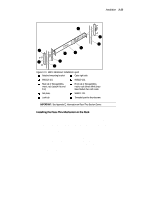
3-18 Compaq TL881 Minilibrary System Users Guide Rackmounting in a Standard 19" EIA/RETMA Cabinet: These procedures assume that you have already separated the slide racks and attached the mounting brackets to the slides as described in the beginning of this chapter. Next: 1. Fasten each outer slide behind the front rail of the rack using two 10-32 low-profile screws with washers and one nut plate. Two 10-32 clip nuts are provided to engage the captive screws on the front panel. 2. Fasten each of the mounting brackets to the front of the rear rail of the rack using two 10-32 screws and one nut plate. 3. Tighten the screws installed in step 4 of the previous section. 4. If they are not already locked, pull the intermediate slides toward the front (out of the rack) so that they lock in the extended position. 2 3 1 6 8 4 7 5 8 SHR-1430 Figure 3-11. Rack Slide Parts for Standard 19" EIA/RETMA Rackmounting 1 Outer slide 5 10-32 screws 2 Intermediate slide 6 10-32 low-profile screws 3 Inner slide (attached to module) 7 Mounting bracket 4 Lock tab 8 Nut plate WARNING: Step 5 should be performed by two people. Make certain that when the module is fully extended that a force of 20% of the rack weight, but not more than 57 lb. Applied in any direction but upwards does not cause the rack to overbalance.
-
 1
1 -
2
-
3
-
4
-
5
-
6
-
7
-
8
-
9
-
10
-
11
-
12
-
13
-
14
-
15
-
16
-
17
-
18
-
19
-
20
-
21
-
22
-
23
-
24
-
25
-
26
-
27
-
28
-
29
-
30
-
31
-
32
-
33
-
34
-
35
-
36
-
37
-
38
-
39
-
40
-
41
-
42
-
43
-
44
-
45
-
46
-
47
-
48
-
49
-
50
-
51
-
52
-
53
-
54
-
55
-
56
-
57
-
58
-
59
-
60
-
61
-
62
-
63
-
64
-
65
-
66
-
67
-
68
-
69
-
70
-
71
-
72
-
73
-
74
-
75
-
76
-
77
-
78
-
79
-
80
-
81
-
 82
82 -
 83
83 -
 84
84 -
 85
85 -
 86
86 -
 87
87 -
 88
88 -
 89
89 -
 90
90 -
 91
91 -
 92
92 -
93
-
94
-
95
-
96
-
97
-
98
-
99
-
100
-
101
-
102
-
103
-
104
-
105
-
106
-
107
-
108
-
109
-
110
-
111
-
112
-
113
-
114
-
115
-
116
-
117
-
118
-
119
-
120
-
121
-
122
-
123
-
124
-
125
-
126
-
127
-
128
-
129
-
130
-
131
-
132
-
133
-
134
-
135
-
136
-
137
-
138
-
139
-
140
-
141
-
142
-
143
-
144
-
145
-
146
-
147
-
148
-
149
-
150
-
151
-
152
-
153
-
154
-
155
-
156
-
157
-
158
-
159
-
160
-
161
-
162
-
163
-
164
-
165
-
166
-
167
-
168
-
169
-
170
-
171
-
172
-
173
-
174
-
175
-
176
-
177
-
178
-
179
-
180
-
181
-
182
-
183
-
184
-
185
-
186
-
187
-
188
-
189
-
190
-
191
-
192
-
193
-
194
-
195
-
196
-
197
-
198
-
199
-
200
 |
 |
