HP SW TL881 DLT Mini-Lib/1 Compaq TL881 MiniLibrary System Users Guide (May 19 - Page 105
Setting up a Mail Slot, Con Submenu.
 |
View all HP SW TL881 DLT Mini-Lib/1 manuals
Add to My Manuals
Save this manual to your list of manuals |
Page 105 highlights
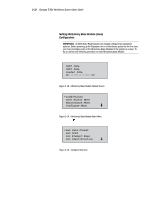
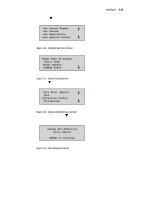
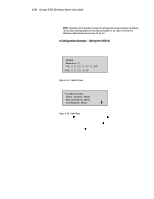
3-36 Compaq TL881 Minilibrary System Users Guide Figure 3-29. Set SCSI Submenu Scrolled SHR-1457 6. With the next to line 1, press the Enter button. The moves to line 2 and the remains at the end of line 4, and a appears at the end of line 1. Now you can use the and buttons to scroll through the possible settings. Scroll downward so that 3 is displayed, then press the Enter button to save the new selection. An * appears to the left of the 4, to indicate that it is the current selection. 7. Press the Escape button repeatedly until the submenu in Figure 3-27 reappears. 8. Repeat this procedure for each configuration option you want to change. Setting up a Mail Slot Some of the available host software enables the system administrator to limit access to the library as a whole while permitting insertion into or removal from the library of one or more tape cartridges when needed. This feature is commonly called a mail slot. It is implemented using SCSI Import/Export elements. In the MiniLibrary system, you can designate the magazine of any MiniLibrary Base Module as the mail slot magazine. When you do so, the entire magazine is withdrawn from the list of storage elements. You can designate any number of mail slots from one slot up to the full size of the magazine. To configure a mail slot, use the following procedure. 1. As shown in Figures 3-25 through 3-27 in the preceding procedure, navigate from the Default Screen through the Main Menu to the Configure Submenu. 2. Scroll down on the Configure Submenu until you see 'Set Mail Slot', and select that option. The screen shown in Figure 3-30 appears: SHR-1340
-
 1
1 -
2
-
3
-
4
-
5
-
6
-
7
-
8
-
9
-
10
-
11
-
12
-
13
-
14
-
15
-
16
-
17
-
18
-
19
-
20
-
21
-
22
-
23
-
24
-
25
-
26
-
27
-
28
-
29
-
30
-
31
-
32
-
33
-
34
-
35
-
36
-
37
-
38
-
39
-
40
-
41
-
42
-
43
-
44
-
45
-
46
-
47
-
48
-
49
-
50
-
51
-
52
-
53
-
54
-
55
-
56
-
57
-
58
-
59
-
60
-
61
-
62
-
63
-
64
-
65
-
66
-
67
-
68
-
69
-
70
-
71
-
72
-
73
-
74
-
75
-
76
-
77
-
78
-
79
-
80
-
81
-
82
-
83
-
84
-
85
-
86
-
87
-
88
-
89
-
90
-
91
-
92
-
93
-
94
-
95
-
96
-
97
-
98
-
99
-
 100
100 -
 101
101 -
 102
102 -
 103
103 -
 104
104 -
 105
105 -
 106
106 -
 107
107 -
 108
108 -
 109
109 -
 110
110 -
111
-
112
-
113
-
114
-
115
-
116
-
117
-
118
-
119
-
120
-
121
-
122
-
123
-
124
-
125
-
126
-
127
-
128
-
129
-
130
-
131
-
132
-
133
-
134
-
135
-
136
-
137
-
138
-
139
-
140
-
141
-
142
-
143
-
144
-
145
-
146
-
147
-
148
-
149
-
150
-
151
-
152
-
153
-
154
-
155
-
156
-
157
-
158
-
159
-
160
-
161
-
162
-
163
-
164
-
165
-
166
-
167
-
168
-
169
-
170
-
171
-
172
-
173
-
174
-
175
-
176
-
177
-
178
-
179
-
180
-
181
-
182
-
183
-
184
-
185
-
186
-
187
-
188
-
189
-
190
-
191
-
192
-
193
-
194
-
195
-
196
-
197
-
198
-
199
-
200
 |
 |
