HP rp8420 HP 9000 rp8420 Server - User Service Guide, Fifth Edition - Page 130
Example To upgrade the System Firmware firmware, NOTE 1: After
 |
View all HP rp8420 manuals
Add to My Manuals
Save this manual to your list of manuals |
Page 130 highlights
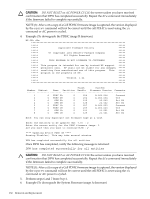
CAUTION: DO NOT RESET or AC POWER CYCLE the server unless you have received confirmation that DFW has completed successfully. Repeat the dfw command immediately if the firmware failed to complete successfully. NOTE (1): After a dfw copy of a Cell PDHC firmware image is captured, the version displayed by the sysrev command will not be correct until the cell PDHC is reset using the ru command or AC power is cycled. 4. Perform steps 6 and 7 from Step 6. 5. Example (To upgrade the System Firmware firmware) MP:CM> dfw ***** ***** ***** Duplicate Firmware Utility ***** ***** ***** ***** (C) Copyright 2001 Hewlett-Packard Company ***** ***** All Rights Reserved ***** ***** ***** ***** THIS PROGRAM IS NOT LICENSED TO CUSTOMERS ***** ***** ***** ***** This program is intended for use by trained HP support ***** ***** personnel only. HP shall not be liable for any damages ***** ***** resulting from unauthorized use of this program. This ***** ***** program is the property of HP. ***** ***** ***** ***** Version 1.04 ***** ***** ***** Flash Current Number Cabinet Name Partition Handle Firmware Version Comments 1 0 PDHC 0A 0 256 A.003.034 Current 2 0 PDHC 0B 0 264 A.003.034 Old 3 0 SFW 0A 0 320 21.001 Pri PA 4 0 SFW 0B 0 328 21.001 Sec PA 5 0 PDHC 1A 0 257 A.003.034 Current 6 0 PDHC 1B 0 265 A.003.034 Old 7 0 SFW 1A 0 321 22.002 Pri PA 8 0 SFW 1B 0 329 22.002 Sec PA Note: You can only duplicate one firmware type at a time. Enter the Entities to be updated (EX: 7,8) : 3 Enter the source entity for the System firmware image: 7 Are you sure that you want to continue(Y/N): y **** Updating device SFW 0A **** Erasing Flash(es). This may take several minutes. DFW has completed successfully for all entities Once DFW has completed, verify the following message is returned: DFW has completed successfully for all entities CAUTION: DO NOT RESET or AC POWER CYCLE the cell or server unless you have received confirmation that DFW has completed successfully. Repeat the dfw command immediately if the firmware failed to complete successfully. 6. Perform steps 11 and 12 from Step 11. 130 Removal and Replacement
-
 1
1 -
2
-
3
-
4
-
5
-
6
-
7
-
8
-
9
-
10
-
11
-
12
-
13
-
14
-
15
-
16
-
17
-
18
-
19
-
20
-
21
-
22
-
23
-
24
-
25
-
26
-
27
-
28
-
29
-
30
-
31
-
32
-
33
-
34
-
35
-
36
-
37
-
38
-
39
-
40
-
41
-
42
-
43
-
44
-
45
-
46
-
47
-
48
-
49
-
50
-
51
-
52
-
53
-
54
-
55
-
56
-
57
-
58
-
59
-
60
-
61
-
62
-
63
-
64
-
65
-
66
-
67
-
68
-
69
-
70
-
71
-
72
-
73
-
74
-
75
-
76
-
77
-
78
-
79
-
80
-
81
-
82
-
83
-
84
-
85
-
86
-
87
-
88
-
89
-
90
-
91
-
92
-
93
-
94
-
95
-
96
-
97
-
98
-
99
-
100
-
101
-
102
-
103
-
104
-
105
-
106
-
107
-
108
-
109
-
110
-
111
-
112
-
113
-
114
-
115
-
116
-
117
-
118
-
119
-
120
-
121
-
122
-
123
-
124
-
 125
125 -
 126
126 -
 127
127 -
 128
128 -
 129
129 -
 130
130 -
 131
131 -
 132
132 -
 133
133 -
 134
134 -
 135
135 -
136
-
137
-
138
-
139
-
140
-
141
-
142
-
143
-
144
-
145
-
146
-
147
-
148
-
149
-
150
-
151
-
152
-
153
-
154
-
155
-
156
-
157
-
158
-
159
-
160
-
161
-
162
-
163
-
164
-
165
-
166
-
167
-
168
-
169
-
170
-
171
-
172
-
173
-
174
-
175
-
176
-
177
-
178
-
179
-
180
-
181
-
182
-
183
-
184
-
185
-
186
-
187
-
188
-
189
-
190
-
191
-
192
-
193
-
194
-
195
-
196
-
197
-
198
-
199
-
200
-
201
-
202
-
203
-
204
-
205
-
206
-
207
-
208
-
209
-
210
-
211
-
212
-
213
-
214
-
215
 |
 |
