HP rp8420 HP 9000 rp8420 Server - User Service Guide, Fifth Edition - Page 46
Attaching a Caster Wheel to the Server
 |
View all HP rp8420 manuals
Add to My Manuals
Save this manual to your list of manuals |
Page 46 highlights
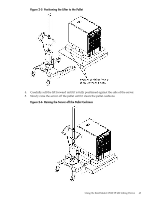
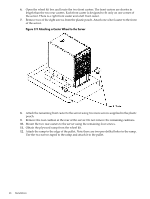
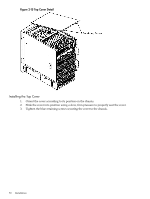
6. Open the wheel kit box and locate the two front casters. The front casters are shorter in length than the two rear casters. Each front caster is designed to fit only on one corner of the server. There is a right front caster and a left front caster. 7. Remove two of the eight screws from the plastic pouch. Attach one wheel caster to the front of the server. Figure 2-9 Attaching a Caster Wheel to the Server 8. Attach the remaining front caster to the server using two more screws supplied in the plastic pouch. 9. Remove the rear cushion at the rear of the server. Do not remove the remaining cushions. 10. Mount the two rear casters to the server using the remaining four screws. 11. Obtain the plywood ramp from the wheel kit. 12. Attach the ramp to the edge of the pallet. Note there are two pre-drilled holes in the ramp. Use the two screws taped to the ramp and attach it to the pallet. 46 Installation
-
 1
1 -
2
-
3
-
4
-
5
-
6
-
7
-
8
-
9
-
10
-
11
-
12
-
13
-
14
-
15
-
16
-
17
-
18
-
19
-
20
-
21
-
22
-
23
-
24
-
25
-
26
-
27
-
28
-
29
-
30
-
31
-
32
-
33
-
34
-
35
-
36
-
37
-
38
-
39
-
40
-
 41
41 -
 42
42 -
 43
43 -
 44
44 -
 45
45 -
 46
46 -
 47
47 -
 48
48 -
 49
49 -
 50
50 -
 51
51 -
52
-
53
-
54
-
55
-
56
-
57
-
58
-
59
-
60
-
61
-
62
-
63
-
64
-
65
-
66
-
67
-
68
-
69
-
70
-
71
-
72
-
73
-
74
-
75
-
76
-
77
-
78
-
79
-
80
-
81
-
82
-
83
-
84
-
85
-
86
-
87
-
88
-
89
-
90
-
91
-
92
-
93
-
94
-
95
-
96
-
97
-
98
-
99
-
100
-
101
-
102
-
103
-
104
-
105
-
106
-
107
-
108
-
109
-
110
-
111
-
112
-
113
-
114
-
115
-
116
-
117
-
118
-
119
-
120
-
121
-
122
-
123
-
124
-
125
-
126
-
127
-
128
-
129
-
130
-
131
-
132
-
133
-
134
-
135
-
136
-
137
-
138
-
139
-
140
-
141
-
142
-
143
-
144
-
145
-
146
-
147
-
148
-
149
-
150
-
151
-
152
-
153
-
154
-
155
-
156
-
157
-
158
-
159
-
160
-
161
-
162
-
163
-
164
-
165
-
166
-
167
-
168
-
169
-
170
-
171
-
172
-
173
-
174
-
175
-
176
-
177
-
178
-
179
-
180
-
181
-
182
-
183
-
184
-
185
-
186
-
187
-
188
-
189
-
190
-
191
-
192
-
193
-
194
-
195
-
196
-
197
-
198
-
199
-
200
-
201
-
202
-
203
-
204
-
205
-
206
-
207
-
208
-
209
-
210
-
211
-
212
-
213
-
214
-
215
 |
 |
