Lenovo ThinkPad 390X User's Reference for ThinkPad 390 - Page 19
accept PC Cards., PC Card slots - manual
 |
View all Lenovo ThinkPad 390X manuals
Add to My Manuals
Save this manual to your list of manuals |
Page 19 highlights
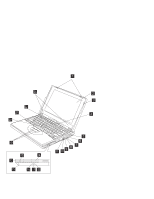
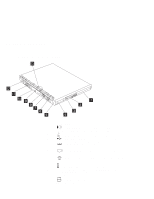
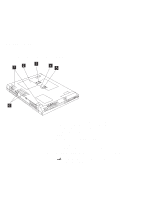
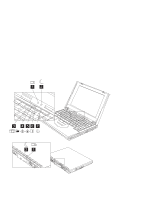
Identifying the Hardware Features (1) The LCD latches release the LCD when pressed and allow it to be opened. (2) The color LCD screen displays computer output. (3) The built-in microphone captures sound and voice when it is used with an application program capable of handling audio. (4) The brightness control adjusts the brightness of the display. (5) The internal modem port is used for connecting your com- puter to an analog telephone line. (6) The headphone jack, a ⅛inch (3.5mm) diameter jack, is where you connect stereo headphones or external speakers. (7) The line-in jack, a ⅛inch (3.5mm) diameter jack, is where you connect an external audio device. (8) The microphone jack, a ⅛inch (3.5mm) diameter jack, is where you connect a self-powered stereo microphone. Note: Do not plug any device into the microphone jack except a microphone. (9) The PC Card slots accept PC Cards. (10) The PC Card eject buttons eject the PC Card from the PC Card slot. (11) The audio volume control adjusts the volume of the speakers. (12) The diskette drive (shown installed in the UltraBay FX). (13) The diskette-drive-activity indicator lights up when the computer is accessing the diskette drive. (14) The diskette-eject button ejects the diskette from the diskette drive. (15) The CD-ROM drive (shown installed in the UltraBay FX). (16) The CD-ROM access indicator is on when data is read from a CD-ROM in the CD-ROM drive. (17) The CD-ROM eject button ejects the CD-ROM tray . (18) The manual-eject hole is used to eject the CD-ROM tray when it does not open with the eject button. (19) The TrackPoint buttons work with the TrackPoint (20) and func- tion similar to the buttons on a mouse. (20) The TrackPoint is a built-in pointing device that provides a func- tion similar to that of a mouse. (21) The Fn key is used with the function keys to activate the Fn key functions. (22) The indicator panel consists of the system-status indicators and their associated symbols. (23) The left and right internal speakers generate stereo sound. Chapter 1. Getting Familiar with Your Computer 3
-
 1
1 -
2
-
3
-
4
-
5
-
6
-
7
-
8
-
9
-
10
-
11
-
12
-
13
-
 14
14 -
 15
15 -
 16
16 -
 17
17 -
 18
18 -
 19
19 -
 20
20 -
 21
21 -
 22
22 -
 23
23 -
 24
24 -
25
-
26
-
27
-
28
-
29
-
30
-
31
-
32
-
33
-
34
-
35
-
36
-
37
-
38
-
39
-
40
-
41
-
42
-
43
-
44
-
45
-
46
-
47
-
48
-
49
-
50
-
51
-
52
-
53
-
54
-
55
-
56
-
57
-
58
-
59
-
60
-
61
-
62
-
63
-
64
-
65
-
66
-
67
-
68
-
69
-
70
-
71
-
72
-
73
-
74
-
75
-
76
-
77
-
78
-
79
-
80
-
81
-
82
-
83
-
84
-
85
-
86
-
87
-
88
-
89
-
90
-
91
-
92
-
93
-
94
-
95
-
96
-
97
-
98
-
99
-
100
-
101
-
102
-
103
-
104
-
105
-
106
-
107
-
108
-
109
-
110
-
111
-
112
-
113
-
114
-
115
-
116
-
117
-
118
-
119
-
120
-
121
-
122
-
123
-
124
-
125
-
126
-
127
-
128
-
129
-
130
-
131
-
132
-
133
-
134
-
135
-
136
-
137
-
138
-
139
-
140
-
141
-
142
-
143
-
144
-
145
-
146
-
147
-
148
-
149
-
150
-
151
-
152
-
153
-
154
-
155
-
156
-
157
-
158
-
159
-
160
-
161
-
162
-
163
-
164
-
165
-
166
-
167
-
168
-
169
-
170
-
171
-
172
-
173
-
174
-
175
-
176
 |
 |