Lenovo ThinkPad 390X User's Reference for ThinkPad 390 - Page 89
Enabling the CardBus Sockets (for Windows 98), Instruments PCI-1250 CardBus Controller
 |
View all Lenovo ThinkPad 390X manuals
Add to My Manuals
Save this manual to your list of manuals |
Page 89 highlights
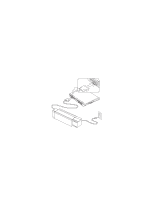
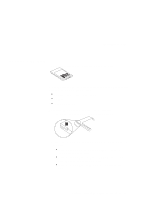
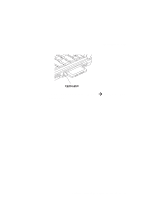
Using a Port Replicator Press the Eject Request button of the port replicator (suspend mode). or: Power off the computer and close the LCD. Note: Warm dock is only available under the Windows 98 or Windows 95 OSR2 operating system. Do not dock or undock the computer when the computer is in hibernation mode. For Windows NT: You can dock or undock the computer only when the computer power is turned off. Power off the computer and close the LCD. Note: If the power-on indicator of the computer or the port replicator does not turn on, press Fn. Enabling the CardBus Sockets (for Windows 98) The port replicator might not function properly if you attach a computer to it that is in suspend mode. In such a case, enable the CardBus sockets as follows: 1. Click on Start. 2. Move the cursor to Settings, and then click on Control Panel. 3. Double-click on System. 4. Click on Device Manager and double-click on PCMCIA socket. If the CardBus sockets are not enabled, you see two Texas Instruments PCI-1250 CardBus Controller lines with an exclamation mark (!) under PCMCIA socket. 5. Click on one of the lines; then click on the Remove button. 6. Click on the other line; then click on the Remove button. 7. Click on the Refresh button. The CardBus sockets are now enabled. Chapter 2. Extending the Features of Your Computer 73
-
 1
1 -
2
-
3
-
4
-
5
-
6
-
7
-
8
-
9
-
10
-
11
-
12
-
13
-
14
-
15
-
16
-
17
-
18
-
19
-
20
-
21
-
22
-
23
-
24
-
25
-
26
-
27
-
28
-
29
-
30
-
31
-
32
-
33
-
34
-
35
-
36
-
37
-
38
-
39
-
40
-
41
-
42
-
43
-
44
-
45
-
46
-
47
-
48
-
49
-
50
-
51
-
52
-
53
-
54
-
55
-
56
-
57
-
58
-
59
-
60
-
61
-
62
-
63
-
64
-
65
-
66
-
67
-
68
-
69
-
70
-
71
-
72
-
73
-
74
-
75
-
76
-
77
-
78
-
79
-
80
-
81
-
82
-
83
-
 84
84 -
 85
85 -
 86
86 -
 87
87 -
 88
88 -
 89
89 -
 90
90 -
 91
91 -
 92
92 -
 93
93 -
 94
94 -
95
-
96
-
97
-
98
-
99
-
100
-
101
-
102
-
103
-
104
-
105
-
106
-
107
-
108
-
109
-
110
-
111
-
112
-
113
-
114
-
115
-
116
-
117
-
118
-
119
-
120
-
121
-
122
-
123
-
124
-
125
-
126
-
127
-
128
-
129
-
130
-
131
-
132
-
133
-
134
-
135
-
136
-
137
-
138
-
139
-
140
-
141
-
142
-
143
-
144
-
145
-
146
-
147
-
148
-
149
-
150
-
151
-
152
-
153
-
154
-
155
-
156
-
157
-
158
-
159
-
160
-
161
-
162
-
163
-
164
-
165
-
166
-
167
-
168
-
169
-
170
-
171
-
172
-
173
-
174
-
175
-
176
 |
 |