Lenovo ThinkServer RD210 Hardware Maintenance Manual - Page 144
Removing a microprocessor and heat sink
 |
View all Lenovo ThinkServer RD210 manuals
Add to My Manuals
Save this manual to your list of manuals |
Page 144 highlights
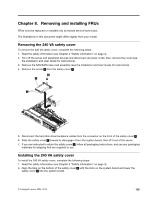
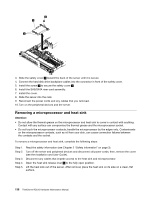
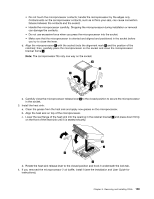
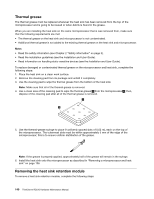
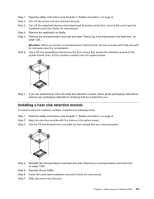
3. Slide the safety cover 2 toward the back of the server until it is secure. 4. Connect the hard disk drive backplane cables into the connector in front of the safety cover. 5. Install the screw 3 to secure the safety cover 2 . 6. Install the SAS/SATA riser-card assembly. 7. Install the cover. 8. Slide the server into the rack. 9. Reconnect the power cords and any cables that you removed. 10. Turn on the peripheral devices and the server. Removing a microprocessor and heat sink Attention: • Do not allow the thermal grease on the microprocessor and heat sink to come in contact with anything. Contact with any surface can compromise the thermal grease and the microprocessor socket. • Do not touch the microprocessor contacts; handle the microprocessor by the edges only. Contaminants on the microprocessor contacts, such as oil from your skin, can cause connection failures between the contacts and the socket. To remove a microprocessor and heat sink, complete the following steps: Step 1. Step 2. Step 3. Step 4. Step 5. Read the safety information (see Chapter 2 "Safety information" on page 3). Turn off the server and peripheral devices and disconnect all power cords; then, remove the cover (see the Installation and User Guide). Disconnect any cables that impede access to the heat sink and microprocessor. Open the heat sink release lever 1 to the fully open position. Lift the heat sink out of the server. After removal, place the heat sink on its side on a clean, flat surface. 136 ThinkServer RD210 Hardware Maintenance Manual
-
 1
1 -
2
-
3
-
4
-
5
-
6
-
7
-
8
-
9
-
10
-
11
-
12
-
13
-
14
-
15
-
16
-
17
-
18
-
19
-
20
-
21
-
22
-
23
-
24
-
25
-
26
-
27
-
28
-
29
-
30
-
31
-
32
-
33
-
34
-
35
-
36
-
37
-
38
-
39
-
40
-
41
-
42
-
43
-
44
-
45
-
46
-
47
-
48
-
49
-
50
-
51
-
52
-
53
-
54
-
55
-
56
-
57
-
58
-
59
-
60
-
61
-
62
-
63
-
64
-
65
-
66
-
67
-
68
-
69
-
70
-
71
-
72
-
73
-
74
-
75
-
76
-
77
-
78
-
79
-
80
-
81
-
82
-
83
-
84
-
85
-
86
-
87
-
88
-
89
-
90
-
91
-
92
-
93
-
94
-
95
-
96
-
97
-
98
-
99
-
100
-
101
-
102
-
103
-
104
-
105
-
106
-
107
-
108
-
109
-
110
-
111
-
112
-
113
-
114
-
115
-
116
-
117
-
118
-
119
-
120
-
121
-
122
-
123
-
124
-
125
-
126
-
127
-
128
-
129
-
130
-
131
-
132
-
133
-
134
-
135
-
136
-
137
-
138
-
 139
139 -
 140
140 -
 141
141 -
 142
142 -
 143
143 -
 144
144 -
 145
145 -
 146
146 -
 147
147 -
 148
148 -
 149
149 -
150
-
151
-
152
-
153
-
154
-
155
-
156
-
157
-
158
-
159
-
160
-
161
-
162
-
163
-
164
-
165
-
166
-
167
-
168
-
169
-
170
-
171
-
172
-
173
-
174
-
175
-
176
-
177
-
178
-
179
-
180
-
181
-
182
 |
 |
