Lenovo ThinkServer RD210 Hardware Maintenance Manual - Page 93
Removing and installing a memory module (DIMMs), Removing a memory module (DIMMs)
 |
View all Lenovo ThinkServer RD210 manuals
Add to My Manuals
Save this manual to your list of manuals |
Page 93 highlights
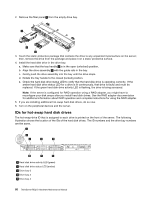
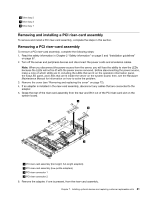
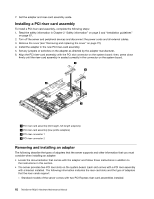
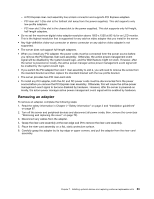
0000 0000 0000 0000 00000 00000 00000 00000 00000 00000 00000 0000 0 000 00 000 0000 000 00 0000 00 000 0000 00 0000 0000 0 0 0 00 00 0 0 0 00 00 0 00 0 0 00 0 00 00 0 0 0 0 00 0 0 00 00 000 0 0 0 00 0 00 0 0 0 0 0 0 0 0 00 0 00 0 000 0 00 00 0 00 0 00 0 0 0 0 00 0 0 0 0 0 00 0 0 0 0 0 0 00 0 000 00 0 0 0 0 0 0 00 00 0 0 00 0 0 0 0 000 0 0 0 000 0 00 00 0 0 0 00 0 0 00 00 000 0 0 0 00 0 00 0 0 0 0 0 0 0 0 00 0 00 0 000 0 00 00 0 00 0 00 0 0 0 0 00 0 0 0 0 00 00 0 0 0 0 0 0 000 00 000 00 0 0 0 1 Adapter 2 Expansion slot cover 3 PCI riser card assembly 5. Install the riser-card assembly in the server (see "Removing and installing a PCI riser-card assembly" on page 81). 6. Perform any configuration tasks that are required for the adapter. If you have other options to install or remove, do so now. Otherwise, go to "Completing the installation" on page 130. Removing and installing a memory module (DIMMs) To remove and install a memory module, complete the steps in this section. Removing a memory module (DIMMs) To remove a dual inline memory module (DIMM), complete the following steps: 1. Read the safety information in Chapter 2 "Safety information" on page 3 and "Installation guidelines" on page 67. 2. Turn off the server and peripheral devices and disconnect all power cords. 3. Remove the cover (see "Removing and replacing the cover" on page 72). 4. Disconnect any cables that impede access to the DIMMs. 5. Remove the DIMM air baffle (see "Removing and installing the DIMM air baffle" on page 77). 6. Carefully open the retaining clips 2 on each end of the DIMM connector and remove the DIMM 1 . Attention: To avoid breaking the retaining clips or damaging the DIMM connectors, open and close the clips gently. Chapter 7. Installing optional devices and replacing customer replaceable units 85
-
 1
1 -
2
-
3
-
4
-
5
-
6
-
7
-
8
-
9
-
10
-
11
-
12
-
13
-
14
-
15
-
16
-
17
-
18
-
19
-
20
-
21
-
22
-
23
-
24
-
25
-
26
-
27
-
28
-
29
-
30
-
31
-
32
-
33
-
34
-
35
-
36
-
37
-
38
-
39
-
40
-
41
-
42
-
43
-
44
-
45
-
46
-
47
-
48
-
49
-
50
-
51
-
52
-
53
-
54
-
55
-
56
-
57
-
58
-
59
-
60
-
61
-
62
-
63
-
64
-
65
-
66
-
67
-
68
-
69
-
70
-
71
-
72
-
73
-
74
-
75
-
76
-
77
-
78
-
79
-
80
-
81
-
82
-
83
-
84
-
85
-
86
-
87
-
 88
88 -
 89
89 -
 90
90 -
 91
91 -
 92
92 -
 93
93 -
 94
94 -
 95
95 -
 96
96 -
 97
97 -
 98
98 -
99
-
100
-
101
-
102
-
103
-
104
-
105
-
106
-
107
-
108
-
109
-
110
-
111
-
112
-
113
-
114
-
115
-
116
-
117
-
118
-
119
-
120
-
121
-
122
-
123
-
124
-
125
-
126
-
127
-
128
-
129
-
130
-
131
-
132
-
133
-
134
-
135
-
136
-
137
-
138
-
139
-
140
-
141
-
142
-
143
-
144
-
145
-
146
-
147
-
148
-
149
-
150
-
151
-
152
-
153
-
154
-
155
-
156
-
157
-
158
-
159
-
160
-
161
-
162
-
163
-
164
-
165
-
166
-
167
-
168
-
169
-
170
-
171
-
172
-
173
-
174
-
175
-
176
-
177
-
178
-
179
-
180
-
181
-
182
 |
 |
