Lenovo ThinkServer RD210 Hardware Maintenance Manual - Page 145
Installing a microprocessor and heat sink
 |
View all Lenovo ThinkServer RD210 manuals
Add to My Manuals
Save this manual to your list of manuals |
Page 145 highlights
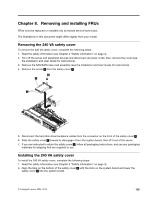
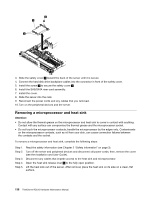
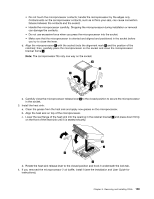
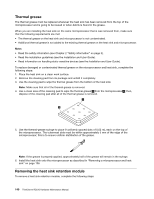
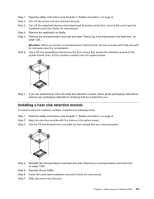
Step 6. Step 7. Release the microprocessor retention latch by pressing down on the end, moving it to the side, and releasing it to the open (up) position. Open the microprocessor bracket frame 1 by lifting up the tab on the top edge. Keep the bracket frame in the open position. Step 8. Step 9. Carefully lift the microprocessor 2 straight up and out of the socket, and place it on a static-protective surface. If you are instructed to return the microprocessor, follow all packaging instructions, and use any packaging materials for shipping that are supplied to you. Installing a microprocessor and heat sink The following notes describe the type of microprocessor that the server supports and other information that you must consider when you install a microprocessor and heat sink: • The server supports up to two ®Intel™Xeon dual-core or quad-core microprocessors. See http://www.lenovo.com/thinkserverfor a list of supported microprocessors. • Do not mix dual-core and quad-core microprocessors in the same server. • The upgrade of microprocessors are not supported on this server. For example, if the server came with a 2.0 GHz microprocessor, you cannot upgrade the microprocessor to a 2.3 GHz microprocessor, it is not supported. • The first microprocessor must always be installed in microprocessor socket 1 on the system board. • When one microprocessor is installed, a heat sink filler is not required for microprocessor socket 2, however, the microprocessor 2 air baffle and the DIMM air baffle must be installed to provide proper system cooling. Chapter 8. Removing and installing FRUs 137
-
 1
1 -
2
-
3
-
4
-
5
-
6
-
7
-
8
-
9
-
10
-
11
-
12
-
13
-
14
-
15
-
16
-
17
-
18
-
19
-
20
-
21
-
22
-
23
-
24
-
25
-
26
-
27
-
28
-
29
-
30
-
31
-
32
-
33
-
34
-
35
-
36
-
37
-
38
-
39
-
40
-
41
-
42
-
43
-
44
-
45
-
46
-
47
-
48
-
49
-
50
-
51
-
52
-
53
-
54
-
55
-
56
-
57
-
58
-
59
-
60
-
61
-
62
-
63
-
64
-
65
-
66
-
67
-
68
-
69
-
70
-
71
-
72
-
73
-
74
-
75
-
76
-
77
-
78
-
79
-
80
-
81
-
82
-
83
-
84
-
85
-
86
-
87
-
88
-
89
-
90
-
91
-
92
-
93
-
94
-
95
-
96
-
97
-
98
-
99
-
100
-
101
-
102
-
103
-
104
-
105
-
106
-
107
-
108
-
109
-
110
-
111
-
112
-
113
-
114
-
115
-
116
-
117
-
118
-
119
-
120
-
121
-
122
-
123
-
124
-
125
-
126
-
127
-
128
-
129
-
130
-
131
-
132
-
133
-
134
-
135
-
136
-
137
-
138
-
139
-
 140
140 -
 141
141 -
 142
142 -
 143
143 -
 144
144 -
 145
145 -
 146
146 -
 147
147 -
 148
148 -
 149
149 -
 150
150 -
151
-
152
-
153
-
154
-
155
-
156
-
157
-
158
-
159
-
160
-
161
-
162
-
163
-
164
-
165
-
166
-
167
-
168
-
169
-
170
-
171
-
172
-
173
-
174
-
175
-
176
-
177
-
178
-
179
-
180
-
181
-
182
 |
 |
