Lenovo ThinkServer RD210 Hardware Maintenance Manual - Page 31
Table 2. EasyLED panel LEDs continued, Remove the SAS/SATA RAID riser card, DIMMs
 |
View all Lenovo ThinkServer RD210 manuals
Add to My Manuals
Save this manual to your list of manuals |
Page 31 highlights
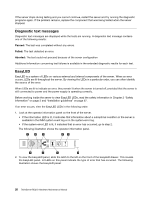
Table 2. EasyLED panel LEDs (continued) LED Description OVER SPEC (Continued) The power supplies are using more power than their maximum rating. Action If the 12V channel C error LED is lit, complete the following steps: 1. Turn the server off and disconnect the power from the server. 2. Remove the SAS/SATA RAID riser card, DIMMs in connectors 1 through 8, and the microprocessor in socket 1. Note: The server will not power-on when the microprocessor in socket 1 is not installed in the server. You will need to toggle the switch block (SW3) to pin 6 to power-on the server. 3. Restart the server to see if the problem remains. 4. Reinstall each device that was removed in step b one at a time, starting the server each time, to isolate the failing device. 5. Replace any failing device. 6. (Trained service technician only) Replace the system board, if the problem remains. If the 12V channel D error LED is lit, complete the following steps: 1. Turn the server off and disconnect the power from the server. 2. Remove the microprocessor in socket 1. Note: The server will not power-on when the microprocessor in socket 1 is not installed in the server. You will need to toggle the switch block (SW3) to pin 6 to power-on the server. 3. Restart the server to see if the problem remains. 4. Reinstall the microprocessor in socket 1 and restart the server. 5. Replace any failing device. 6. (Trained service technician only) Replace the system board, if the problem remains. (Continued on the next page.) Chapter 5. Diagnostic 23
-
 1
1 -
2
-
3
-
4
-
5
-
6
-
7
-
8
-
9
-
10
-
11
-
12
-
13
-
14
-
15
-
16
-
17
-
18
-
19
-
20
-
21
-
22
-
23
-
24
-
25
-
 26
26 -
 27
27 -
 28
28 -
 29
29 -
 30
30 -
 31
31 -
 32
32 -
 33
33 -
 34
34 -
 35
35 -
 36
36 -
37
-
38
-
39
-
40
-
41
-
42
-
43
-
44
-
45
-
46
-
47
-
48
-
49
-
50
-
51
-
52
-
53
-
54
-
55
-
56
-
57
-
58
-
59
-
60
-
61
-
62
-
63
-
64
-
65
-
66
-
67
-
68
-
69
-
70
-
71
-
72
-
73
-
74
-
75
-
76
-
77
-
78
-
79
-
80
-
81
-
82
-
83
-
84
-
85
-
86
-
87
-
88
-
89
-
90
-
91
-
92
-
93
-
94
-
95
-
96
-
97
-
98
-
99
-
100
-
101
-
102
-
103
-
104
-
105
-
106
-
107
-
108
-
109
-
110
-
111
-
112
-
113
-
114
-
115
-
116
-
117
-
118
-
119
-
120
-
121
-
122
-
123
-
124
-
125
-
126
-
127
-
128
-
129
-
130
-
131
-
132
-
133
-
134
-
135
-
136
-
137
-
138
-
139
-
140
-
141
-
142
-
143
-
144
-
145
-
146
-
147
-
148
-
149
-
150
-
151
-
152
-
153
-
154
-
155
-
156
-
157
-
158
-
159
-
160
-
161
-
162
-
163
-
164
-
165
-
166
-
167
-
168
-
169
-
170
-
171
-
172
-
173
-
174
-
175
-
176
-
177
-
178
-
179
-
180
-
181
-
182
 |
 |
