Lenovo ThinkServer RD210 Hardware Maintenance Manual - Page 84
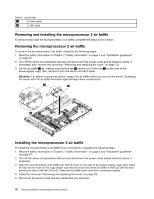
Removing and installing the microprocessor 2 air baffle
 |
View all Lenovo ThinkServer RD210 manuals
Add to My Manuals
Save this manual to your list of manuals |
Page 84 highlights
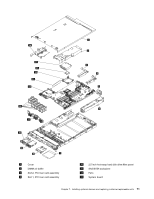
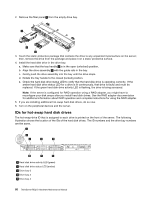
Table 6. (continued) 3 Video cable 4 USB cable Removing and installing the microprocessor 2 air baffle To remove and install the microprocessor 2 air baffle, complete the steps in this section. Removing the microprocessor 2 air baffle To remove the microprocessor 2 air baffle, complete the following steps: 1. Read the safety information in Chapter 2 "Safety information" on page 3 and "Installation guidelines" on page 67. 2. Turn off the server and peripheral devices and disconnect the power cords and all external cables, if necessary; then, remove the cover (see "Removing and replacing the cover" on page 72). 3. Lift the air baffle 2 up, making sure that the tab 1 comes out of the hole 3 on the side of the power-supply cage; then, remove it from the server and set it aside. Attention: For proper cooling and airflow, replace the air baffle before you turn on the server. Operating the server with the air baffle removed might damage server components. 000000 000000 000000 000000 000000 000000 0 000000 0 000000 0 000000 000000 Installing the microprocessor 2 air baffle To install the microprocessor 2 air baffle (if you removed it), complete the following steps: 1. Read the safety information in Chapter 2 "Safety information" on page 3 and "Installation guidelines" on page 67. 2. Turn off the server and peripheral devices and disconnect the power cords and all external cables, if necessary. 3. Align the microprocessor 2 air baffle tab with the hole on the side of the power-supply cage; then insert the tab into the hole on the cage (make sure that the front end of the air baffle is lined up with the blue press point tab on the left of fan 6). Press the air baffle down until the it is securely seated. 4. Install the cover see "Removing and replacing the cover" on page 72). 5. Reconnect the power cords and any cables that you removed. 76 ThinkServer RD210 Hardware Maintenance Manual
-
 1
1 -
2
-
3
-
4
-
5
-
6
-
7
-
8
-
9
-
10
-
11
-
12
-
13
-
14
-
15
-
16
-
17
-
18
-
19
-
20
-
21
-
22
-
23
-
24
-
25
-
26
-
27
-
28
-
29
-
30
-
31
-
32
-
33
-
34
-
35
-
36
-
37
-
38
-
39
-
40
-
41
-
42
-
43
-
44
-
45
-
46
-
47
-
48
-
49
-
50
-
51
-
52
-
53
-
54
-
55
-
56
-
57
-
58
-
59
-
60
-
61
-
62
-
63
-
64
-
65
-
66
-
67
-
68
-
69
-
70
-
71
-
72
-
73
-
74
-
75
-
76
-
77
-
78
-
 79
79 -
 80
80 -
 81
81 -
 82
82 -
 83
83 -
 84
84 -
 85
85 -
 86
86 -
 87
87 -
 88
88 -
 89
89 -
90
-
91
-
92
-
93
-
94
-
95
-
96
-
97
-
98
-
99
-
100
-
101
-
102
-
103
-
104
-
105
-
106
-
107
-
108
-
109
-
110
-
111
-
112
-
113
-
114
-
115
-
116
-
117
-
118
-
119
-
120
-
121
-
122
-
123
-
124
-
125
-
126
-
127
-
128
-
129
-
130
-
131
-
132
-
133
-
134
-
135
-
136
-
137
-
138
-
139
-
140
-
141
-
142
-
143
-
144
-
145
-
146
-
147
-
148
-
149
-
150
-
151
-
152
-
153
-
154
-
155
-
156
-
157
-
158
-
159
-
160
-
161
-
162
-
163
-
164
-
165
-
166
-
167
-
168
-
169
-
170
-
171
-
172
-
173
-
174
-
175
-
176
-
177
-
178
-
179
-
180
-
181
-
182
 |
 |
