Lenovo ThinkServer RD210 Hardware Maintenance Manual - Page 86
Removing and installing a hot-swap hard disk drive, Options, Options & Software, Attention
 |
View all Lenovo ThinkServer RD210 manuals
Add to My Manuals
Save this manual to your list of manuals |
Page 86 highlights
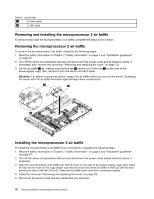
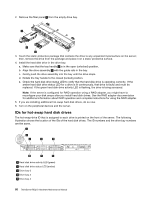
000000 000000 000000 000000 000000 000000 0 000000 0 000000 0 000000 000000 Removing and installing a hot-swap hard disk drive The following notes describe the type of internal drives that the server supports and other information that you must consider when installing a drive. For a list of supported hard disk drives, go to www.lenovo.com/thinkserver and click on the Options tab. • Locate the documentation that comes with the drive and follow those instructions in addition to the instructions in this chapter. • Make sure that you have all the cables and other equipment that are specified in the documentation that comes with the drive. • Select the bay in which you want to install the drive. • Check the instructions that come with the drive to determine whether you have to set any switches or jumpers on the drive. If you are installing a SAS or SATA hard disk drive, be sure to set the SAS or SATA ID for that device. • The server supports six 2.5-inch hot-swap SAS or hot-swap SATA hard disk drives. • All hot-swap drives in the server should have the same throughput speed rating. Mixing hard disk drives with different speed ratings will cause all drives to operate at the lower throughput speed. • Do not mix SAS and SATA hard disk drives in the same system. • The electromagnetic interference (EMI) integrity and cooling of the server are protected by having all bays and PCI and PCI Express slots covered or occupied. When you install a drive, PCI, or PCI Express adapter, save the EMC shield and filler panel from the bay or PCI or PCI Express adapter slot cover in the event that you later remove the device. • For a complete list of supported optional devices for the server, go to www.lenovo.com/thinkserver and click on the Options & Software tab. To remove and install a hot-swap hard disk drive, complete the steps in this section. Removing a hot-swap hard disk drive To remove a hot-swap hard disk drive, complete the following steps. Attention: 78 ThinkServer RD210 Hardware Maintenance Manual
-
 1
1 -
2
-
3
-
4
-
5
-
6
-
7
-
8
-
9
-
10
-
11
-
12
-
13
-
14
-
15
-
16
-
17
-
18
-
19
-
20
-
21
-
22
-
23
-
24
-
25
-
26
-
27
-
28
-
29
-
30
-
31
-
32
-
33
-
34
-
35
-
36
-
37
-
38
-
39
-
40
-
41
-
42
-
43
-
44
-
45
-
46
-
47
-
48
-
49
-
50
-
51
-
52
-
53
-
54
-
55
-
56
-
57
-
58
-
59
-
60
-
61
-
62
-
63
-
64
-
65
-
66
-
67
-
68
-
69
-
70
-
71
-
72
-
73
-
74
-
75
-
76
-
77
-
78
-
79
-
80
-
 81
81 -
 82
82 -
 83
83 -
 84
84 -
 85
85 -
 86
86 -
 87
87 -
 88
88 -
 89
89 -
 90
90 -
 91
91 -
92
-
93
-
94
-
95
-
96
-
97
-
98
-
99
-
100
-
101
-
102
-
103
-
104
-
105
-
106
-
107
-
108
-
109
-
110
-
111
-
112
-
113
-
114
-
115
-
116
-
117
-
118
-
119
-
120
-
121
-
122
-
123
-
124
-
125
-
126
-
127
-
128
-
129
-
130
-
131
-
132
-
133
-
134
-
135
-
136
-
137
-
138
-
139
-
140
-
141
-
142
-
143
-
144
-
145
-
146
-
147
-
148
-
149
-
150
-
151
-
152
-
153
-
154
-
155
-
156
-
157
-
158
-
159
-
160
-
161
-
162
-
163
-
164
-
165
-
166
-
167
-
168
-
169
-
170
-
171
-
172
-
173
-
174
-
175
-
176
-
177
-
178
-
179
-
180
-
181
-
182
 |
 |