Lenovo ThinkServer RD210 Hardware Maintenance Manual - Page 146
Servers and Storage, Select your product list, Brand, Family, ThinkServer RD210, Continue
 |
View all Lenovo ThinkServer RD210 manuals
Add to My Manuals
Save this manual to your list of manuals |
Page 146 highlights
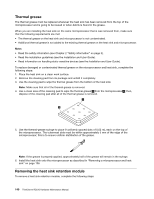
• Do not remove the first microprocessor from the system board when you install the second microprocessor. • When you install the second microprocessor, you must also install additional memory. See the Installation and User Guide for details about the installation sequence. • To ensure proper server operation when you install an additional microprocessor, use microprocessors that have the same QuickPath Interconnect (QPI) link speed, integrated memory controller frequency, core frequency, power segment, internal cache size, and type. • Mixing microprocessors of different stepping levels within the same server model is supported. • When mixing microprocessors with different stepping levels within the same server model, you do not have to install the microprocessor with lowest stepping level and features in microprocessor socket 1. • Both microprocessor voltage regulator modules are integrated on the system board. • If you have to replace a microprocessor, call for service. • Read the documentation that comes with the microprocessor, so that you can determine whether you have to update the server firmware. To download the latest level of server firmware and other code updates for your server, complete the following steps: 1. Go to http://www.lenovo.com/support. 2. Enter your product number (machine type and model number) or select Servers and Storage from the Select your product list. 3. Select Servers and Storage from the Brand list. 4. From Family list, select ThinkServer RD210, and click Continue. 5. Click Downloads and drivers to download firmware updates. • The microprocessor speeds are automatically set for this server; therefore, you do not have to set any microprocessor frequency-selection jumpers or switches. • If the thermal-grease protective cover (for example, a plastic cap or tape liner) is removed from the heat sink, do not touch the thermal grease on the bottom of the heat sink or set down the heat sink. For more information about applying or working with thermal grease, see "Thermal grease" on page 140. Note: Removing the heat sink from the microprocessor destroys the even distribution of the thermal grease and requires replacing the thermal grease. • To order an additional optional microprocessor, contact your Lenovo marketing representative or authorized reseller. To install an additional microprocessor and heat sink, complete the following steps: Attention: When you handle static-sensitive devices, take precautions to avoid damage from static electricity. For details about handling these devices, see Chapter 2 "Safety information" on page 3. 1. Read the safety information (see Chapter 2 "Safety information" on page 3). 2. Install the microprocessor: a. Press down and out on the release lever on microprocessor socket and lift up the microprocessor release lever until it stops in the fully open position. b. Lift the hinged microprocessor bracket frame into an open position and remove the microprocessor dust cover, tape, or label from the surface of the microprocessor socket, if one is present. Store the dust cover in a safe place. Attention: When you handle static-sensitive devices, take precautions to avoid damage from static electricity. For details about handling these devices, see Chapter 2 "Safety information" on page 3. c. Touch the static-protective package that contains the new microprocessor to any unpainted metal surface on the server; then, remove the microprocessor from the package. Attention: 138 ThinkServer RD210 Hardware Maintenance Manual
-
 1
1 -
2
-
3
-
4
-
5
-
6
-
7
-
8
-
9
-
10
-
11
-
12
-
13
-
14
-
15
-
16
-
17
-
18
-
19
-
20
-
21
-
22
-
23
-
24
-
25
-
26
-
27
-
28
-
29
-
30
-
31
-
32
-
33
-
34
-
35
-
36
-
37
-
38
-
39
-
40
-
41
-
42
-
43
-
44
-
45
-
46
-
47
-
48
-
49
-
50
-
51
-
52
-
53
-
54
-
55
-
56
-
57
-
58
-
59
-
60
-
61
-
62
-
63
-
64
-
65
-
66
-
67
-
68
-
69
-
70
-
71
-
72
-
73
-
74
-
75
-
76
-
77
-
78
-
79
-
80
-
81
-
82
-
83
-
84
-
85
-
86
-
87
-
88
-
89
-
90
-
91
-
92
-
93
-
94
-
95
-
96
-
97
-
98
-
99
-
100
-
101
-
102
-
103
-
104
-
105
-
106
-
107
-
108
-
109
-
110
-
111
-
112
-
113
-
114
-
115
-
116
-
117
-
118
-
119
-
120
-
121
-
122
-
123
-
124
-
125
-
126
-
127
-
128
-
129
-
130
-
131
-
132
-
133
-
134
-
135
-
136
-
137
-
138
-
139
-
140
-
 141
141 -
 142
142 -
 143
143 -
 144
144 -
 145
145 -
 146
146 -
 147
147 -
 148
148 -
 149
149 -
 150
150 -
 151
151 -
152
-
153
-
154
-
155
-
156
-
157
-
158
-
159
-
160
-
161
-
162
-
163
-
164
-
165
-
166
-
167
-
168
-
169
-
170
-
171
-
172
-
173
-
174
-
175
-
176
-
177
-
178
-
179
-
180
-
181
-
182
 |
 |
