Lexmark Photo P3150 User's Guide for Windows - Page 29
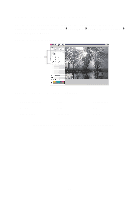
The Lexmark All-In-One Center opens with the Saved Images tab, Select your Save Options.
 |
View all Lexmark Photo P3150 manuals
Add to My Manuals
Save this manual to your list of manuals |
Page 29 highlights
2 Click Select storage location and images to save. 3 Click OK. 4 Type a name for your new sub-folder. 5 Select your Save Options. Note: Do not select After saving, erase the saved images from the memory card unless you want to delete the photos from the memory card permanently. 6 Click OK. 7 Type a name for your photo, if desired. 8 Click Next to save, or click Skip if you do not want to save the photo. 9 Repeat steps 7 and 8 for each photo. 10 Click OK. The Lexmark All-In-One Center opens with the Saved Images tab selected. The photos stored in the sub-folder you created appear in the Preview section of the Saved Images page. 25
-
 1
1 -
2
-
3
-
4
-
5
-
6
-
7
-
8
-
9
-
10
-
11
-
12
-
13
-
14
-
15
-
16
-
17
-
18
-
19
-
20
-
21
-
22
-
23
-
 24
24 -
 25
25 -
 26
26 -
 27
27 -
 28
28 -
 29
29 -
 30
30 -
 31
31 -
 32
32 -
 33
33 -
 34
34 -
35
-
36
-
37
-
38
-
39
-
40
-
41
-
42
-
43
-
44
-
45
-
46
-
47
-
48
-
49
-
50
-
51
-
52
-
53
-
54
-
55
-
56
-
57
-
58
-
59
-
60
-
61
-
62
-
63
-
64
-
65
 |
 |

25
2
Click
Select storage location and images to save
.
3
Click
OK
.
4
Type a name for your new sub-folder.
5
Select your Save Options.
Note:
Do not select
After saving, erase the saved images
from the memory card
unless you want to delete the
photos from the memory card permanently.
6
Click
OK
.
7
Type a name for your photo, if desired.
8
Click
Next
to save, or click
Skip
if you do not want to save the
photo.
9
Repeat steps 7 and 8 for each photo.
10
Click
OK
.
The Lexmark All-In-One Center opens with the Saved Images tab
selected. The photos stored in the sub-folder you created appear in
the Preview section of the Saved Images page.