Lexmark X500n Service Manual - Page 106
Uneven density (right and left
 |
View all Lexmark X500n manuals
Add to My Manuals
Save this manual to your list of manuals |
Page 106 highlights
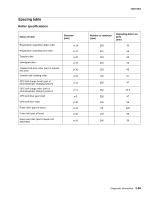
7100-XXX Uneven density (right and left) Optical density is different between right and left side of printed image. Problem area 1 Rear cover assembly 2 Transfer roller 3 Laser unit assembly (printhead) 4 Toner cartridge 5 Photodeveloper cartridge 6 Transfer belt unit Action Open rear cover assembly and reclose, ensuring that both sides properly latch. If rear cover assembly will not properly latch, ensure that white door actuators located at top of rear cover assembly are not damaged. If damaged, replace. These items are part of parts packet. If actuators are not damaged, and door will still not latch, replace rear cover assembly. See "Rear cover assembly removal" on page 4-14. Transfer roller is not properly installed. Remove transfer roller and reinstall. See "Transfer roller removal" on page 4-6. Ensure transfer roller bias pole is touching spring contact on left side (as viewed from front of printer) of roller. Dust-proof glass of laser unit is smeared with toner or foreign particles. Clean glass: • Remove toner cartridges and photodeveloper cartridge. See "Photodeveloper cartridge removal" on page 4-8. • Open glass cover. • Clean glass. There are foreign particles adhering to laser beam opening of printhead. Clean laser beam opening. Toner cartridge has insufficient amount of toner. Replace toner cartridge. Replace faulty photodeveloper cartridge. See "Photodeveloper cartridge removal" on page 4-8. Replace faulty transfer belt unit. See "Transfer belt unit removal" on page 4-5. 2-68 Service Manual
-
 1
1 -
2
-
3
-
4
-
5
-
6
-
7
-
8
-
9
-
10
-
11
-
12
-
13
-
14
-
15
-
16
-
17
-
18
-
19
-
20
-
21
-
22
-
23
-
24
-
25
-
26
-
27
-
28
-
29
-
30
-
31
-
32
-
33
-
34
-
35
-
36
-
37
-
38
-
39
-
40
-
41
-
42
-
43
-
44
-
45
-
46
-
47
-
48
-
49
-
50
-
51
-
52
-
53
-
54
-
55
-
56
-
57
-
58
-
59
-
60
-
61
-
62
-
63
-
64
-
65
-
66
-
67
-
68
-
69
-
70
-
71
-
72
-
73
-
74
-
75
-
76
-
77
-
78
-
79
-
80
-
81
-
82
-
83
-
84
-
85
-
86
-
87
-
88
-
89
-
90
-
91
-
92
-
93
-
94
-
95
-
96
-
97
-
98
-
99
-
100
-
 101
101 -
 102
102 -
 103
103 -
 104
104 -
 105
105 -
 106
106 -
 107
107 -
 108
108 -
 109
109 -
 110
110 -
 111
111 -
112
-
113
-
114
-
115
-
116
-
117
-
118
-
119
-
120
-
121
-
122
-
123
-
124
-
125
-
126
-
127
-
128
-
129
-
130
-
131
-
132
-
133
-
134
-
135
-
136
-
137
-
138
-
139
-
140
-
141
-
142
-
143
-
144
-
145
-
146
-
147
-
148
-
149
-
150
-
151
-
152
-
153
-
154
-
155
-
156
-
157
-
158
-
159
-
160
-
161
-
162
-
163
-
164
-
165
-
166
-
167
-
168
-
169
-
170
-
171
-
172
-
173
-
174
-
175
-
176
-
177
-
178
-
179
-
180
-
181
-
182
-
183
-
184
-
185
-
186
-
187
-
188
-
189
-
190
-
191
-
192
-
193
-
194
-
195
-
196
-
197
-
198
-
199
-
200
-
201
-
202
-
203
-
204
-
205
-
206
-
207
-
208
-
209
-
210
-
211
-
212
-
213
-
214
-
215
-
216
-
217
-
218
-
219
-
220
-
221
-
222
-
223
-
224
-
225
-
226
-
227
-
228
-
229
-
230
-
231
-
232
-
233
-
234
-
235
-
236
-
237
-
238
-
239
-
240
-
241
-
242
-
243
-
244
 |
 |
