Lexmark X500n Service Manual - Page 62
Fuser thermistor service check, Fuser assembly service check
 |
View all Lexmark X500n manuals
Add to My Manuals
Save this manual to your list of manuals |
Page 62 highlights
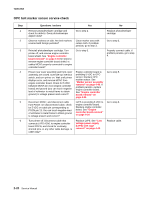
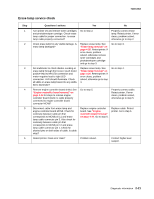
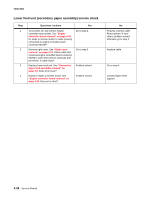
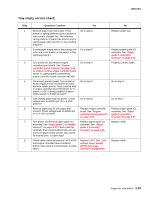
7100-XXX Fuser thermistor service check Step 1 2 3 4 Questions / actions Yes Remove and reinstall fuser assembly. See "Fuser assembly removal" on page 4-6. Does error clear? Problem solved. Check fuser connector for damage. Replace Problem solved. if necessary. Does error clear? Turn printer off, and check cable that connects engine controller board connector FUCN to fuser for proper connection, continuity, and pin shorts. Is cable okay? Go to step 4. Replace fuser assembly. See "Fuser assembly removal" on page 4-6. Does error clear? Problem solved. Note: Fuser is a customer order supply. Fuser assembly service check Step 1 2 3 4 5 Questions / actions Yes Check for proper input line voltage. Is line voltage correct? Go to step 2. Remove and reinstall fuser assembly. See "Fuser assembly removal" on page 4-6. Does error clear? Problem solved. Check fuser connector for damage. Replace Problem solved. if necessary. Does error clear? Turn printer off, and check cable that connects engine controller board connector FUCN to fuser for proper connection, continuity, and pin shorts. Is cable okay? Go to step 5. Replace fuser assembly. See "Fuser assembly removal" on page 4-6. Does error clear? Problem solved. Note: Fuser is a customer-ordered supply. No Go to step 2. Go to step 3. Properly connect cable or replace if damaged. If error clears, problem solved, otherwise go to step 4. Replace engine controller board. See "Engine controller board removal" on page 4-34. No Provide proper line voltage. Go to step 3. Go to step 4. Properly connect cable or replace if damaged. If error clears, problem solved, otherwise go to step 5. Replace LVPS. See "Low voltage power supply (LVPS) with cage removal" on page 4-40. If error does not clear, replace engine controller board. See "Engine controller board removal" on page 4-34. 2-24 Service Manual
-
 1
1 -
2
-
3
-
4
-
5
-
6
-
7
-
8
-
9
-
10
-
11
-
12
-
13
-
14
-
15
-
16
-
17
-
18
-
19
-
20
-
21
-
22
-
23
-
24
-
25
-
26
-
27
-
28
-
29
-
30
-
31
-
32
-
33
-
34
-
35
-
36
-
37
-
38
-
39
-
40
-
41
-
42
-
43
-
44
-
45
-
46
-
47
-
48
-
49
-
50
-
51
-
52
-
53
-
54
-
55
-
56
-
 57
57 -
 58
58 -
 59
59 -
 60
60 -
 61
61 -
 62
62 -
 63
63 -
 64
64 -
 65
65 -
 66
66 -
 67
67 -
68
-
69
-
70
-
71
-
72
-
73
-
74
-
75
-
76
-
77
-
78
-
79
-
80
-
81
-
82
-
83
-
84
-
85
-
86
-
87
-
88
-
89
-
90
-
91
-
92
-
93
-
94
-
95
-
96
-
97
-
98
-
99
-
100
-
101
-
102
-
103
-
104
-
105
-
106
-
107
-
108
-
109
-
110
-
111
-
112
-
113
-
114
-
115
-
116
-
117
-
118
-
119
-
120
-
121
-
122
-
123
-
124
-
125
-
126
-
127
-
128
-
129
-
130
-
131
-
132
-
133
-
134
-
135
-
136
-
137
-
138
-
139
-
140
-
141
-
142
-
143
-
144
-
145
-
146
-
147
-
148
-
149
-
150
-
151
-
152
-
153
-
154
-
155
-
156
-
157
-
158
-
159
-
160
-
161
-
162
-
163
-
164
-
165
-
166
-
167
-
168
-
169
-
170
-
171
-
172
-
173
-
174
-
175
-
176
-
177
-
178
-
179
-
180
-
181
-
182
-
183
-
184
-
185
-
186
-
187
-
188
-
189
-
190
-
191
-
192
-
193
-
194
-
195
-
196
-
197
-
198
-
199
-
200
-
201
-
202
-
203
-
204
-
205
-
206
-
207
-
208
-
209
-
210
-
211
-
212
-
213
-
214
-
215
-
216
-
217
-
218
-
219
-
220
-
221
-
222
-
223
-
224
-
225
-
226
-
227
-
228
-
229
-
230
-
231
-
232
-
233
-
234
-
235
-
236
-
237
-
238
-
239
-
240
-
241
-
242
-
243
-
244
 |
 |
