Lexmark X500n Service Manual - Page 61
High voltage power supply (HVPS) service check, HVCN and HVPS BCN1 connector
 |
View all Lexmark X500n manuals
Add to My Manuals
Save this manual to your list of manuals |
Page 61 highlights
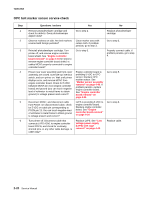
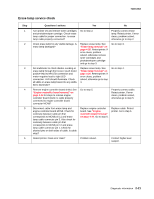
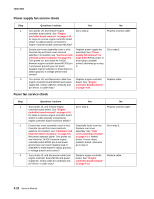
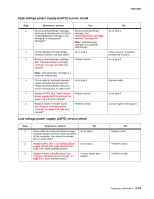
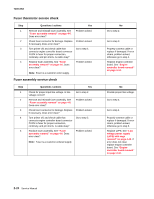
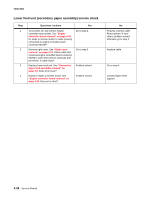
7100-XXX High voltage power supply (HVPS) service check Step 1 2 3 4 5 6 Questions / actions Yes Remove photodeveloper cartridge, and ensure charging unit on bottom of photodeveloper cartridge is not damaged. Is charging unit damaged? Check charging unit high voltage contacts in printer. Are they clean? Replace photodeveloper cartridge. See "Photodeveloper cartridge removal" on page 4-8. Has error cleared? Replace photodeveloper cartridge. See "Photodeveloper cartridge removal" on page 4-8. Note: photodeveloper cartridge is a customerordered part. Go to step 3. Problem solved. Note: photodeveloper cartridge is a customer-ordered part. Check cable for continuity between engine controller board connector HVCN and HVPS BCN1 connector and for shorted pins. Is cable okay? Replace HVPS. See "High voltage power supply (HVPS) removal" on page 4-39. Has error cleared? Replace engine controller board. See "Engine controller board removal" on page 4-34. Has error cleared? Go to step 5. Problem solved. Problem solved. Low voltage power supply (LVPS) service check No Go to step 2. Clean contacts. If problem persists, go to step 3. Go to step 4. Replace cable. Go to step 6. Contact higher level support. Step 1 2 3 Questions / actions Yes Check cable for continuity between engine controller board connector LVCN and LVPS ACN4 connector. Also check for shorted pins. Is cable okay? Go to step 2. Replace LVPS. See "Low voltage power supply (LVPS) with cage removal" on page 4-40. Does problem persist? Go to step 3. Replace engine controller board. See "Engine controller board removal" on page 4-34. Does problem persist? Contact higher level support. No Replace cable. Problem solved. Problem solved. Diagnostic information 2-23
-
 1
1 -
2
-
3
-
4
-
5
-
6
-
7
-
8
-
9
-
10
-
11
-
12
-
13
-
14
-
15
-
16
-
17
-
18
-
19
-
20
-
21
-
22
-
23
-
24
-
25
-
26
-
27
-
28
-
29
-
30
-
31
-
32
-
33
-
34
-
35
-
36
-
37
-
38
-
39
-
40
-
41
-
42
-
43
-
44
-
45
-
46
-
47
-
48
-
49
-
50
-
51
-
52
-
53
-
54
-
55
-
 56
56 -
 57
57 -
 58
58 -
 59
59 -
 60
60 -
 61
61 -
 62
62 -
 63
63 -
 64
64 -
 65
65 -
 66
66 -
67
-
68
-
69
-
70
-
71
-
72
-
73
-
74
-
75
-
76
-
77
-
78
-
79
-
80
-
81
-
82
-
83
-
84
-
85
-
86
-
87
-
88
-
89
-
90
-
91
-
92
-
93
-
94
-
95
-
96
-
97
-
98
-
99
-
100
-
101
-
102
-
103
-
104
-
105
-
106
-
107
-
108
-
109
-
110
-
111
-
112
-
113
-
114
-
115
-
116
-
117
-
118
-
119
-
120
-
121
-
122
-
123
-
124
-
125
-
126
-
127
-
128
-
129
-
130
-
131
-
132
-
133
-
134
-
135
-
136
-
137
-
138
-
139
-
140
-
141
-
142
-
143
-
144
-
145
-
146
-
147
-
148
-
149
-
150
-
151
-
152
-
153
-
154
-
155
-
156
-
157
-
158
-
159
-
160
-
161
-
162
-
163
-
164
-
165
-
166
-
167
-
168
-
169
-
170
-
171
-
172
-
173
-
174
-
175
-
176
-
177
-
178
-
179
-
180
-
181
-
182
-
183
-
184
-
185
-
186
-
187
-
188
-
189
-
190
-
191
-
192
-
193
-
194
-
195
-
196
-
197
-
198
-
199
-
200
-
201
-
202
-
203
-
204
-
205
-
206
-
207
-
208
-
209
-
210
-
211
-
212
-
213
-
214
-
215
-
216
-
217
-
218
-
219
-
220
-
221
-
222
-
223
-
224
-
225
-
226
-
227
-
228
-
229
-
230
-
231
-
232
-
233
-
234
-
235
-
236
-
237
-
238
-
239
-
240
-
241
-
242
-
243
-
244
 |
 |
