Lexmark X500n Service Manual - Page 52
Printer service checks
 |
View all Lexmark X500n manuals
Add to My Manuals
Save this manual to your list of manuals |
Page 52 highlights
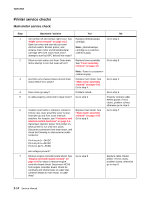
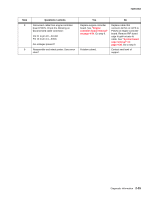
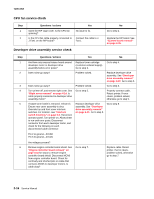
7100-XXX Printer service checks Main motor service check Step 1 2 3 4 5 6 7 Questions / actions Yes No Turn printer off and remove right cover. See "Right cover removal" on page 4-13. Open top cover and override top cover interlock switch. Restart printer, and observe main motor and photodeveloper cartridge OPC belt. Does main motor attempt to turn but OPC belt will not rotate? Observe main motor and fuser. Does main motor attempt to turn but fuser will not? Replace photodeveloper cartridge. Note: photodeveloper cartridge is a customerordered supply. Replace fuser assembly. See "Fuser assembly removal" on page 4-6. Go to step 2. Go to step 3. Are there any unusual noises around main motor before error posts? Does noise go away? Is cable properly connected to main motor? If waste toner bottle is removed, reinsert it. Ensure rear cover assembly cover is shut. Override top and front cover interlock switches. For location, see "Fan/motor and interlock switch locations" on page 5-6. Reconnect operator panel. Turn printer on. Allow printer to run until error posts. Disconnect connector from main motor, and check the following on disconnected cable connector: Note: Fuser is a customerordered supply. Replace main motor. See "Main motor assembly removal" on page 4-26. Go to step 4. Problem solved. Go to step 6. Replace main motor. See "Main motor assembly removal" on page 4-26. Go to step 9. Go to step 5. Go to step 5. Properly connect cable. Retest printer. If error clears, problem solved, otherwise go to step 6. Go to step 7. Pin 4 to pin 5-24VDC Pin 6 to pin 5-24VDC Pin 10 to pin 5-5VDC Are voltages present? Remove engine controller board shield. See "Engine controller board removal" on page 4-34 for steps to remove engine controller board shield. Disconnect MCN5 from engine controller board. Check for continuity and shorted pins on cable that connects MCN5 to main motor. Is cable okay? Go to step 8. Replace cable. Retest printer. If error clears, problem solved, otherwise go to step 8. 2-14 Service Manual
-
 1
1 -
2
-
3
-
4
-
5
-
6
-
7
-
8
-
9
-
10
-
11
-
12
-
13
-
14
-
15
-
16
-
17
-
18
-
19
-
20
-
21
-
22
-
23
-
24
-
25
-
26
-
27
-
28
-
29
-
30
-
31
-
32
-
33
-
34
-
35
-
36
-
37
-
38
-
39
-
40
-
41
-
42
-
43
-
44
-
45
-
46
-
 47
47 -
 48
48 -
 49
49 -
 50
50 -
 51
51 -
 52
52 -
 53
53 -
 54
54 -
 55
55 -
 56
56 -
 57
57 -
58
-
59
-
60
-
61
-
62
-
63
-
64
-
65
-
66
-
67
-
68
-
69
-
70
-
71
-
72
-
73
-
74
-
75
-
76
-
77
-
78
-
79
-
80
-
81
-
82
-
83
-
84
-
85
-
86
-
87
-
88
-
89
-
90
-
91
-
92
-
93
-
94
-
95
-
96
-
97
-
98
-
99
-
100
-
101
-
102
-
103
-
104
-
105
-
106
-
107
-
108
-
109
-
110
-
111
-
112
-
113
-
114
-
115
-
116
-
117
-
118
-
119
-
120
-
121
-
122
-
123
-
124
-
125
-
126
-
127
-
128
-
129
-
130
-
131
-
132
-
133
-
134
-
135
-
136
-
137
-
138
-
139
-
140
-
141
-
142
-
143
-
144
-
145
-
146
-
147
-
148
-
149
-
150
-
151
-
152
-
153
-
154
-
155
-
156
-
157
-
158
-
159
-
160
-
161
-
162
-
163
-
164
-
165
-
166
-
167
-
168
-
169
-
170
-
171
-
172
-
173
-
174
-
175
-
176
-
177
-
178
-
179
-
180
-
181
-
182
-
183
-
184
-
185
-
186
-
187
-
188
-
189
-
190
-
191
-
192
-
193
-
194
-
195
-
196
-
197
-
198
-
199
-
200
-
201
-
202
-
203
-
204
-
205
-
206
-
207
-
208
-
209
-
210
-
211
-
212
-
213
-
214
-
215
-
216
-
217
-
218
-
219
-
220
-
221
-
222
-
223
-
224
-
225
-
226
-
227
-
228
-
229
-
230
-
231
-
232
-
233
-
234
-
235
-
236
-
237
-
238
-
239
-
240
-
241
-
242
-
243
-
244
 |
 |
