Lexmark X500n Service Manual - Page 193
ADF unit removal, Upper left rear cover removal
 |
View all Lexmark X500n manuals
Add to My Manuals
Save this manual to your list of manuals |
Page 193 highlights
7100-XXX 6. Repeat steps 3, 4, and 5 for the other arm, if needed. Note: If you are replacing the scanner arm, remove the spring from the old scanner arm. The spring will go on the new arm. ADF unit removal 1. Remove the upper left rear cover. See "Upper left rear cover removal" on page 4-17. 2. Remove the left rear cover. See "Left rear cover removal" on page 4-16. 3. Remove the system board cover. 4. Remove the screw (B) that secures the ADF, and flatbed ground wires to the RIP cage. B 5. Disconnect the ADF cable from the system board. Repair information 4-53
-
 1
1 -
2
-
3
-
4
-
5
-
6
-
7
-
8
-
9
-
10
-
11
-
12
-
13
-
14
-
15
-
16
-
17
-
18
-
19
-
20
-
21
-
22
-
23
-
24
-
25
-
26
-
27
-
28
-
29
-
30
-
31
-
32
-
33
-
34
-
35
-
36
-
37
-
38
-
39
-
40
-
41
-
42
-
43
-
44
-
45
-
46
-
47
-
48
-
49
-
50
-
51
-
52
-
53
-
54
-
55
-
56
-
57
-
58
-
59
-
60
-
61
-
62
-
63
-
64
-
65
-
66
-
67
-
68
-
69
-
70
-
71
-
72
-
73
-
74
-
75
-
76
-
77
-
78
-
79
-
80
-
81
-
82
-
83
-
84
-
85
-
86
-
87
-
88
-
89
-
90
-
91
-
92
-
93
-
94
-
95
-
96
-
97
-
98
-
99
-
100
-
101
-
102
-
103
-
104
-
105
-
106
-
107
-
108
-
109
-
110
-
111
-
112
-
113
-
114
-
115
-
116
-
117
-
118
-
119
-
120
-
121
-
122
-
123
-
124
-
125
-
126
-
127
-
128
-
129
-
130
-
131
-
132
-
133
-
134
-
135
-
136
-
137
-
138
-
139
-
140
-
141
-
142
-
143
-
144
-
145
-
146
-
147
-
148
-
149
-
150
-
151
-
152
-
153
-
154
-
155
-
156
-
157
-
158
-
159
-
160
-
161
-
162
-
163
-
164
-
165
-
166
-
167
-
168
-
169
-
170
-
171
-
172
-
173
-
174
-
175
-
176
-
177
-
178
-
179
-
180
-
181
-
182
-
183
-
184
-
185
-
186
-
187
-
 188
188 -
 189
189 -
 190
190 -
 191
191 -
 192
192 -
 193
193 -
 194
194 -
 195
195 -
 196
196 -
 197
197 -
 198
198 -
199
-
200
-
201
-
202
-
203
-
204
-
205
-
206
-
207
-
208
-
209
-
210
-
211
-
212
-
213
-
214
-
215
-
216
-
217
-
218
-
219
-
220
-
221
-
222
-
223
-
224
-
225
-
226
-
227
-
228
-
229
-
230
-
231
-
232
-
233
-
234
-
235
-
236
-
237
-
238
-
239
-
240
-
241
-
242
-
243
-
244
 |
 |

Repair information
4-53
7100-XXX
6.
Repeat steps 3, 4, and 5 for the other arm, if needed.
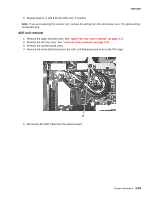
Note:
If you are replacing the scanner arm, remove the spring from the old scanner arm. The spring will go
on the new arm.
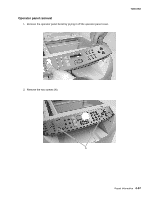
ADF unit removal
1.
Remove the upper left rear cover. See
“Upper left rear cover removal” on page 4-17
.
2.
Remove the left rear cover. See
“Left rear cover removal” on page 4-16
.
3.
Remove the system board cover.
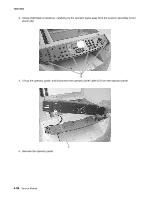
4.
Remove the screw (B) that secures the ADF, and flatbed ground wires to the RIP cage.
5.
Disconnect the ADF cable from the system board.
B