Lexmark X500n Service Manual - Page 162
Waste toner bottle holder removal, Developer drive assembly removal, Right cover removal
 |
View all Lexmark X500n manuals
Add to My Manuals
Save this manual to your list of manuals |
Page 162 highlights
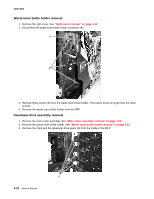
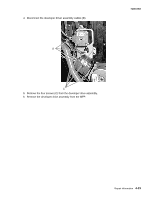
7100-XXX Waste toner bottle holder removal 1. Remove the right cover. See "Right cover removal" on page 4-13. 2. Disconnect the waste toner bottle holder connector (A). A B 3. Remove three screws (B) from the waste toner bottle holder. The bottom screw is longer than the other screws. 4. Remove the waste toner bottle holder from the MFP. Developer drive assembly removal 1. Remove the main motor assembly. See "Main motor assembly removal" on page 4-26. 2. Remove the waste toner bottle holder. See "Waste toner bottle holder removal" on page 4-22. 3. Remove four clips and the developer drive gears (A) from the inside of the MFP. A 4-22 Service Manual
-
 1
1 -
2
-
3
-
4
-
5
-
6
-
7
-
8
-
9
-
10
-
11
-
12
-
13
-
14
-
15
-
16
-
17
-
18
-
19
-
20
-
21
-
22
-
23
-
24
-
25
-
26
-
27
-
28
-
29
-
30
-
31
-
32
-
33
-
34
-
35
-
36
-
37
-
38
-
39
-
40
-
41
-
42
-
43
-
44
-
45
-
46
-
47
-
48
-
49
-
50
-
51
-
52
-
53
-
54
-
55
-
56
-
57
-
58
-
59
-
60
-
61
-
62
-
63
-
64
-
65
-
66
-
67
-
68
-
69
-
70
-
71
-
72
-
73
-
74
-
75
-
76
-
77
-
78
-
79
-
80
-
81
-
82
-
83
-
84
-
85
-
86
-
87
-
88
-
89
-
90
-
91
-
92
-
93
-
94
-
95
-
96
-
97
-
98
-
99
-
100
-
101
-
102
-
103
-
104
-
105
-
106
-
107
-
108
-
109
-
110
-
111
-
112
-
113
-
114
-
115
-
116
-
117
-
118
-
119
-
120
-
121
-
122
-
123
-
124
-
125
-
126
-
127
-
128
-
129
-
130
-
131
-
132
-
133
-
134
-
135
-
136
-
137
-
138
-
139
-
140
-
141
-
142
-
143
-
144
-
145
-
146
-
147
-
148
-
149
-
150
-
151
-
152
-
153
-
154
-
155
-
156
-
 157
157 -
 158
158 -
 159
159 -
 160
160 -
 161
161 -
 162
162 -
 163
163 -
 164
164 -
 165
165 -
 166
166 -
 167
167 -
168
-
169
-
170
-
171
-
172
-
173
-
174
-
175
-
176
-
177
-
178
-
179
-
180
-
181
-
182
-
183
-
184
-
185
-
186
-
187
-
188
-
189
-
190
-
191
-
192
-
193
-
194
-
195
-
196
-
197
-
198
-
199
-
200
-
201
-
202
-
203
-
204
-
205
-
206
-
207
-
208
-
209
-
210
-
211
-
212
-
213
-
214
-
215
-
216
-
217
-
218
-
219
-
220
-
221
-
222
-
223
-
224
-
225
-
226
-
227
-
228
-
229
-
230
-
231
-
232
-
233
-
234
-
235
-
236
-
237
-
238
-
239
-
240
-
241
-
242
-
243
-
244
 |
 |

4-22
Service Manual
7100-XXX
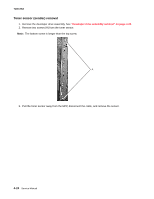
Waste toner bottle holder removal
1.
Remove the right cover. See
“Right cover removal” on page 4-13
.
2.
Disconnect the waste toner bottle holder connector (A).
3.
Remove three screws (B) from the waste toner bottle holder. The bottom screw is longer than the other
screws.
4.
Remove the waste toner bottle holder from the MFP.
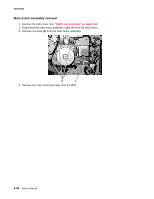
Developer drive assembly removal
1.
Remove the main motor assembly. See
“Main motor assembly removal” on page 4-26
.
2.
Remove the waste toner bottle holder. See
“Waste toner bottle holder removal” on page 4-22
.
3.
Remove four clips and the developer drive gears (A) from the inside of the MFP.
A
B
A