Lexmark X500n Service Manual - Page 192
Scanner arm removal, Flatbed assembly removal
 |
View all Lexmark X500n manuals
Add to My Manuals
Save this manual to your list of manuals |
Page 192 highlights
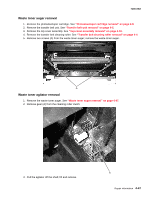
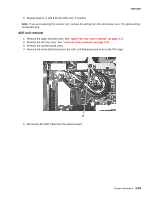
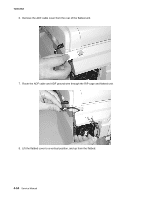
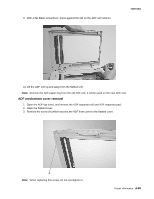
7100-XXX Scanner arm removal 1. Remove the flatbed assembly. See "Flatbed assembly removal" on page 4-49. 2. Remove the screw (A) securing the scanner armlock to the printer top cover. A 3. Tilt the top of the scanner arm to the center of the MFP, and remove the armlock (B). Note: Save the armlock for the new scanner arm. B 4. Continue tilting the scanner arm, and pull the arm outward and up. 5. Lift the scanner arm up and away from the printer top cover. 4-52 Service Manual
-
 1
1 -
2
-
3
-
4
-
5
-
6
-
7
-
8
-
9
-
10
-
11
-
12
-
13
-
14
-
15
-
16
-
17
-
18
-
19
-
20
-
21
-
22
-
23
-
24
-
25
-
26
-
27
-
28
-
29
-
30
-
31
-
32
-
33
-
34
-
35
-
36
-
37
-
38
-
39
-
40
-
41
-
42
-
43
-
44
-
45
-
46
-
47
-
48
-
49
-
50
-
51
-
52
-
53
-
54
-
55
-
56
-
57
-
58
-
59
-
60
-
61
-
62
-
63
-
64
-
65
-
66
-
67
-
68
-
69
-
70
-
71
-
72
-
73
-
74
-
75
-
76
-
77
-
78
-
79
-
80
-
81
-
82
-
83
-
84
-
85
-
86
-
87
-
88
-
89
-
90
-
91
-
92
-
93
-
94
-
95
-
96
-
97
-
98
-
99
-
100
-
101
-
102
-
103
-
104
-
105
-
106
-
107
-
108
-
109
-
110
-
111
-
112
-
113
-
114
-
115
-
116
-
117
-
118
-
119
-
120
-
121
-
122
-
123
-
124
-
125
-
126
-
127
-
128
-
129
-
130
-
131
-
132
-
133
-
134
-
135
-
136
-
137
-
138
-
139
-
140
-
141
-
142
-
143
-
144
-
145
-
146
-
147
-
148
-
149
-
150
-
151
-
152
-
153
-
154
-
155
-
156
-
157
-
158
-
159
-
160
-
161
-
162
-
163
-
164
-
165
-
166
-
167
-
168
-
169
-
170
-
171
-
172
-
173
-
174
-
175
-
176
-
177
-
178
-
179
-
180
-
181
-
182
-
183
-
184
-
185
-
186
-
 187
187 -
 188
188 -
 189
189 -
 190
190 -
 191
191 -
 192
192 -
 193
193 -
 194
194 -
 195
195 -
 196
196 -
 197
197 -
198
-
199
-
200
-
201
-
202
-
203
-
204
-
205
-
206
-
207
-
208
-
209
-
210
-
211
-
212
-
213
-
214
-
215
-
216
-
217
-
218
-
219
-
220
-
221
-
222
-
223
-
224
-
225
-
226
-
227
-
228
-
229
-
230
-
231
-
232
-
233
-
234
-
235
-
236
-
237
-
238
-
239
-
240
-
241
-
242
-
243
-
244
 |
 |

4-52
Service Manual
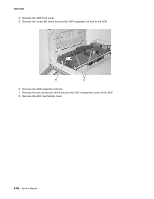
7100-XXX
Scanner arm removal
1.
Remove the flatbed assembly. See
“Flatbed assembly removal” on page 4-49
.
2.
Remove the screw (A) securing the scanner armlock to the printer top cover.
3.
Tilt the top of the scanner arm to the center of the MFP, and remove the armlock (B).
Note:
Save the armlock for the new scanner arm.
4.
Continue tilting the scanner arm, and pull the arm outward and up.
5.
Lift the scanner arm up and away from the printer top cover.
A
B