Lexmark X500n Service Manual - Page 120
Step 2: Expose
 |
View all Lexmark X500n manuals
Add to My Manuals
Save this manual to your list of manuals |
Page 120 highlights
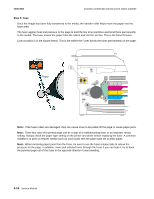
7100-XXX Lexmark confidential until announce edited 1/4/2007 Step 2: Expose During the expose step, the laser fires a focused beam of light at the surface of the photodeveloper and writes an invisible image called a latent image or electrostatic image. This is repeated for each color printed. This is the expose process. The laser beam actually discharges the surface only where the beam hits the photodeveloper. This creates a difference in charge potential between the exposed area and the rest of the photodeveloper surface. Look at callout 2 in the picture below. This is the where the laser beam hits the photodeveloper in Step 2 of the EP process. Note: The laser beam passes through a glass lens as it exits the laser unit. If this lens gets contaminated with toner or other debris, it will cause vertical streaking of white/lightness on the page. Cleaning the lens will solve the problem. Note: Never touch the surface of the photodeveloper with your bare hand. The oil from your skin may cause a charge differential on the surface, and toner will not stick properly. The result would be repeating blotches of voids/light print on a page. Then the photodeveloper will have to be replaced. Note: The surface of the photodeveloper is coated with an organic substance that makes it sensitive to light. Be sure and cover the photodeveloper when you are working on the printer so you don't "burn" it. If exposed to light for too long, it will cause light/dark print quality problems and have to be replaced. 3-12 Service Manual
-
 1
1 -
2
-
3
-
4
-
5
-
6
-
7
-
8
-
9
-
10
-
11
-
12
-
13
-
14
-
15
-
16
-
17
-
18
-
19
-
20
-
21
-
22
-
23
-
24
-
25
-
26
-
27
-
28
-
29
-
30
-
31
-
32
-
33
-
34
-
35
-
36
-
37
-
38
-
39
-
40
-
41
-
42
-
43
-
44
-
45
-
46
-
47
-
48
-
49
-
50
-
51
-
52
-
53
-
54
-
55
-
56
-
57
-
58
-
59
-
60
-
61
-
62
-
63
-
64
-
65
-
66
-
67
-
68
-
69
-
70
-
71
-
72
-
73
-
74
-
75
-
76
-
77
-
78
-
79
-
80
-
81
-
82
-
83
-
84
-
85
-
86
-
87
-
88
-
89
-
90
-
91
-
92
-
93
-
94
-
95
-
96
-
97
-
98
-
99
-
100
-
101
-
102
-
103
-
104
-
105
-
106
-
107
-
108
-
109
-
110
-
111
-
112
-
113
-
114
-
 115
115 -
 116
116 -
 117
117 -
 118
118 -
 119
119 -
 120
120 -
 121
121 -
 122
122 -
 123
123 -
 124
124 -
 125
125 -
126
-
127
-
128
-
129
-
130
-
131
-
132
-
133
-
134
-
135
-
136
-
137
-
138
-
139
-
140
-
141
-
142
-
143
-
144
-
145
-
146
-
147
-
148
-
149
-
150
-
151
-
152
-
153
-
154
-
155
-
156
-
157
-
158
-
159
-
160
-
161
-
162
-
163
-
164
-
165
-
166
-
167
-
168
-
169
-
170
-
171
-
172
-
173
-
174
-
175
-
176
-
177
-
178
-
179
-
180
-
181
-
182
-
183
-
184
-
185
-
186
-
187
-
188
-
189
-
190
-
191
-
192
-
193
-
194
-
195
-
196
-
197
-
198
-
199
-
200
-
201
-
202
-
203
-
204
-
205
-
206
-
207
-
208
-
209
-
210
-
211
-
212
-
213
-
214
-
215
-
216
-
217
-
218
-
219
-
220
-
221
-
222
-
223
-
224
-
225
-
226
-
227
-
228
-
229
-
230
-
231
-
232
-
233
-
234
-
235
-
236
-
237
-
238
-
239
-
240
-
241
-
242
-
243
-
244
 |
 |
